chris
-
Posts
1,256 -
Joined
-
Last visited
-
Days Won
78
Content Type
Profiles
Forums
Gallery
Everything posted by chris
-
There are more bird boxes and feeders than trains. A quick count up and there are 4 bird houses and 12 bird feeders in that photo. I hope I've modified them enough that I don't get residents.
-
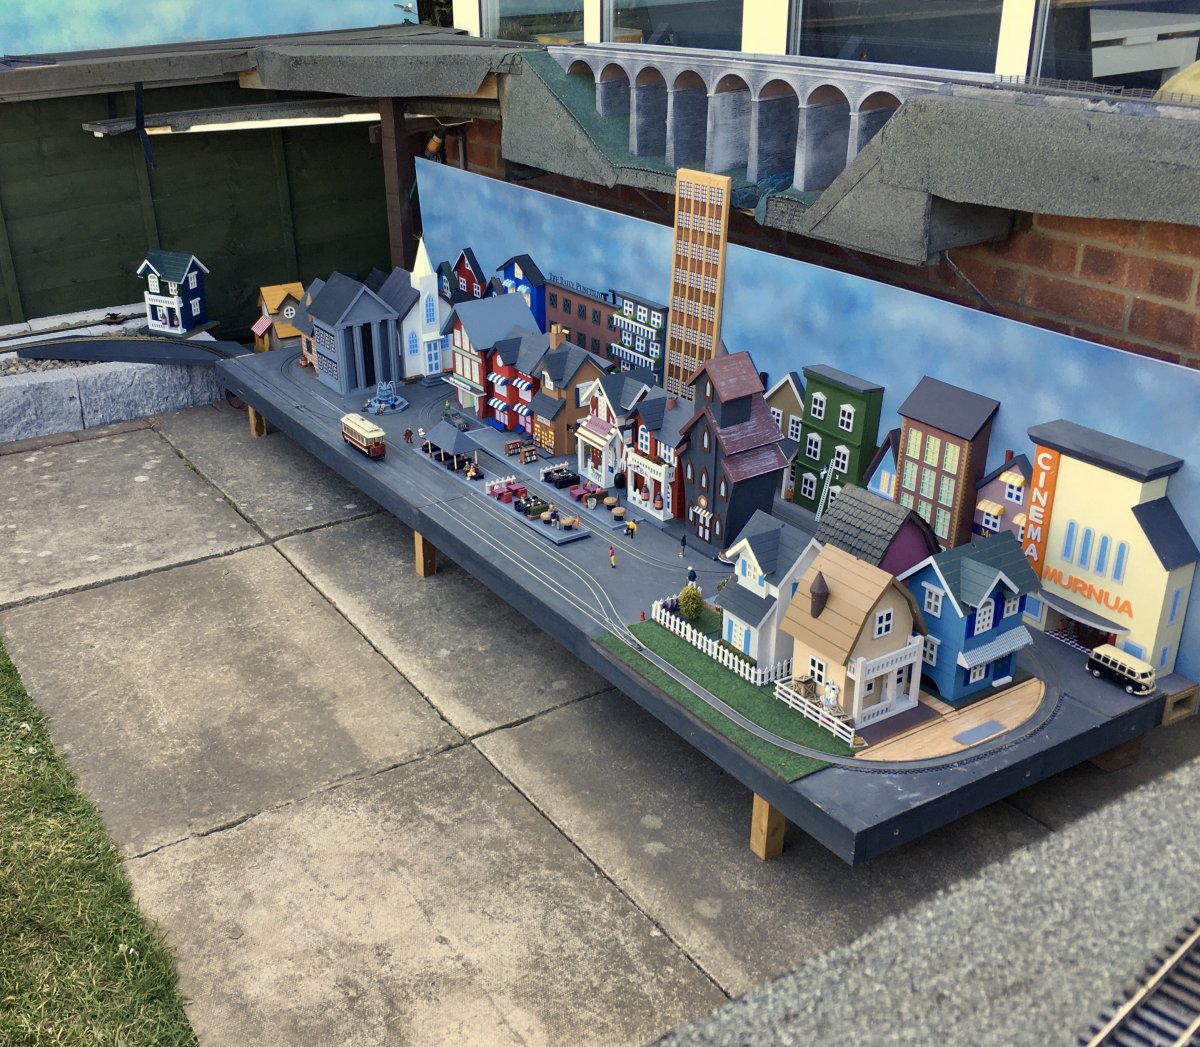
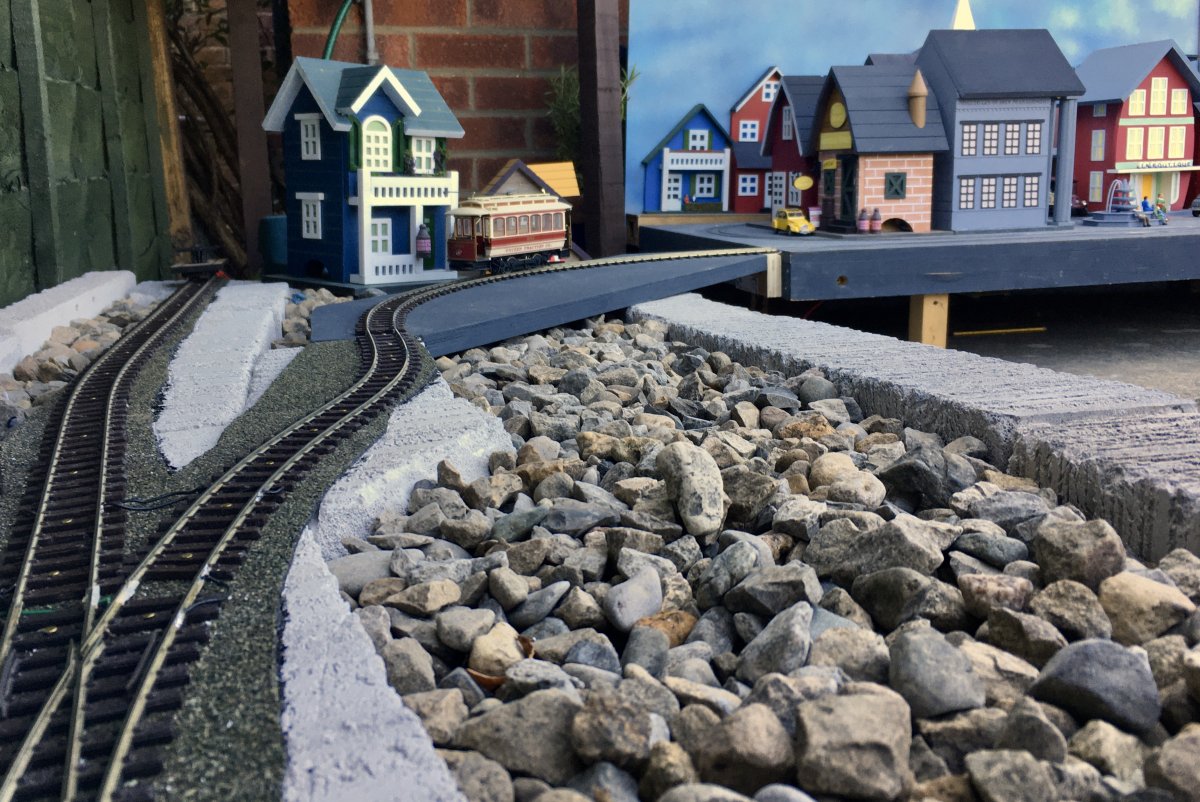
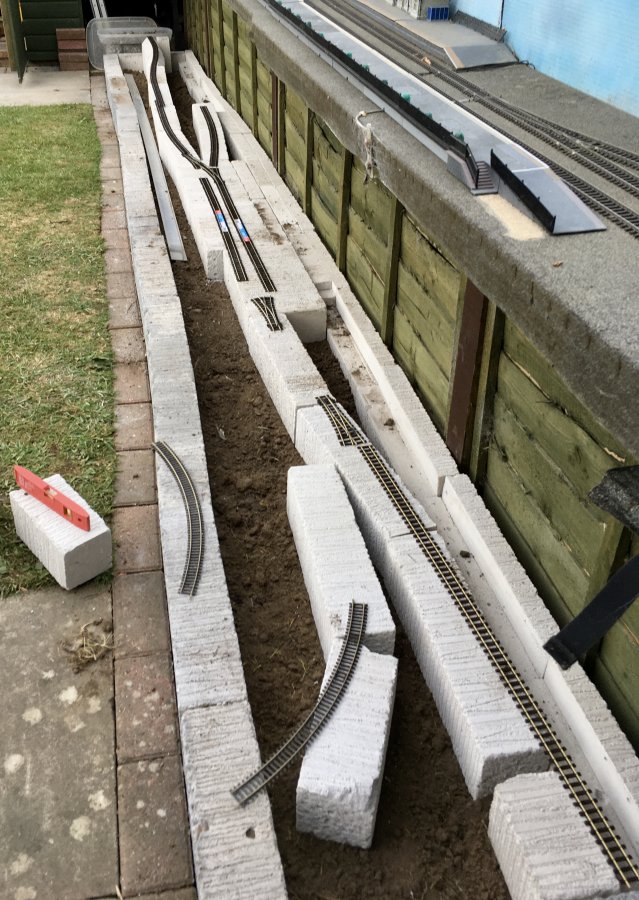
With the Paltryville Ridge and Peak Railroad operational, the next task was to create the link to the Snicketway. This was a two part job. A short 90º bend to needed to be built and the Snicketway Baseboards needed short legs to lift it to the correct height of the PR & PR. I'd previously cut a suitable piece a of 18mm ply for the link board. I had to worth though how it would attach at each end. I added another piece of 18mm ply at a right-angle to enable it to be screwed to the Snicketway. I'd previously cut a step out of the aerated block for the other end to sit on. The track was pinned to a simple curve. Carefully alined with the Snicketway and fishplates used at the Paltryville connection. I cut 6 short legs for the baseboards and screwed them into the existing insert nuts. This took awhile, my saws are blunt after cutting the aerated blocks. And I was up and running. With the weather playing nice I left it all set up overnight. Yesterday morning I put in a permeant power feed. Dropping off one of the bus zones for Amblethorpe, I added a DPDT switch to allow me to switch it off while running my OO setup. The MacBook relocated to the shed and I was soon running using my old iPhone as a throttle. I then went the whole hog and got all the buildings, backscenes and people out on the Snicketway. I spent most of the time with a trolley circling and a shunter shuttling wagons back and forth. I have a magnetic uncoupler installed on the Snicketway. I need to add another in Paltryville. I may install that today.

-
Yesterday the track was pinned and trains did run along the railroad. Today I'm going to get the Snicketway Baseboard out and try and connect it to the PR & PR.
-
I thought about putting sprung points on my tramway, where they are very prototypical. I did a few tests with an old hornby point and didn't get very far. That said, tram wheels can be rather small. As you say, the challenge will be getting the springs loose enough to allow coaches and wagons through. The obvious, yet brave, thing to do is to remove the spring from the point. I say brave because I've tried to put turnout springs back in, and that makes soldering look like an enjoyable afternoon task. Set up a test board and see it you can run a wagon back and forth while adjusting the tension on your springy device.
-
Dues to the design of the points there isn't a great deal I can do. All the metal bits in the middle are wired together and I don't fancy removing those wires from a very cramped space below the frog. When the switch rails stop conducting from the stock, I'll wire in a frog juicer, I've already soldered a wire in place thinking that they would be needed from the start. I only have one juicer at the mo, so at least I can hold off for now on buying another 3.
-
The last couple of lengths of track were cut. The dozen or so remaining bonds were soldered up, thankfully in a very light wind. My DCC system was clipped to the end of the track and the first train did trundle along the Paltryville Ridge and Peak. I filmed the occasion and will post it tomorrow. I then got very confused about my electrofrog points. They worked absolutely fine, yet I convinced myself that they shouldn't. I'm so used to having to power the frog I had forgotten how they actually work. I've done some reading online and recognised that it's all OK. I think O-16.5 Narrow Gauge turnouts have a bigger throw on the switch rail, this gives more room for the flange to pass and less chance of a short circuit. They certainly don't have the gaps in the rails that enable the frog to be powered. Not sure how long the point blades with conduct the power for. I'll have to wait and see. Anyway. The loco ran really well. Tomorrows job is to pin down the track.
-
I had forgotten how long it takes to solder up so many rails. Spent all afternoon on it. Fortunately I’ve many to do all but the last few sat at the kitchen table. Might actually pin down some track this evening.
-
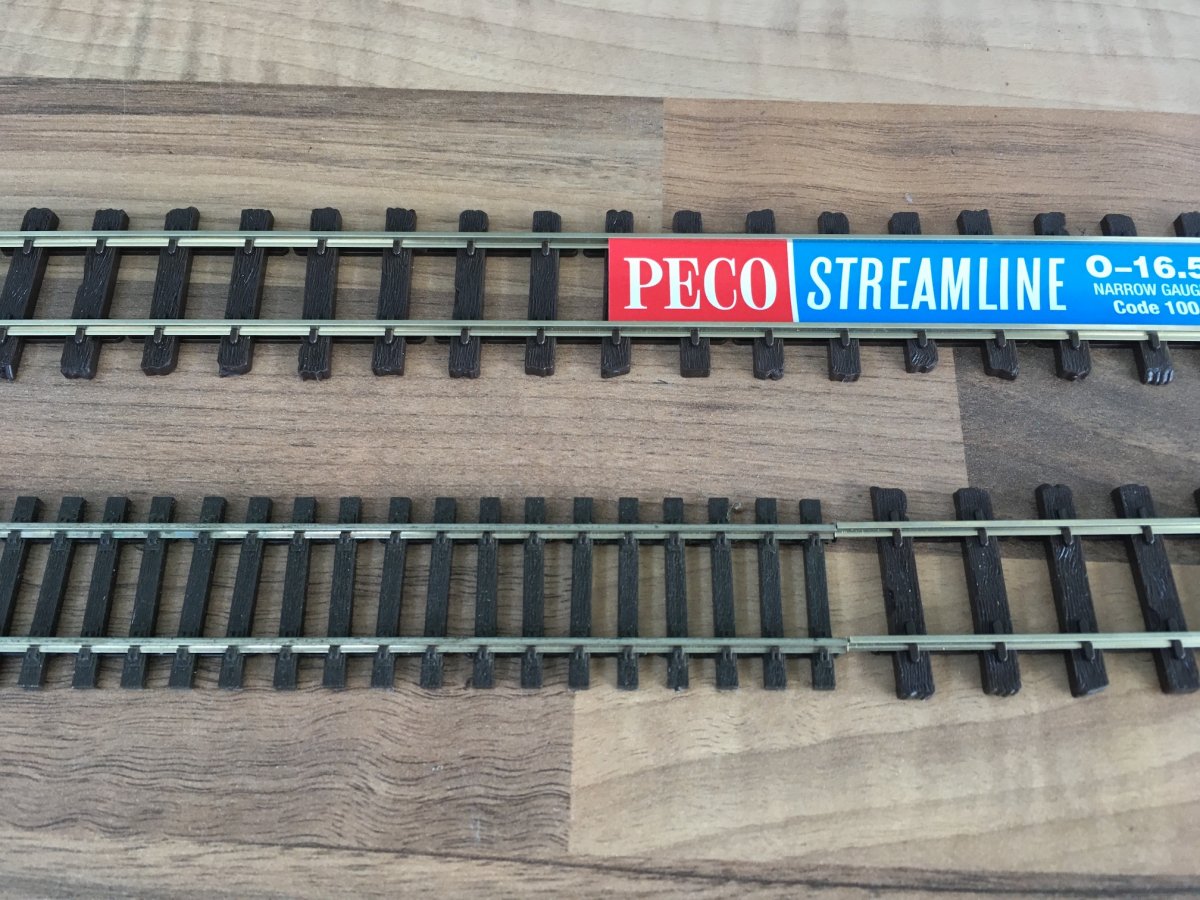
All the strips of roofing felt are now stuck down. I can't say it has improved the look of the scene so I haven't photographed it. Should be track laying today. Cracking weather, if the wind is low enough, soldering outside may only be a small pain in the arse. I'm interested to see how easy it is to solder the O-16.5 track, its exactly the same Code 100 rail, but the sleepers are further apart so there may be a little more room for the iron.
-
The bridge and approach road look amazing. I watch your latest YouTube on my TV before I read this post about construction. I spotted all the work you had done and even commented to my wife how impressed I was. Great work.
-
The only concern is that the platforms may become a water trap if the water drains that way. I have one platform where this is a problem and another two where it isn't. Gently pour some water on it and see where it drains. If you are leaving it out then make sure that the top section of your trunking can't slide along the bottoms section. You may think that there is enough friction, but expansion and contraction with heat will make the top creep. I drill a small hole through the bit where they clip together and stick a track pin in. This ensures that the top can't slip along.
-
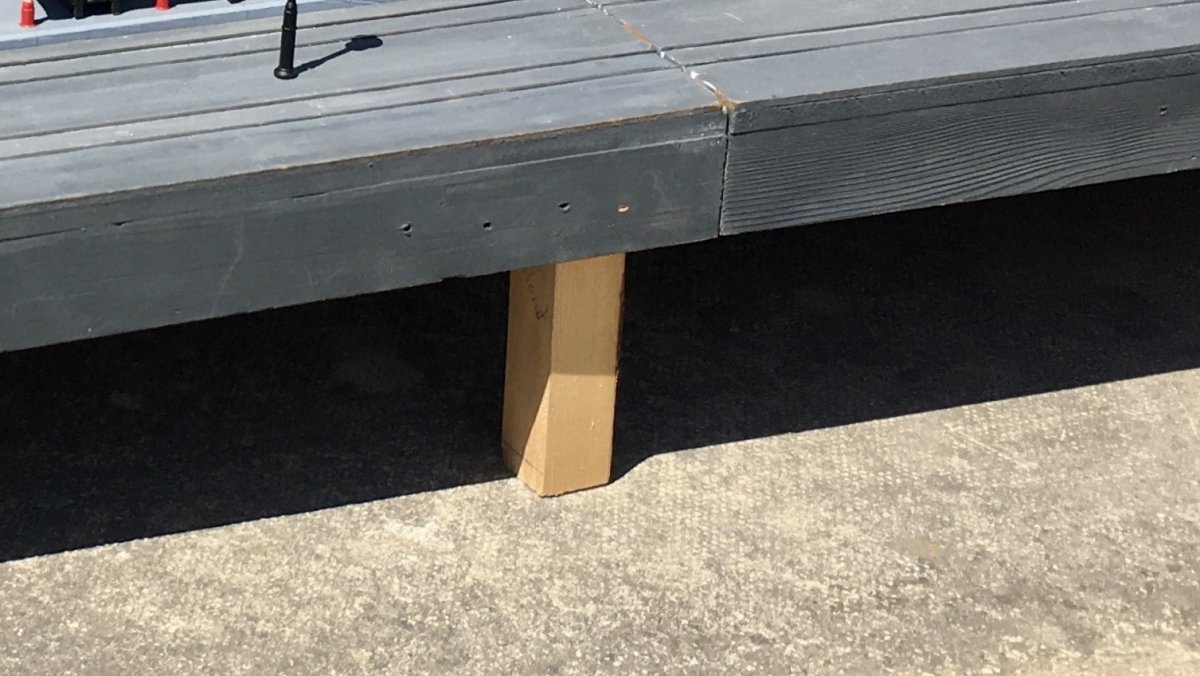
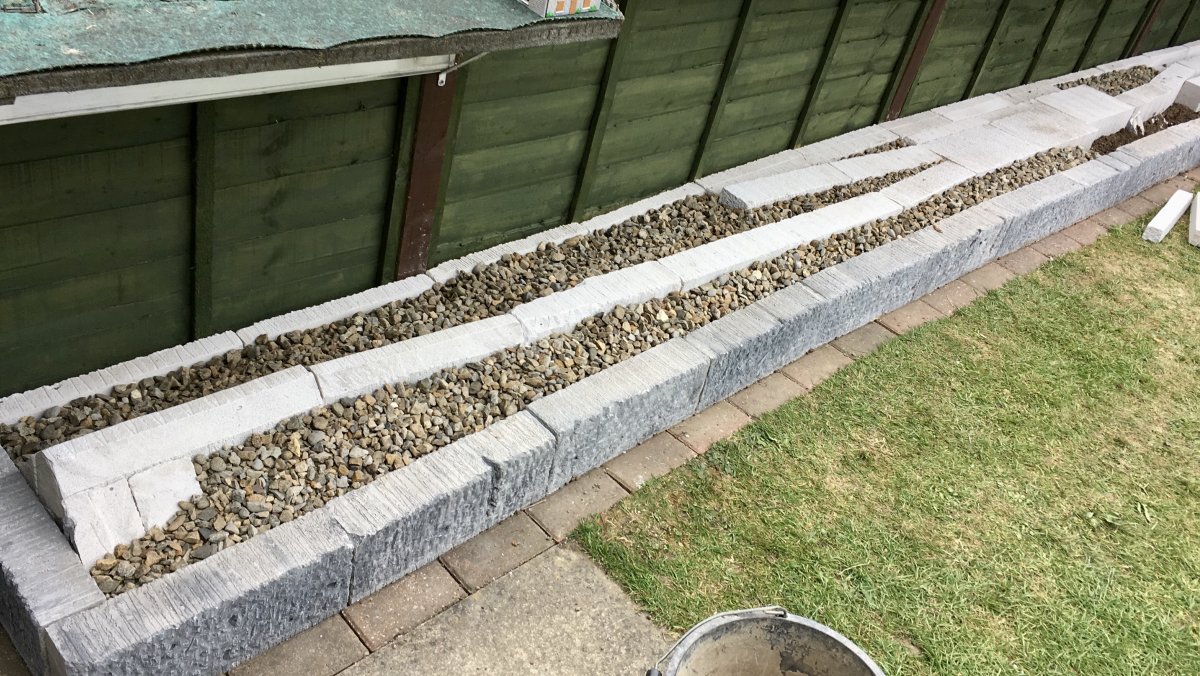
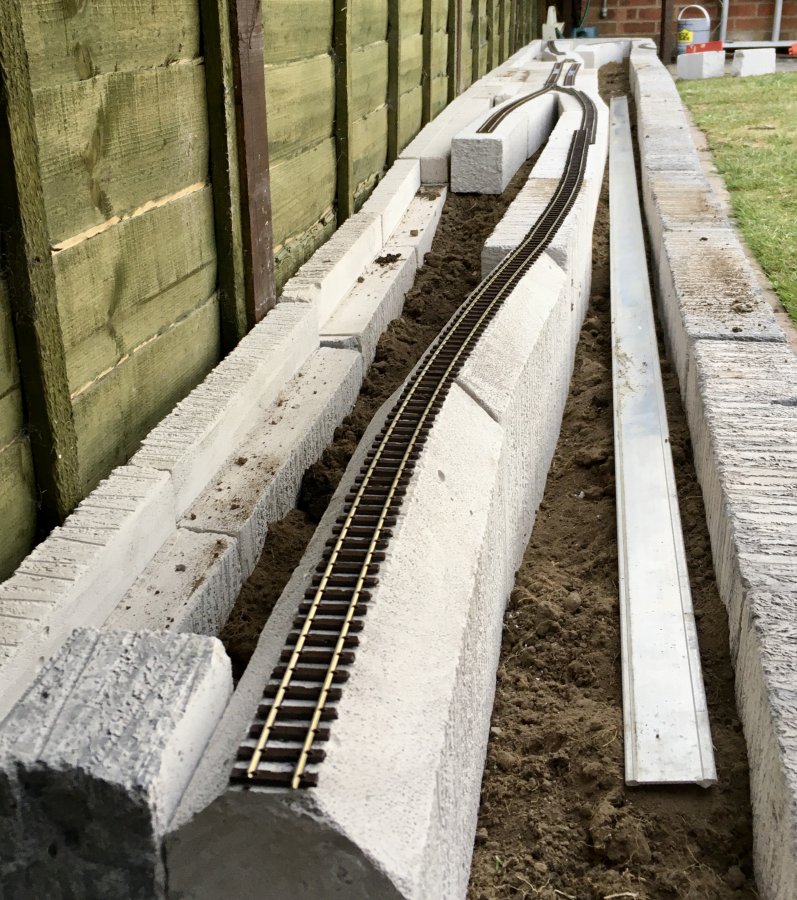
Yesterday I began the process of filling the gaps with earth and stone. Months ago I rescued the stones form a friends driveway before she had it tarmaced. I didn't know if I had enough, which meant it was guess work as to how much earth I'd need to fill with first. We did about 72% of the filling. Getting the point where the final position of the trackbed blocks has yet be decided. This morning I placed some track down and, for fun, popped some coaches on. This turned out to be helpful, it shows me how long my passing loop will have to be, allowing for a loco on the front. Up shot is that I can'y make it any shorter. I'm still uncertain which point to use where. I have two right hand and two Y. I've started thinking through how I can create a connecting line to the Snicketway baseboards. I'm going to use some 18mm ply which should be ridged enough for the 70cm length it will span. For the radius I'm following the track that came with train set, which ensures that it won't be too tight. This afternoon I'm going to have to lower a couple of the ridge blocks by 18mm to allow for the linking track to be able to pass over them while the track stays on the level. Feels like real progress now. Should be sticking down roofing felt and laying track soon.
-
Tried to avoid the procrastination (beard stroking) phase of development which was looming upon me. So far with my railways I've built baseboards and then laid the track independently. This has meant that I haven't had to have an exact track plan before building the baseboards. With this build I don't have the baseboard so I need to finalise my track plan beforehand. Yesterday I worked through that process; placing, levelling, adjusting and swapping around blocks to enable the track plan I am after. One consideration was to try to keep the track from being below the drip line off the Amblethorpe baseboard. This would have been easy if it was a constant width, but it varies form 40cm to 20cm to 30cm along its length. Locating points away from drips was more important. I still can't figure out how things will work at the house end of the line. A track needs to turn off to allow a connection with the Snicketway baseboards. This requires a 90º turn in around 40cm, which is around 1st radius. This is OK for a narrow gauge, but I'll have to check that my stock is fine with that. Not that there is any set-track for On30. At the shed end the level trackbed creates a significant rise within the landscape. I cut the tops off the blocks at 45º to create a very narrow track bed, a common feature on American railroads. Still work to be done on the trackbed before I can fill the gaps and create the landscape.
-
Invasion of the Giant Spiders!
-
Hi David, Are you thinking of running at (or near) ground level or going for a raised baseboard about 1metre off the ground?
-
Copy someone else. There's load of photos on here. Find a garden railway you like. Read that topic and do as they do. Thats how I started.
-

Hi. Thinking about putting a line around my garden.
chris replied to Clay Mills Junction's topic in Welcome & Introductions
Temporary is a good idea. You will learn so much from building your first phase, you may find that your second build is much improved from your experience. I removed nearly all of my original baseboard after three years and rebuilt it to the higher standard I'd developed. The track was reused. -
A reasonable summary of capitalism.
-
About £2000, all in.
-
I spent an age trying to decide what height to build the raised bed too so I could keep everything level. Then I realised the the bed itself could rise and fall while the trackbed stayed level. I've been cutting blocks in half today. My saw has got rather blunt. I did a test cut with an old circular saw. It worked fine. Job was suddenly a lot easier. Time allowing, I'll start on the trackbed tomorrow.
-
Blocks collected. Sawn, carved and washed in grey paint. Weed membrane down. Blocks in place. Soil back-filled. Resting. Next job, the blocks that will form the track bed. There is a noticeable drop in the raised bed. However the track bed will remain level. This means that there will be an embankment and may be a bridge.
-
The plan was to build the raised bed along side the lawn. Having put the blocks in place we decided to bring forward the further extension of the bed to now. More blocks are on order. Two paving slabs have been lifted to allow 90cm extensions at either end of the bed. This photos shows the scene after the first slab had been relocated from the top left to bottom centre. The slab at this end of the bed was the next task on the job sheet. The hardest job was lifting the turf to make room for the slabs. We've had next to no rain, the earth was like stone. We developed a technique that involved the spade and the sledge hammer. This extensions will make the area of the bed 50cm by 580cm. I plan a single track with a passing loop and one siding. OK, may be two sidings. I managed to scrounge together some fishplates form a couple of friends so once Wickes sort my click and collect order of blocks I should make swift progress.
-
I'm glad you've found an effective way to get materials. I ordered more aerated blocks from Wickes yesterday. Got a text at 7am saying that there was a delay of up to 8 hours sorting my clicked collect order and to wait for another text before heading to the store. That text hasn't arrived.
-
Hi. Thinking about putting a line around my garden.
chris replied to Clay Mills Junction's topic in Welcome & Introductions
Hi Barry. 23' by 14' turns out to be the size of my garden, once it's been converted into metric. Plenty of room to get some long trains running. Having build a twin track loop around the perimeter, I've started a second end to end one. Its very easy to procrastinate about taking on a project of this scale. I recommend that you crack on with it. Work in phases, so you can get trains running, and recognise that it may take a few years to build your whole layout. Which is rather good if you like the construction side of the hobby. -
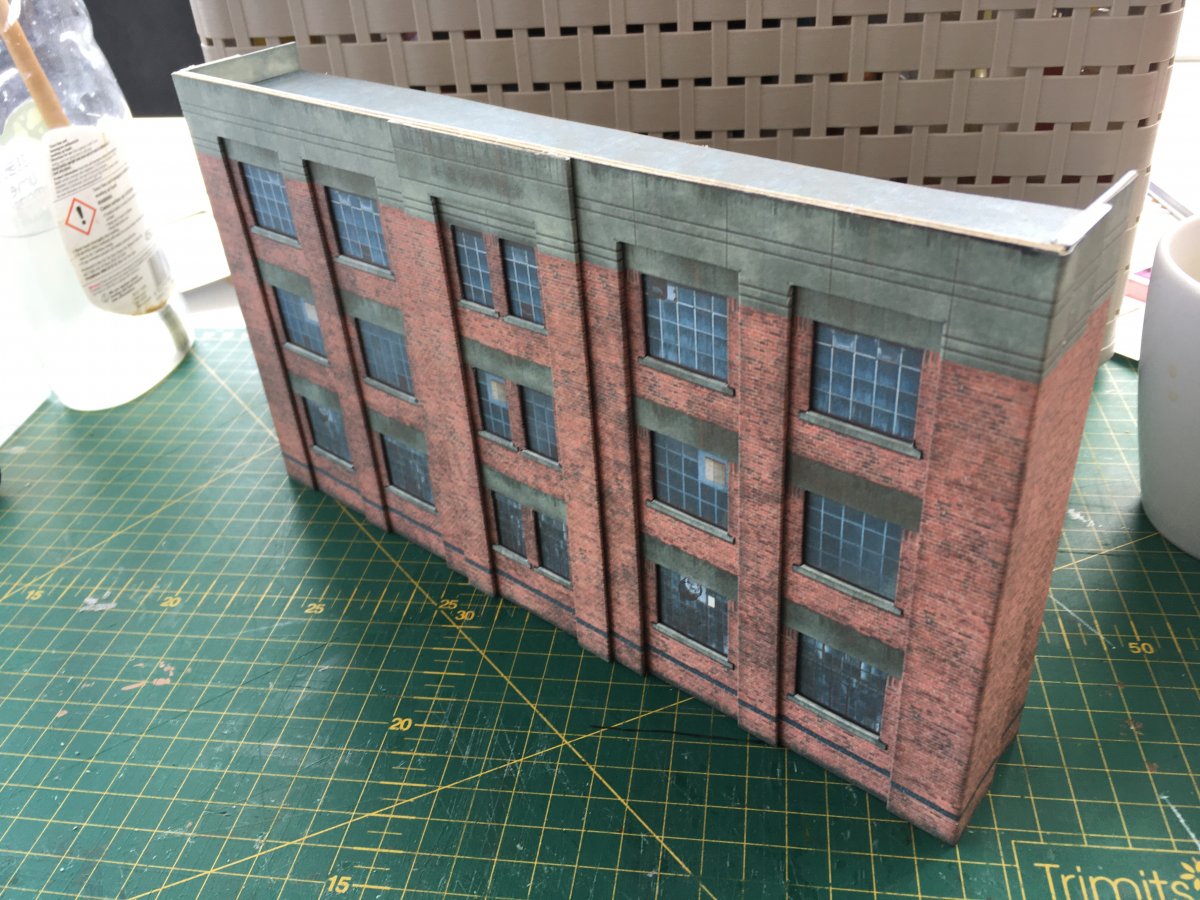
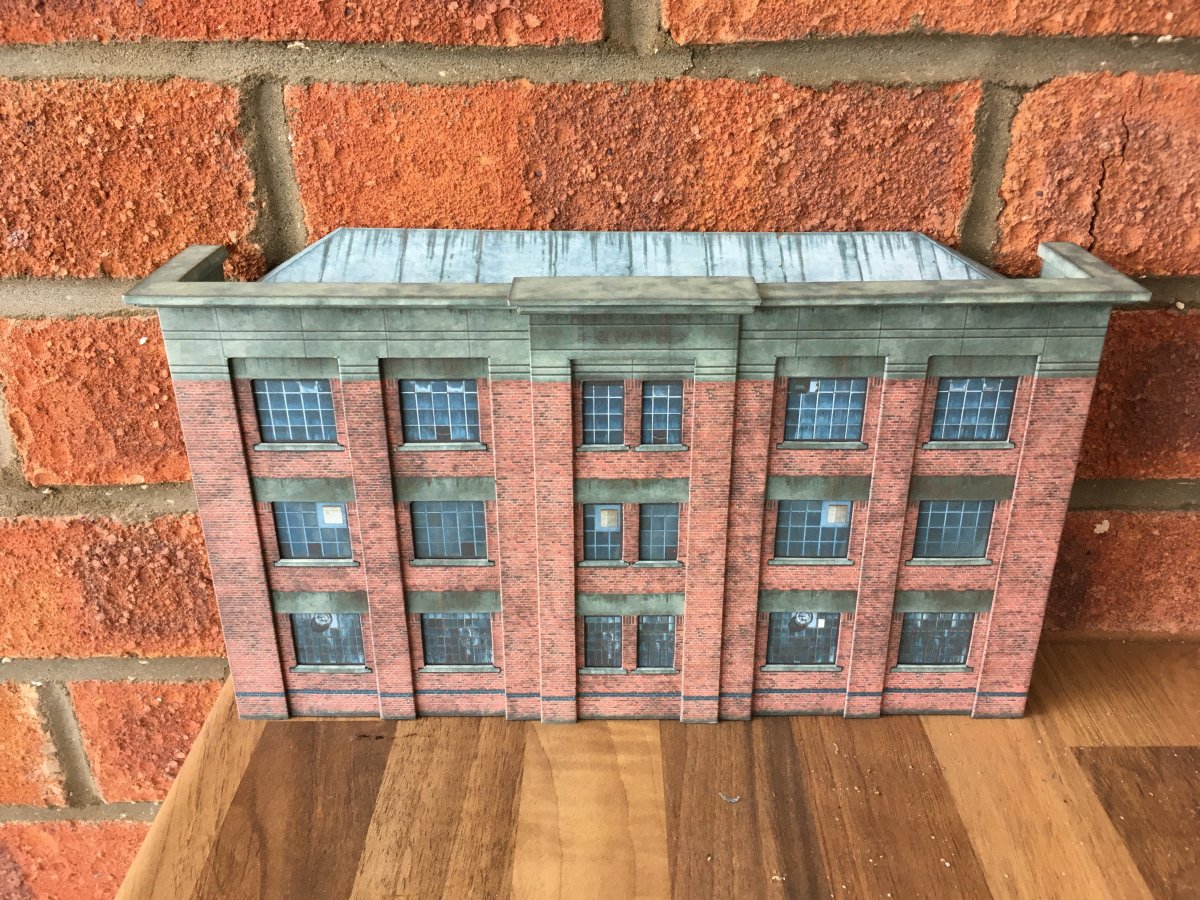
This week i've become a convert to Print at Home. I've had a few freebie downloads hanging around on my hard drive for years but never got round to building them. I even picked up a DVD of them at a show or sale or something, sometime... Lockdown, actually, a bitterly cold day in in Lockdown, pushed me toward Print at Home. I started with the simple and within an hour or two I had a perfectly reasonable back scene building. But my printer wasn't cutting the mustard so I got a mate to do some. He got carried away and delivered me half a ream of print out. Taking this more seriously I decided to spray the sheets with lacquer before construction. This was rather satisfying as it darkened and enriched the print. It also protected the print form later mishaps with glue! The result was great I upped the complexity slightly with a lots more windows... Improving my techniques with each model I stepped it up from very low relief to stander low relief. This was a much more complicated build. But the experience on the simple stuff helped and I knew what I was doing. Especially on the adhesives. The office block had bowed baldly, which I put down to the use of PVA. I've developed a system of switching between Prit-stik for large flat surfaces and PVA for wrap-a-rounds. I also placed glued elements under a brick or while drying. The final result of the 1930s factory is very impressive. The plan is for them to form a moveable backscene for Amblethorpe which will drop in near Colwick Station.
-
I wasn't expecting Code 100 track in O-16.5 to look so different to the OO/HO stuff.