chris
-
Posts
1,256 -
Joined
-
Last visited
-
Days Won
78
Content Type
Profiles
Forums
Gallery
Everything posted by chris
-
I've just moved my first train using my computer My trusty Northern Rail 153 test car moved about 2 meters and back within the shed Also, with the MAcBook in the shed I can now keep you in formed as it happens. Next iPod Control and then Accessory. Best get back to it.
-
Just realised that I will be able to sit here at my desk, look out the upstairs window and control my layout. Not sure exactly what functionality will be available on via the iPod throttle, but that doesn't matter because I can remotely control my laptop from my desktop computer so even if my laptop is in the shed I'll be able to run it from indoors Sorry, I may be geeting a little carried away
-
One of the things I love about Model Railways is the multiple aspects of the hobby. For some it's all about ready to run, others it's scratch building. Some build in a shoe box, we go for the garden. Some people get great pleasure from seeing their trains driving by, others have to run to a timetable. One of the big things for me is Command and Control. I love remote control, I think computer networks are amazing, wifi blows my mind. I often wonder why as a teenager I choose to do a degree in electronics when I wasn't into computers, but I think it was probably the simple thrill of pushing a button here makes something happen over there. DCC is completely my thing, clever computing and electronics controlling things that actually move, that gets me excited. My USB Interface has arrived (excellent service from Bromsgrove Models by the way) and I can't wait to get it all set up and have a go at something I've wanted to do for over 20 years, drive a model train using a computer.
-
Not sure this is a specifically out door theme, but it still seems like the best place on the forum to put it. After my running session on Sunday, when I'd had 4 trains to play with, I started to think about what shape my DCC control should take. On the advice of a friend I'd plumped for NCE for my DCC system, investing in a PowerCab starter pack. I added a intermediate (slave) cab shortly afterwards as a cost effective way allowing two people to control at once. These controllers allow me to control both trains and accessories (so far only points). This means I can stand in the shed and control the station area which is 10 metres away. Using a "Macro" feature I can throw several points with just one command, a route can be set, but it still takes three button presses to achieve (eg [Macro] [5] [Enter] ) and I started to wonder if there may be a better way. I'd read somewhere that NCE did an accessory decoder which also accepted a push button switch so a point could be controlled by both. When I looked into this I came across their "Mini Panel". At a very basic level this can be connected to up to 30 switches and each of these switches can then be programed to just about any DCC function. A switch could throw a point, or set a route. It could sound a horn or switch in the lights. It can even start or stop a train. The switches could be on a "Panel" or they could be out on the railway detecting train movements. It's a very impressive bit of kit for £35! Having got my head around the mini panel I then looked into the USB interface. I knew that I could add computer control to DCC, but I'd not really thought about how this would be helpful, at least not until I had all my points sorted for DCC control. I was expecting computer control to be expensive but JMRI is open source and free so my interest grew a lot. NCE's USB interface is only £35 so I decided that it was time to give both the Mini Panel and the Computer a spin. But there did seem to be an issue. From what I could work out, with my PowerCab starter system both the Mini Panel and the USB interface have to be Cab 3, which would mean that they couldn't be used at the same time. I couldn't confirm this so I joined the NCE-DCC group on yahoo and continued my research. I soon came across this This was interesting, but trying to control 4 throttles on one computer screen didn't appeal. It was the next line that got me excited. Hold on a minute I can use my iPod Touch as a wireless throttle This is too good to be true But it's true. £35 for the USB interface and £5.99 WiThrottle and I have a wireless controller, in fact I'll have two, cos my iPad will work as well. My order from Bromsgrove Models has already been dispatched and I'll leave the Mini Panel for now (i've spent that money on decoders for my Voyager). I hope we get some good weather over the weekend, I want play.
-
Hi Roy, A cheat way to resize photos is to e-mail them to yourself. Most e-mail programs will resize a photo when you attach it to an e-mail, some do this automatically, some will offer you size options. You can then send it to your own e-mail address, or if it won't let you do that, send it to a friend who and get them to forward them back. What you may also find, and this is a little more complicated/clever-clogs, is that once you have attached the photo (and it's resized it) you can then drag the icon of the photo from the attached list back onto your computer desktop. If this works you'll have your small photo and you won't have to bother e-mailing them to yourself. When I switched from a PC to a Mac I used this kind of technique for photo resizing for months before I worked out the "proper" way to do it! Please let us know if this works or not. If not I'll let you upload them the web site I've got my Amblethorpe pictures on and then I'll be able to resize them for you.
-

-
Just come back into the house after a running session that lasted a good few hours. I was delayed this morning because I locate a track rubber. I just couldn't find it, so almost gave up on running, but I really didn't want to spend the day in the shed with the soldering iron, I wanted to make use of the sunny day. Eventually I remembered that I had last used the rubber while I was test running my new trains on an indoor oval on Boxing Day, but a search in the house bore no fruit. Finally I remembered that I had shoved a load of bits and bobs into the flight case I keep my controller in when I took it back out to the shed, and that is where it was hiding. Lesson: own more than one track rubber The track came up nice and clean without much effort. I've not bonded all my joints yet so I needed to slide a few fish plates back and forth with pliers to get the power to flow. But after that things worked fine all day. I added the moveable baseboard which is a terminus station (well just the track at the moment) and I was off and running. I ran my Northern rail fleet out of the shed and back a couple of times and then I was on to the main business of the day, giving my new Grand Central HST a run. Having only run 1 or 2 coach units previously, stepping up to 6 was great fun. My two turnback sidings were only just long enough to hold it, this wasn't a problem in the shed, but judging where to stop it when I was 10 metres away was a bit of a challenge. A couple of mates joined me for the afternoon and we spent most of the time admiring the HST I might write a timetable for my next running session and see how that goes. Then again, I should have got round to chipping my Cross Country Voyager by then so I'll have enough to keep me occupied.
-
I sneaked in a couple of hours in the shed on Thursday and managed to solder up droppers to the five pairs of rails in the sidings, I've not tested them, but they should now be operational. There's still more work to do in the shed, but if the weather is OK tomorrow I do fancy a bit of a running session, your videos have really got me in the mood.
-
Competition is a good thing. Look at it this way. Hornby have noticed that their is room for improvement in Bachmanns B1 so they have gone out and made their own version which we all expect to be better. We will now have a choice as to which one we buy. Bachmann may now choose to lower the price of their B1 to compete. If Hornby had produced a Railroad version of the Blue Pullman, there would have been a lot of complaints about the quality. With Bachmann starting from scratch we are all expecting a high quality product which will sell well for them. Popular trains should be made by more than one manufacturer to provide us with choice and to drive up standards.
-
The rules for rolling stock on Amblethorpe are simple, if the prototype has passed my back garden then it's allowed on. However, having a house between York and Colton junction rules a lot in rather than out, so to begin with I did need a wish list. Which was: Northern Rail 153 (hornby), 156 (Hornby) and 158 (bachmann) Cross Country 4 car voyager (Bachmann) Grand Central HST (Hornby) I swiftly purchased the three Northern Rail units and they have been excellent for testing out the track and DCC control. I was hoping that the other two could be 40th Birthday pressies, but neither were released in time, so that hope had to transfer to Christmas. Sure enough on Christmas morning I opened a present from my wife and it was a shiny new pair of Grand Central power cars. She had also coordinated gifts from other family members so a pair of 1st and a pair of 2nd class coaches were also received. With Hornby still to roll out a buffet car I was more than pleased with a 2+4 unit to play with. But another present arrived and marvellously I received the 4 car Voyager as well The HST is DCC fitted so that's ready to roll once the weather improves, while the Voyager will require 3 chips! I think I may to the lights as well, as per this web site, which is rather good. http://s110605900.websitehome.co.uk/railindex/trainsindex.htm Seen as the temperature has been above freezing (just) for 24 hours now I think I' head out to the shed and see how long I can last out there.
-
I was thinking of the Bachmann 150, so I'll let Hornby off that one
-
I've been thinking about which loco to buy for Amblethorpe, as so far everything i've got is a multiple unit (if a HST is an MU) and I think the new Class 31 in Network Rail livery may have just made it to the top of the wish list. The First GBRF 66 is interesting. With Eurotunnel recent take over I can't see the First livery lasting long on the prototype. I can't find any new DMU's. I was rather hoping for a Pacer or a 150 in Norther Rail.
-
Found one of these under the tree this morning If my family has coordinated their gifts then I may have some coaches to go with it by the end of Boxing Day
-
Weather conditions have certainly been against us garden railway types recently. I've managed to get some time in the shed and made some progress on track laying. I've spent a fair bit of time kitting out the shed for it's new purpose, which has basically been a wiring up the place for power and lights. I started with lots of temporary stuff but kept having to move lights around or had to duck under a cable that was strung across at head height. I now have a couple of lights fixed in sensibel locations and a couple of others that can be hung/pointed where required. I also have a 4 way socket extension screwed to one of the roof beams, it turns out plugging something in above where you are using it can be very handy, soldering is a lot easier without the cable getting in the way! Without a camera I thought it would be helpful if I knocked up a diagram of the track plan in the shed...
-
Tornado has just gone passed in the dark. I didn't know they illuminated the wheels I assume it was Tornado, it passed at 3pm heading down to York and I guess that was it returning on the up.
-
I thought about boxing over my track in a very similar way (a gental slope on the top would probably be sensible, roofing felt and an over hang as well) but found Ian's pictures reassuring and decided not to bother. I did think long and hard about having a covering over the points to give them and their motors some protection, but came to the conclusion that water flows where it wants and in heavy rain it would probably still get in along the track bed so I'd still have to protect my motors.
-
A rake of these went by the house last weekend, and weathering doesn't being to describe their condition. Lots of rust and you could see where the railtrack branding had been painted over. I'm tempted by these, but I think I'll wait for a Network Rail version.
-
On this forum the members railways fall in to two categories, the first is a true garden railway where the tracks and thus the trains are at or around ground level and pass through the flora. The second is an outdoor railway where the tracks are around a metre above the ground on what is best described as a shelf, usually attached to the garden fence. My Amblethopre and Ian's Kirkfield and Warmthorpe railway are both examples of outdoor railways. Ian started the Kirkfield and Warmthorpe a couple of years before my work began, and he is much further down the road (or should that be, up the track?) than me and I have shamelessly followed his construction techniques and been very satisfied with the results. He gives a description of his construction technique at the start of his thread http://www.selbygardenrailway.co.uk/sgrforum/viewtopic.php?f=6&t=21#p51 he has also answered a good number of questions I've asked him on my Amblethorpe thread. But it would probably be wise to start to collate some of our information in this section to make it easier to find. So seen as Ian has just been asked for a second time where he got his shelf brackets from I thought I'd start with them. The brackets are made of Aluminium and are designed for use in Greenhouses. I followed Ian's lead and purchased them from Two Wests & Elliot http://www.twowests.co.uk/TwoWestsSite/product/SBWM.htm They come in two sizes, 6" and 10" and I have used both to support 8" and 12" boards respectively. Not that you need it, but they come with Assembly Instructions. That said, you will probably have to modify the assembly slightly, rotating the horizontal bracket 180º to create an unobstructed top surface. It's also worth drilling a couple of holes in the top bracket (prior to assembly) so you can screw the based board in place. Don't put the holes too close to the ends as this will make it awkward when it comes to putting the screws in, you'll be working upside-down, so no need to make it harder than it has to be.
-
Wow, I really didn't think you would have a dictaphone, that's great. Now you'll begin to understand why they use a clapper board in the movies. You'll need to make a sharp sound in front the camera so you can take the guess work out of aligning the sound to the pictures. I think I may have introduced you to a whole new avenue of fustrations Good luck.
-
I'm probably over complicating things, but... You could always record the sound separately to the video (it's what they do in film and TV). I small digital dictaphone could be placed next to the loco and then added as a sound track when you put the video together. Also you may find that the electric noise that you are picking up is coming from the motor rather than the track. Try adding a couple of coaches to your rake to give the camera a bit of distance from the loco.
-
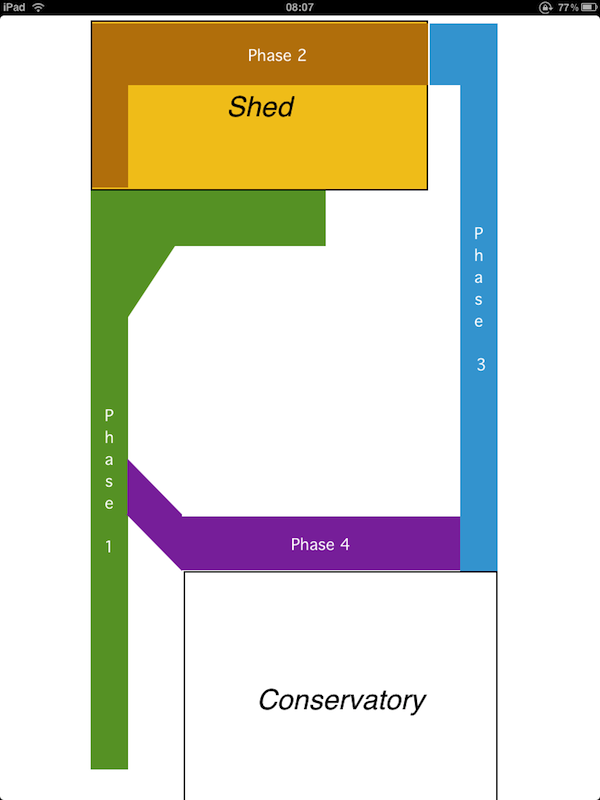
I'm working in four phases. Track wise, phase one is basically complete, and runs between two terminus stations one by the house and the other in front of the shed. Phase two is the shed. The twin tracks enter though the hole you've seen in the photos and then runs along the left side (which is 6 foot) and then along the back (12 foot). This will fan out into sidings, I'm thinking six lines before returning to two to exiting the shed at the back of the right side. Phase three will run back towards the house along the fence on the right hand side of the garden. There may be a terminus station at the end. The forth phase, and most ambitious, will extend phase three back to phase one running along the outside of the conservatory creating a loop as it joins the current track about a metre down from the throat of station by the house. Neither of the phase one stations will be on the loop. At the moment I'm constructing the base board in the shed. It's progressing well and I've even laid some more track. There are a couple of challenges in there and I think I will have to use set track in the corner, but 67mm is a big gap for a 6 foot when you're used to streamline.
-
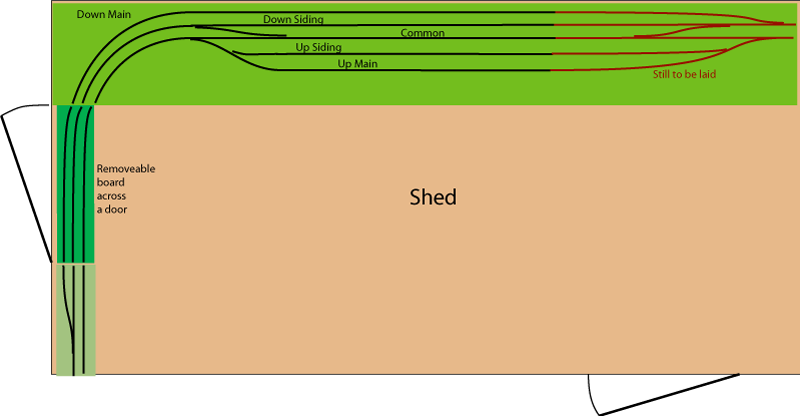
I thought you'd said that you were going to put the sidings in, that's why I gave you the cheeky reminder. Shame about the lack of a mic input, but at that price it's no surprise. Just spent the time since my previous post in the shed. I've now got about half the based boards in place including the lift-out section across the door. The bend will have to be set track (hopefully 3rd and 4th) with part of it on the lift-out board, which will make things challenging!
-
I enjoyed the cab ride. Interesting that it takes about 3 minutes to do the loop. That should give you enough time to be running two trains on each line, as they'd have a minute or so headway. Without any station stops to worry about you could probably push it up to three. That said, even with DCC three on the same running line would be a bit hairy. It would definitely add something to a cab ride, where half the enjoyment comes from spotting whats coming the other way. Also, catching a glimpse of the tail lights of the train infront would be fun. Can you plug a microphone into the camera? A lapel mic near the loco should produce much better sound. You've not installed any sidings in the shed yet. Is that a project for the winter? Looking forward to more cab rides.
-
Good luck on the video formats. Somethings are never simple.
-
Our camera developed a fault on a recent trip to London, so no pics until I fix it, or buy a new one!