

chris
-
Posts
1,256 -
Joined
-
Last visited
-
Days Won
78
Content Type
Profiles
Forums
Gallery
Posts posted by chris
-
-
There's a trail of a express freight service into St Pancras today. Great to see a TGV in London.

-
mick said:
NIce steady progress. Some of us
plod along and do very little, some (doublecee for eg) are able to get up an running in no time but Amblethorpe just 'ambles' along getting better all the time.
Thanks Mick.
At the beginning of 2010 I decided I needed a hobby and Amblethorpe is the result. I've got into a routine of spending most of Sunday working on the railway and the last few months have produced some very consistant progress.
I decided at the beginning of this year that my priority had to be making Amblethorpe look like a railway rather than just trains on tracks. The key to that would be stations for trains to stop at and a few scenic areas for trains to pass through. But by the end of March I should have my stations ready and some nice scenic bits, so I'm starting to think that the original plan (made in spring 2010) of completing Phase 4 in 2012 may still be possible. I've reposted the sketch of my phases for clarity.
-
Once I've got some more of the scenic elements of Amblethopre sorted I'm sure the Railtour operators will be beating a path to my door
-
I can't say it was on my radar, but then we got an email on Sunday from a friend telling us that she is taking my wife an I for a day drip to Loch Lomond on the Northern Belle. Suddenly I'm rather interested in this
http://www.hornby.com/shop/train-packs/r3134-northern-belle-train-pack/
Looks like its Railroad, but I'm not that bothered about that. Even with the supplementary coach pack it's a bargain compared to a ticket on the prototype.
-
As things stand I've set all my trains to have forward in down direction. This is helpful with multiple units and my HST, but less important on my two loco hauled trains. A present Scots Guardsman is stored on the up main in the shed, but is facing down. These means it is basically pointing in the wrong direction. Although reversing it and running it on the down main wouldn't be hard.
Amblethorpe is currently a DMU railway. The other trains I have don't make much sense on it at the moment. Even the HST is too big, with only one platform long enough to accomodate it. I need to get a loop completed before I sart running my steam specials and freights (when I've bought them), and the good news is that I've finally worked out how I'm going to get the loop to work.
The problem that most of us have is that we have to have access to the garden and the railway gets in the way. Building on a shelf-system I don't have to contemplate tunnelling under the lawn, but I will need a lift-out section over the path and the path isn't in a convenient location. I'm going to have to cut out about a metre of Phase One baseboard where the loop rejoins the main line and replace it with a large board containing the junction and a 90º curve.
Here's a pic of the plan, the dark green is the old and the light the new.. It's twin track so the lines represent tracks not rails.
-
Having a permeant canopy over part of my railway means I can be a bit more adventurous with the scenic elements in that area. As i started building my first our door station I decided keeping the rain off that area would be a good idea. Using bits of redundant framework and sheeting I've developed a cover that can be removed, or replaced in less than 30 seconds.
-
Concentrated on scenery again this Sunday. i've added photos to my gallery.
Fencing and pan scrubs create a good look.
-
IanR said:
Nice photos Chris, I'm liking the embankment and bridge... very nice.
Me too,
Need to go to town with the pan scrubs now.
-
I can feel your excitement growing from here.
Start small, but in the back of your mind, plan for expansion later.
-
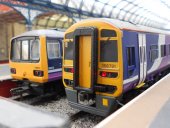
I'm hoping that sometime this year I'll get my hands on one of the new Northern Rail 144's being produced by Real Track Models. I've saw one in the flesh at York Show last year and they going to be rather special, once they've got there coats one.
I wasn't sure which livery version to go for, but this picture I snapped recently at York has made my mind up.
158 791 is already in the shed, so seen as Real Track are producing 144 012, I think I go for that.
-
I've added a bunch of new photos to my gallery. I'll include just the one here.
-
I got hold of some more empty cassette cases, but the new station is under a cover so I'm waiting until I've got a full afternoon free before I do more work on it.
I had an hour or so in the garden and laid 2 metres of double track. These were trimmed to length so a point fits on the end of them so I can have a tempory single track running after that. I'll pop a platform next the single track and that should make running sessions much more interesting.
Photos were taken. I'll post them tomorrow. May be.
-
The terminus sounds great. I looking forward to the pictures of it by this time next week
-
Not soldered any track yet but I know that consistent power feed I'm currently enjoying wont last forever so need to get to some soldering soon.It's funny how priorities change with time. I laid a few lengths of flexi this evening. It's not straight yet and it's not nailed down, but it is soldered. Soldering was mainly done in the shed leaving jus at couple of quick joins outside. Much easier.
Great shot of the APT, hope those chaps were in the Safe Zone
-
York has been basking in sunshine today and I've made the most of it.
One of the frustrations of my running sessions so far have been the lack of stations for trains to call at so today I set about building my second station, and the first one which will be outside permanently. Amblethorpe station is a terminus at the end of a short branch in front of the shed.
The baseboard and track have been in place for the best part of two years and from time to time I've placed my hornby platforms next to the track, but I only had enough for the one platform so the other track looked a bit left out. The aim was to build a large U of platform around the both tracks.
I'm always keen to reuse stuff I already own so a few weeks ago I went up into the loft and searched around for anything that could be turned into a platform that would live outside. After a good bit of hunting I came across a couple of old cassette tape cases which looked like a good fit. I offered them up to the hornby platforms and they were ideal. I took a few measurements and worked out I needed 48. Not a problem I had hundreds. But it turned out I did once have hundreds, before I threw then out, (which I don't remember doing) I now had a handful.
I put out requests to friends and family and a few came in. While I waited for more to arrive I played around with CD cases. A CD case was the width I needed, but only 10mm high. I CD single case placed on top got it to platform height. An evening of faffing around with empty CD boxes turned out to be a waste of time when another trip into the loft turned up some Play Station game cases which measured up very nicely. My earlier faffing had taught me somethings and I found away of linking the cases together to make a very nice 1.3 metre platform base.
The other reused item were floor tiles left over from a Bathroom fitout 6 years ago. These are 30cm square, adhesive on the back and a very slight texture on the top. Perfect for a platform surface. All they needed was a spray grey and to be cut to size with a stanley knife.
Putting it all together...
I got some more done after I snapped this pics, but I still need some more cassette cases and I need to fashion the platform ramps before I can finish it all.
-
Hi Howard,
I'm sure I'm not alone in thinking that your tunnel plans are very brave
I suggest you take a belt and braces approach to the power supply to the track in the tunnel. Bond every joint twice (solder two separate wires per join) or run a power bus through the tunnel and solder two links to each length of rail. It will take ages, but it will be "fit and forget".
Peco code 100 nickel/silver is pretty much what we all use.
Go for it, take lots of pictures and keep posting on here. I've found some people get a bit cheeky if you don't post enough pictures
-
Amazing
Not only have you produced a garden railway in a couple of weeks, but you've done a top-noch job of it.
Well done, I hope you are really pleased with it.
I'm sure you'll tell us that there's still lots to do, but most of us took months to get anywhere close to what you've achieved.
-
Wow, you turn your back for a couple of days and somebodies only gone and built a garden railway.
Very impressive work.
Don't use a piece of string to get track straight, it won't be straight. Get a long straight object and push it up against the sleeper ends, and use a Peco track gauge to get your 6 foot right. I use a metre length of aluminium trunking which I had hanging around.
Felt is good, I'd go as as far as great, if you stick it down and you get a smooth surface. One of my friends wants to use it on his inside layout he likes the finish so much!
I've got on well with B&Q's felt adhesive. In fact I've just purchased another small tin today.
-
With the temperature rising and the evenings getting lighter I'm finding the time to get lots of little jobs done on the railway.
I made some improvements to the baseboard of my removable station (Colwick). I've attached a couple of bolts to the underside, these slide into slots made in the supports outside. A penny washer and a wingnut allow me to secure it in place once I've got it aligned. I worked out the arrangement a month ago, I even had all the bits and bobs needed, I was just waiting for the weather to improve.
With all the recent improvements to Colwick Station and with new rolling stock to try I just had to have a running session
It was my first chance to stretch the legs of my Network Rail 31 and Scots Guardsman, both looked great running round on Amblethorpe. I can see why so many people model the steam/disel changeover.
Couldn't help but notice that the 5 roads through the shed are starting to fill up and with plans for a couple of Pacers and Container train I think I may need to build stabling sidings in there.
-
doublecee said:
I was under the assumption that you could not use DC locos on a DCC layout as the voltage is constant, with the carrier signal. So that would not enable control of the DC loco.
On DCC the voltage on the track (about 15 volts) is alternating but it's not true AC, it's more of a square wave than a sine wave. It does alternate around 0 volts (-15v to +15v). To operate a DC loco the controller adds a direct voltage, say +10v, on to the tracks so the alternating voltage is cycling between -5v and +25v. This allows you to control one DC loco and lots of DCC ones on your system.
The problem is that some DC motors don't like it when they are stationary and have an AC supply across them. The loco will shake as it tries to move forward and back 50 times a second and can cause the motor to burn out.
My NCE system doesn't allow DC running.
-
Hi Bill,
When I laid my first run of track, about 10 metres, I only bonded a couple of the joints. I had a season of trouble free running. The following Spring I had to get the pliers out on the fish plates to give them a little wiggle back and forth. After doing this a few times I got my soldering iron out and bonded the rest.
I've got another run to do this spring and I will be pre-bonding my rails. I'm can easily carry three length of flexi track joined together so I'll bond those up inside beforehand. I'll also put short tails on the ends ready for a quick solder up outside.
I do have a bus. I don't make much use of it. Bonding is easier.
-
Coincidentally, I spent yesterday improving some Hornby platforms from this range that I bought around 30 years ago. A bit of filler and some paint and they are looking far better than I expected.
-
My local model shop were expecting Scots Guardsman to be delivered form Hornby in July last year. My wife ordered it for me for my birthday. It's just arrived. If it had arrived yesterday then I could have received it as half-birthday pressent
How come Hornby can get their delivery dates so wrong, so often.
My next purchase from Hornby will be their Northern Rail Pacer, it's due first quarter 2012, should I put it on my Birthday or Christmas list?
-
Blimey. Three months on and I'm still working on the first cab of the voyager. Top marker light went in two weeks ago, tail lights today. If I get a move on I may have it done before the end of summer.


Amblethorpe
in Members Garden Railways
Posted
I'm going to pop into town. I may by a box of track.