chris
-
Posts
1,256 -
Joined
-
Last visited
-
Days Won
78
Content Type
Profiles
Forums
Gallery
Everything posted by chris
-

From the album: Amblethorpe DMUs
The older version of the Bachmann 158. I stripped out the directional lights and replaced them with more prototypical lamps. Using a twin colour LED on one side to shine red or white. The unit also has door warning lights fitted, but no interior lights, they would simply illuminate a very large motor. -
From the album: Amblethorpe DMUs
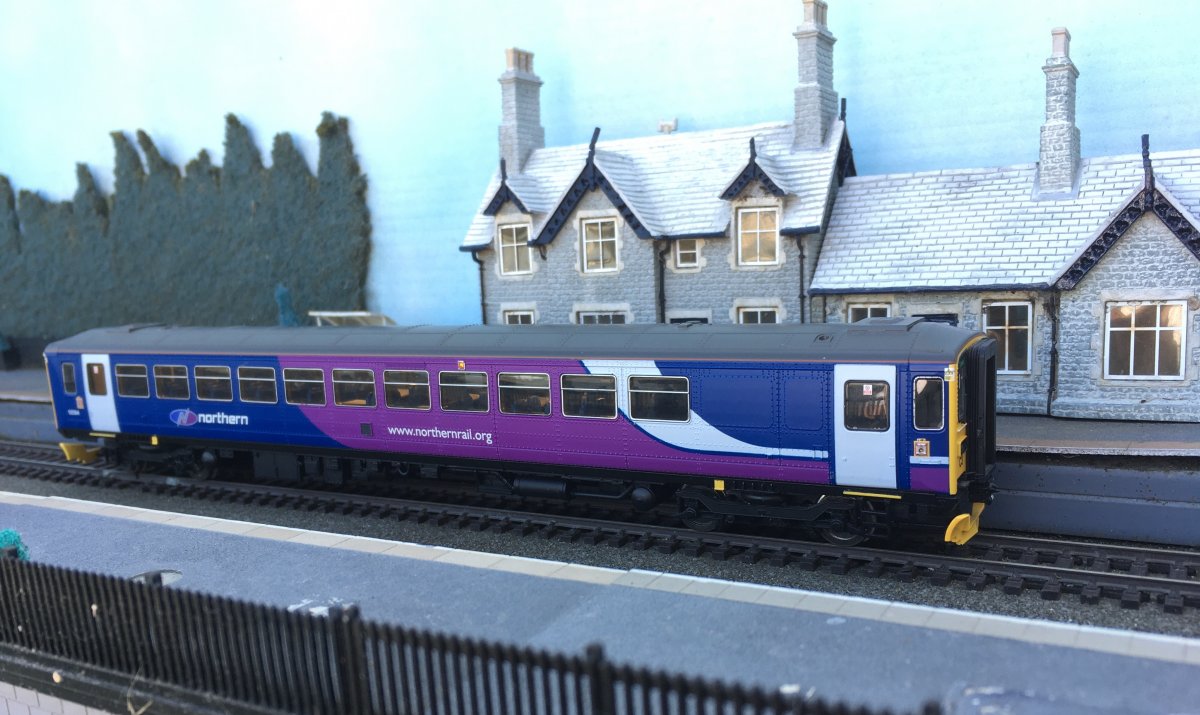
Bachmann's 150/2, here in Northern Rail livery, is a fine model. I have added a DCC chip, but otherwise it runs as purchased. -
From the album: Amblethorpe DMUs
This lovely Realtrack Pacer 144012 is running as it came out of the box. -
From the album: Amblethorpe DMUs
Northern Rail SuperSprinter 156484. A Hornby modelling the exLima tooling. Both cars have DCC chips fitted to work Directional lights, Parking lights, Coat lights and Warning lights. -
From the album: Amblethorpe DMUs
Northern Rail single car using 153324. A fine Hornby model. I have added interior coach lights and door warning l lights. -
From the album: Amblethorpe DMUs
Northern Rail Pacer 142026. A rather poor quality model from Hornby. DCC chips have been added to both cars along with directional lighting, interior coach lights and door warning lights. -
From the album: Amblethorpe DMUs
Northern Rail Pacer 142026. A rather poor quality model from Hornby. DCC chips have been added to both cars along with directional lighting, interior coach lights and door warning lights. -
From the album: Amblethorpe Locomotives
66745 "Modern Railways the First 50 Years" -
From the album: Amblethorpe Locomotives
-
From the album: Amblethorpe Locomotives
-
I've spent the last couple of days working on the garden, or what approximates for it. We have very few plants. Today we switched them from one side of the garden to the other. This has cleared a bed for a ground(dish) level On30 line. Afterwards I did find time to stick some pan scrubs on a fence panel that had been stripped of them when I repainted it last week. Could have been last month actually, time, it's loosing meaning. This evening I've repaired the lift out section. It wasn't broken, but it was far from well. Some mechanical jiggery-pokery was required with saws and screwdrivers to get the two baseboards it links back to their original positions. Attention then turned to the tracks that lead onto it. Several chairs and a couple of sleepers had broken. In the end I realised that I had to replace the last 3 sleepers on each track with some taken from a fresh piece of flexi. Once they had been slid on it was a simple job to align the rails. It saved me having to replace a length of track. Hopefully this will fix the railways main location for derailments. It has inspired me to work on the other spots that derail trains. This may lead to work on the permanent way or the rolling stock.
-
I have some Realtrack intermodal flats that derail at the slightest opportunity. I bough them at York Show. Ran them that night. Went back to the show the next day and commented to one of the Realtrack chaps, his response was basically, "Yeah, there isn't enough weight on them. I stick some lead in the container boxes, that helps a lot." This was not the answer I was looking for when I had spent over £100 with him the day before. That said the Realtrack 144 Pacer is excellent.
-
From the album: Amblethorpe Construction
Test train approaching from viaduct end. -
From the album: Amblethorpe Construction
Track added -
From the album: Amblethorpe Construction
In place -
From the album: Amblethorpe Construction
Test fit -
From the album: Amblethorpe Construction
The gap to span. -
From the album: Amblethorpe Construction
Board built and felted -
From the album: Amblethorpe Construction
Bathroom floor tile top surface going on. -
From the album: Amblethorpe Construction
Trunking instalation. -
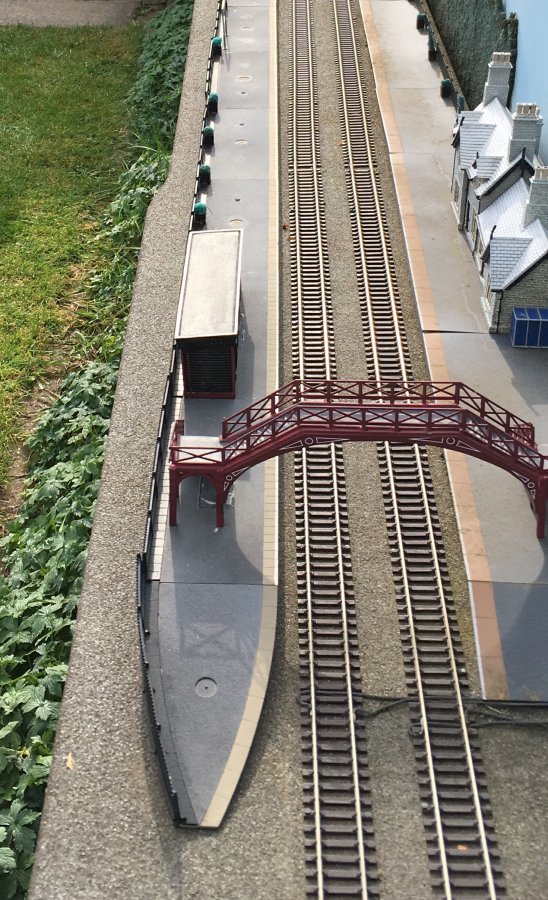
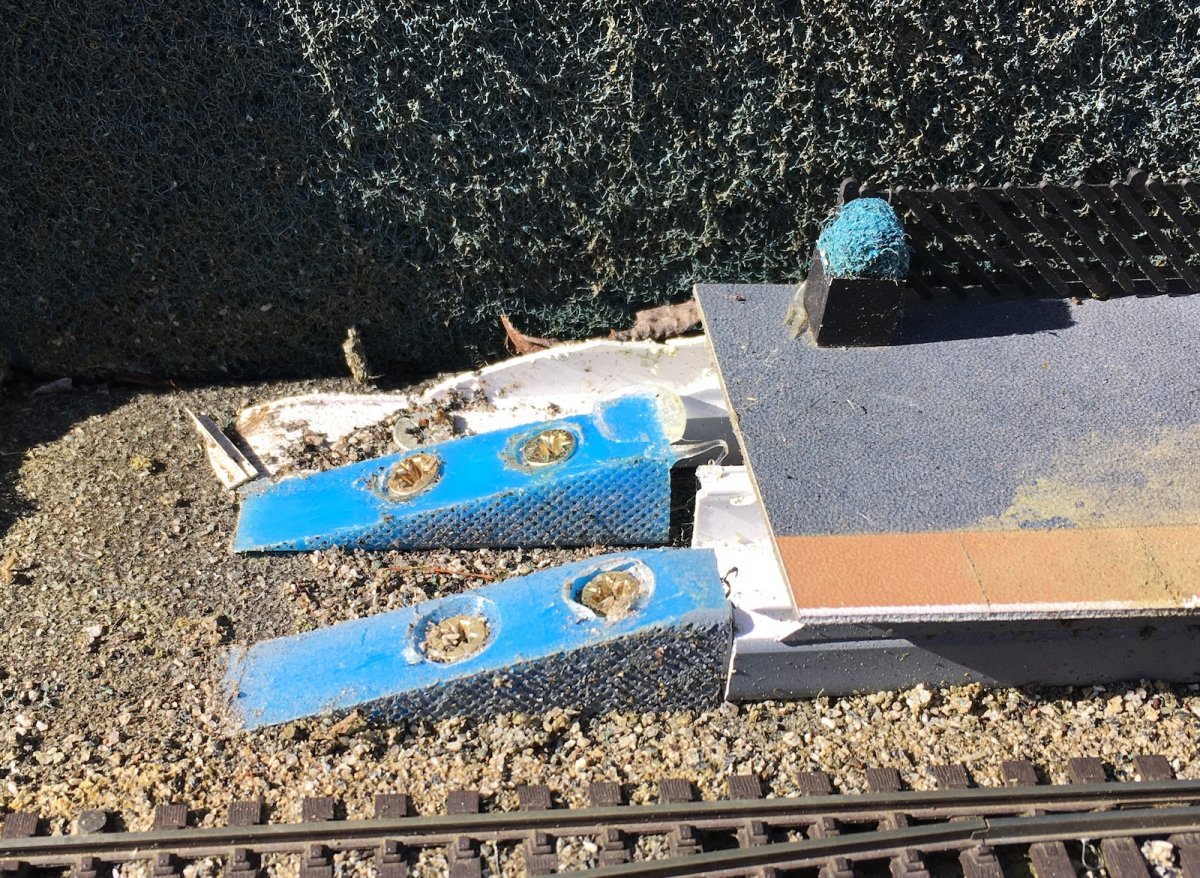
There is a thread for discussing platforms is elsewhere. If you have any thoughts on platforms please add them there. I'll update this How to Guide, when new ideas or suggestions are posted. This is you guide to building OO gauge platforms outside. I’ll outline two techniques both very simple and effective. In the following image the shop bought platforms are on the left with the build your own on the right. Shop bought Use Hornby plastic platforms. The R460 straight platform is 168mm long and rather expensive for what it is. However, they have been making them to the same design forever. Keep an eye open for them on secondhand stalls at shows. Rather than £4 you will be able to pick them up for £1. don’t worry about they condition, you are are going to be painting them. They are better than they look. Grab and aerosol of grey primer and give them a once over. Spray a light dusting of black aerosol from a distance of over 30cm and you will have a tarmac look. What then becomes apparent is that the moulding has larger edging stones than those white squares painted in the factory. These embossed stones look much better. Paint them the colour of stone or concrete slab you desire and then add a white strip. The R464 Platform Ramps can be treated in the same way. Don’t put a white stripe on these, they don’t have them in the wild. The R513 Platform Fencing is also surprisingly good and very easy to find secondhand at shows. Respray it back and this looks the part. Hornby do resin platforms to the same dimensions. They will do a fine job, but are twice the price new, and don’t turn up secondhand as often. Build your own Electrical trunking comes in a variety of widths with a standard hight of 16mm, this makes it ideal as the base for your platforms. A width of 38mm is a scale of 10 foot which is wide enough for a platform. A 2 metre length will cost around £3, it’s a cheap and quick way to build. A platform surface of a suitable plastic will top off the base, I use cheap bathroom floor tiles. I use primer Aerosols for this job. The visible surface of the trucking is sprayed in grey (concrete) or Iron oxide (brick). I drill holes in the base of the trunking. These are slightly oversized for the screws I’m using just incase there is any expansion in the plastic. Don’t be tempted to place your platforms close to the tracks, outside things have a tendency to move a little. Allow an extra millimetre or two of clearance between the train and the platform edge. Screw your trunking to your base and clip the top on. Over time the top will creep along the base as it expands and contracts. I drill a 1mm hole in through the trunking which passed through both the top and the base and push a track pin in. This will prevent any lateral movement. I aerosol spray the floor tile with grey primer and a mist of black to get the tarmac look. I cut the floor tiles to the required width with a Stanley knife. I used to score the edging stones on, but I’ve found this weakens it and with time they snap off. I now mask the tile and paint a strip of brown for the stones and the next day mask again and paint the thin edge line of white. A spray with a clear matt varnish or lacquer may help. The self adhesive tiles go straight on top of the trunking and look great. Simple thin platforms on 38mm trunking will give yo no bother. Wider platforms requiring two or more sections of trunking cause issues with the adhesive. I’m not sure what the mechanism is here, but once the tiles are cut wider than 40mm they curl up tasing the edges of the tile. Using a different material as the platform top would be sensible for wider platforms. I remove the self adhesive form the floor tiles and use contact adhesive instead, this has worked well so far. End ramps The platform ramps can't be made with the trucking. Use a suitable plastic that can be cut to size and screwed in place. I use an old kitchen chopping board lining up two of three pieces depending on the width. These techniques aren't really suitable for curved platforms. If you want a platform on a curve, ask your self the question "why?" You have a garden to play with, find a straight bit and build your station there. Railways are boringly straight, stations more so, with few notable exceptions. Seriously, build your platforms straight. As I said at the start, if you have any ideas or thoughts on platform construction techniques, please add them to the Platforms topic in the Structures and Scenery section.
-
From the album: Amblethorpe
The straight run from the shed, past the fam, campsite and pub to long platforms of Barnmouth -
From the album: Amblethorpe
-
One of things about lockdown is that there is an abundance of time and thus cannot be used as an excuse not to do things. I've had my 153 DMU in bits for over a year. The simple job of adding door warning lights had been started, yet not finished. With it coming out of hibernation at the weekend it was time to crack on and get the job done. I'd already drilled the holes for the lights so it really was just a matter of gluing in the nano LEDs in and wiring up. Yes wiring up, that was the job stopping me. I thought it was the micro connectors that was putting me off. No its was wiring up to the "green wire" from the DCC chip. Normally I'd snip the wire from the harness. But this is a direct plug in chip so no green wire. I'd have to find somewhere to solder the green wire on to the PCB. That somewhere was very inconvenient. And I soldered to the wrong inconvenient pin first time, so had to desolder that inconvenient connection and make another inconvenient joint. Now I remember why I had put off this job. The green wire can be seen emerging form the underside of the of the circuit board. Wires were glued in place and the unit carefully put back together. A quick test on the track, coach lights and the warning lights both worked. But not a the same time. I'd cut a corner on my wiring up and shared a resistor between to two. When both were switched on the current had a choice to flow through either lights and it chose the warning lights, the coach lights switched off. Back to the soldering iron. The tricky bit was freeing the very fine wires from the supper glue I had applied to them half an hour earlier. Lots of fiddling was required to get all the wires in positions that allowed the body to clip properly onto the chassis. Once it was safely seated the first train to run on Amblethorpe came back out of storage (unserviceable) and ran out to Barnmouth. A closer shot at Amblethorpe shows the lighting. I chose too higher resistor for the warning light, so it is a little dim. But I'm not taking the blasted thing apart again, even though I have plenty of time.
-
It has been filmed in the wild.