patlecq
-
Posts
25 -
Joined
-
Last visited
Content Type
Profiles
Forums
Gallery
Everything posted by patlecq
-
Hi Andy, Unfortunately, amost all old diesel types are not anymore used by Belgian Railways. Nevertheless, very few of them are still used by Belgian Railways track works and sub-contractor companies. If not today but very very soon, there will be only very few different types of locomotives, EMU and DMU running in Belgium. This situation will be quiet different compared to the whole fleet made of so many types of locomotives with their own style and colourful liveries which used to run in the eighties. But this is the price to pay (as they say) to keep the belgian railways still alive ! As soon as the weather will be sunny and dry again, I will post more pictures of SNCB Diesel locomotives.
-
Hi Everybody, Since yesterday I work on the points and doubleslips wiring. I don't go as fast as I thought I would do it. I have some problems with the alignment of the motors and the adjustment of the microswitches. I expect to finish this job by end of this week. Picture of locomotive 5320 (Märklin). Same original livery as 5319 but with a third headlamp (from a scrapped steam loc) to be allowed to run in Germany and in the Netherlands. Picture of locomotive 5315 (Roco). 1970's livery.
-
Hi Traingeekboy, If possible, I would like to provide the layout with spurs, tunnel, buildings, signals and so on ... But after so many years of frustrations with my indoor layout, now I want to make this garden railway as simple as possible to allow me to enjoy running (long) trains as soon as possible. If I'm happy with the results of this first stage then I will certainly think about improving the layout decoration.
-
Hi Mick, Sunny day today, so I took several pictures of belgian GM/EMD locomotives from my collection. 5217 (Roco) Locomotive modified in the eighties and then fitted with new cabs fixed on silent blocks. 5319 (Märklin) Last locomotive which ran with its original cabs and original livery almost up to the year 2000 (as well as loco 5404 which has been preserved by SNCB).
-
Hi Traingeek, I bought Peco Electrofrog becauseI I wanted to have the best rail current continuity. Now I regret this choice because it's a little bit complicated to wire. If I would have the choice again, I would go for Peco Code 100 Insulfrog. Today, the weather was fine, a little bit cold but dry and sunny. So I worked outdoor to install properly the ballast layer and the track. But late in the afternoon, came the first raining snow.

-
Hi Ian, Thank You for the warning. I know that maintenance will be big part of the game with outdoor railway. Do you know any improvement that can be made on Peco Electrofrog Doubleslip to avoid electrical continuity problems ? I already modified the Peco Electrofrog points as described previously in this post.
-
Hi Mick, The double headed passenger train shown at Vonêche station is unusual. Actually, there were no international trains running on this line in the Ardennes. There was a railway strike in Belgium on that day and all trains were stopped, except this pilgrims' train heading to Lourdes in France and exceptionnaly allowed to reach France as soon as possible for sanitarian reasons. This is why there is a trade union red flag installed on the head of the leading locomotive. There are many HO scale models (Märklin and Roco) of this type of locomotive. These "europeanized" US GM/EMD locomotives were built in Belgium under licence by Anglo Franco Belge company in the mid fifties. They were used by SNCB until 2007 and are now used for trackworks trains and operated by a private company. I hope to take pictures of these locomotives running on my garden railway very soon.
-
Hi Mick, As much as possible I try to stick on the 1/1000 real track drawing of the railway station. Of course, points and evenmore double slips are too short compare to the reality but the track lengths will be to scale (1/87). Here is a picture of the northern side of the station. This is roughly what will be installed on the first module (see previous picture). The point motors are Peco PL10 (I still got about 20 pieces of them which I already used in the past for my former indoor railway model) . The motors will be installed under table and offset by about 50mm. I intend to glue the point motors (as I did it already indoor with satisfaction) and to couple the throwing pin to a micro switch for frog polarization (still to be experimented). Offset is choosen to avoid water ingress through the pin hole (as much as possible). I expect to make the first trial outdoor this week-end. I will post pictures of the system if satisfactory.
-
Hi Dave, Weather is not too bad here, so I continue to work outdoor. Monday, I temporarely installed the first points, double slip and track to find a suitable way to fix them and also to determine where to drill holes for wiring and switch motor.
-
Hi Traingeekboy, Actually the roofing felt is greener than what we can see on the picture. I guess that the colour looks gray because the picture was taken on a cloudy day and late in the afternoon. With the rest of the roofing felt, I intend to make long bands of 4,5 cm wide to represent the ballast. I would like to paint the bands in matt gray colour similar to ballast stones. I will make a test this morning. This locomotive ( type 201) is the first Diesel locomotive built in Belgium early in the fifties. The design is belgian (Cockerill) but the engine was built under Baldwin Hamilton USA licence, the steam heater (to heat old passenger coaches) was a Vapor Clarkson USA machine and the electrical equipment was built by ACEC Belgium under Westinghouse USA licence. There were more than fifty locomotives of this type built and some of them were still in operation in the years 2000. Now, there are still three or four locomotives preserved by the belgian railways or by private museum companies. As far as I know they are all able to run. The model shows the locomotive with its livery from 1955 up to approx. 1965. It's a DC Trix/Marklin Model. It's one of the last model produced 100% metal. It runs fine but not very smoothly and the noise is very loud. Anyway, it's not a big problem outdoor !
-
I Everybody, This afternoon, I laid the roofing felt on the baseboards. It is temporarely nailed. I still think about the best solution to fix it on the baseboard. I installed a test track and made already some trial runs to check my Roco DCC remote controller. It works fine even at a distance of more than 50 meters. At that distance, the locomotive looks so small that you don't recognize it anymore and its speed seems slow even at full speed.
-
Hi Mick, I intend to nail the roofing felt on both sides of the base board. I bought special rustproof nails. If the weather is fine tomorrow (as foreseen by TV weather man), I will lay the roofing on the baseboard and take pictures. Another good news: I received this morning my new Roco Multimaus radio controlled DCC set. I already tried it (indoor) and it works fine. This radio controlled DCC set will be especially dedicated to my garden railway. Tomorrow, I will test the remote controller in the garden and I'm curious to see how far from the central station it still works. If you are interested, the complete set is sold at 300,00 Euro only in Holland (ebay). It's quiet cheap compare to the normal price which is 450,00 and even more (without transformer). Actually, it's a DCC set which used to be sold together with a loco, 3 coaches and rails in a starting box. I suspect that the price was so high for a starting box (850,00 Euro) and so difficult to sell that some retailers preferred to sell the DCC set and the rest of the box apart.
-
Hi, I'm lucky this morning. I went to a garden shed store and found roofing felt with small stones as used for shed roof. I bought one roll and I will start covering works this afternoon according to the weather. Thank You for your help.
-
Hi Duncan, Do you know the brandname of this type of roofing felt. If yes, then I will try to find the name of the belgian (or Benelux) importer, if any. Thank You.
-
Hi Everybody, I went to the shop this morning and I found a possible solution to cover plywood baseboard. It's a thin rubber sheet which is used to make small garden fish ponds. According to the advertisement it's waterproof and UV resistant and last but not least not too expensive. Any good or bad experience made by members of the forum regarding the use of this material ? By the way, I saw roofing felt (UK style with small stones glued on it) in a DIY shop. It would have been nice to use this type of roofing with my OO garden railway. Unfortunately, it was the coverage of the roof of a garden shed but not available as roofing material according to the employee. Thank You.
-
Hi everybody, I put the roofing (Derbigum) on the plywood baseboard for test and I'm not very sure whether it's a good solution or not to protect it. My concerns are: 1) Derbigum is thick and thus quiet heavy. Much more than what I thought. This extra weight might be a problem for the whole structure. 2) Do I have to foresee 5 cm extra width to protect the sides of the base board. As far as Derbigum is thick, its quiet difficult to ply it nicely at 90°. Do you have any idea of a more suitable solution to protect the baseboard ? Thank You.
-
Hi Mick, Metapost anchors are indeed very strong but one of them had one of the weld broken during the removal work. As far as the spike did'nt move at all and remained firmly in the soil, I decide to break the rest of the square receptacle and to remove it alone and leave the spike in the ground. I guess that if you just dig them into the ground nothing wrong would happen. The good shed (made with synthetic stone) is already built (glued with Loctite superglue as far as I remember) and painted with Humbrol paints. Do you fear problems ? If yes, I still have a second shed (same type) which can be assembled and painted according to outdoor use.
-
Hi Dave, Permission granted by the High Authority to transfer to another location in the garden but not the one I foresaw. Four anchors are already dug in the ground and today provided that the weather is OK (a lot of fog possible), I will install the plywood baseboards on top of the pillars and adjust them to level. As soon as it is done and sunny, I will take pictures. It is foreseen to have all wooden parts painted in dark green. I still hope to make a first train run before mi-december.
-
Hi Mick, I dont know Metapost in the UK, but indeed my anchors have a long metal spike extending from the bottom. I already removed them from the ground for transfer to the sun this afternoon. I didn't anticipate that it would be so difficult to remove them. One of them is broken and its spike is still in the ground (forever I guess).
-
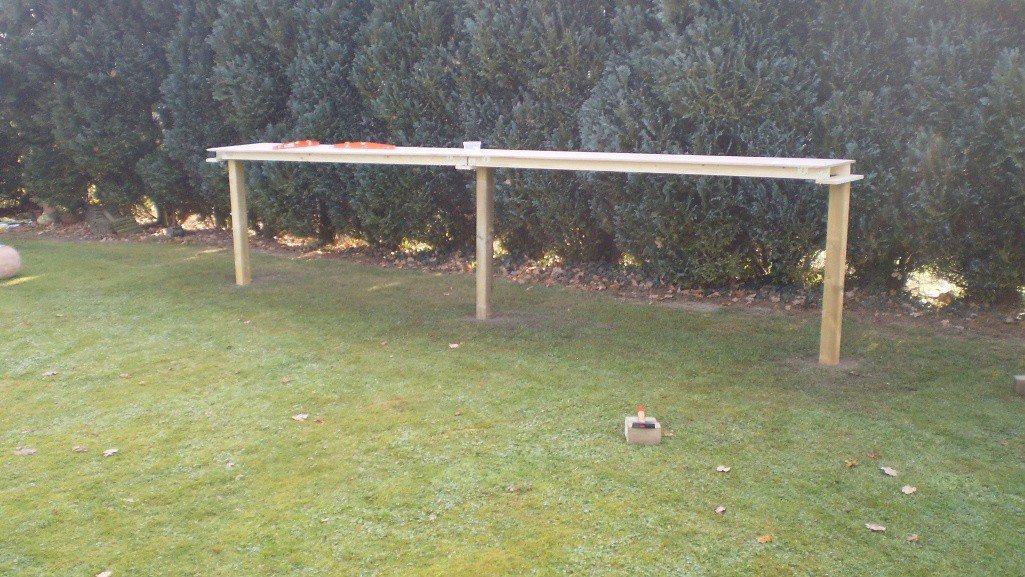
Hi, A few days ago I took two pictures of the type of structures I intend to use for my elevated garden railway. Anchors are dug in the ground, wooden pillars are inserted in the anchors and plywood baseboards (244 X 61 cm) are fixed to the pillars. I choose this type of structure because my garden railway will be semi-permanent i.e. that I will need to remove it at least once a year for garden maintenance. Baseboards have still to be covered by Derbigum (sort of thick roofing). The pictures show the structure installed in the shadow part of my garden. I started there because I thought it was the most suitable location in the garden according to the length available and the ground almost at level. Based on members' comments, I will transfer soon this very first part of the structure to the opposite and sunny side of the garden and then continue my garden railway experience.
-
Hi Ian, Thank You for your reply. Based on members' advices, I'm now negotiating with my wife to obtain the authorization to install my garden railway in the sunny location. Unfortunately, I already bought Peco Electrofrog points and double switches. I intend to follow Allan Gartner's DCC wiring and expect a good result even during bad weather conditions.
-
Hi Mick, Actually the main (and expensive) buildings are not plastic models but "synthetic stone" models (I don't know the english name - it's similar to the stuff used by the dentist). I hope they will resist to belgian extreme weather conditions.
-
Hi Steve, My outdoor layout will represent a small station called Vonêche in the Ardennes. This station is located along a double non electrified track line with a third track for by-pass and three other tracks for goods (wood industry). As much as possible, the layout will be at real HO scale (except peco points and double slips) i.e. a length of approx. 12 meter. I will run belgian and luxembourg diesel locomotives and belgian diesel railcars. Traffic will be mainly long ORE Iron trains, coal trains and steel products trains as well as few passenger trains (maximum 5 coaches) and railcars. The period (era IV) will be from 1980 up to 1990. The reasons why I decided to model this station are various: the simplicity of the track layout with a tunnel at one end and a 90° curve at the other end but also the fact that the station building and the goods shed exist at HO scale. I have now many drawings of the station as it used to be in 1981 and also hundreds of pictures. I already bought the buildings and some pieces of the dedicated rolling stock.
-
Hi Mick, Thank you for your prompt answer. The weather here is almost the same as in England. Maybe a little bit dryer and colder during winter time. As far as my body is concerned I rather prefer to stay in the sun but I fear that rolling stock and plastic buildings might be affected by too long exposure to the sun. Based on what I already read in this forum regarding track and U.V. I bought Peco track and points. On the other hand I also understood that permanent moisture is a real problem for electric circuits and more specifically for poor electrical contacts in the points. These are basically the reasons why I still hesitate on where I have to install my outdoor layout in the backyard.
-
Good Afternnoon, I'm Patrick and I live in the Ardennes (Belgium). I 'm ready to start building an elevated (1,25 m) HO garden railway in my backyard. I have two suitable places to install this garden railway; one exposed to the (west-european) sun almost the whole day and the other one located at the opposite side thus in the shadow from at least 10 am up to 8 pm. Based on your experience, could you please advice me which location would be preferable ? Thank You.