


Clay Mills Junction
-
Posts
390 -
Joined
-
Last visited
-
Days Won
28
Content Type
Profiles
Forums
Gallery
Posts posted by Clay Mills Junction
-
-
1 hour ago, Loco Hauled said:
One of the reasons I plan to work in wood is that I imagine maintaining the permanent way and the structures that hold it are going to be an ongoing constant demand and I'm guessing that will be something easier to rectify in wood rather than concrete or blocks - although I have no experience of either to back that up.
Concrete blocks, depending on how they are founded, shouldn't move and by their nature can't warp over time. Once down, there should be a good few years before any maintenance is needed.
Wood will need more maintenence but is easier to build with and can be used where concrete block cannot. Like crossing an area with roots sticking through the ground.
Wood will also be better for building above ground level, if you don't want to be kneeling constantly.
-
One of the things I notice from watching a few Youtube videos and others is how lumpy a lot of outdoor OO railways seem to be. I will post some examples at the end. Some of it could be exagerated by the views and lenses used and the speed trains are being run at.
Now, I am trying to get mine as flat as possible as I don't want trains to look like they are bouncing about the place, I want everything to be as flat as possible. This means that progress on block laying is taking far longer than if I wasn't so bothered. I just thought it would look more real if the trackwork was dead flat.
So the question is, should I be as fastideous over this as I am being or should I worry less and accept more movement of the trains?
Before anybody suggests I'm criticising these layouts or their builders, that isn't the idea. It obviously works and the trains can cope even at speed. I've also seen much worse examples in the past but can't find them right now.
This one, I could tell the track level was going to be out before the blocks were even laid. https://youtu.be/VTMraT76PZw
A bit of a lump over the straight: https://www.youtube.com/watch?v=hZchh_OWeHk
One from Daws Heath which could be down to the view along the track https://youtu.be/_RS9AXZ_p5k -
Today, another block settled in which isn't a lot but it allows me to get the level for the viaduct in the corner. This block was actually a little more problematic as under the ground there is the remnants of a reinforced concrete washing line pole that slightly sticks up but is too solid to get rid of. Once that was settled, I had found a foot long section of track with one rail quite a bit longer than the other so I used that to counter the offset caused by the curve of the track so I could get another 4' of track to run on.
One thing I am noticing is that the replacement Toplite aerated block that I bought recently is much lower quality than the ones I bought previously. There are large holes in them when cut through and some holes appear in the sides. Thankfully it hasn't negatively affected the building. Glad I have enough better blocks for the viaduct that I bought last year though.
One thing on the APT video, there seemed to be a dip leaving and entering the sidings and I was going to sort this today. It didn't need sorting, the problem was only that I'd forgotten that I designed the boards to be held in place by a weight over the frame and I'd forgotten to put the weight on for that video.
-
Is there a difference between having something complex by having multiple running lines (Thinking like Daws Heath with 4 running lines) and something complex through having a lot of operational complexity like an end to end or where trains have to be brought to a stop to allow others to cross?
It seems like the guy behind Daws Heath makes multiple running lines work. But then he'd probably find what I am doing too simple.
I can't keep track of more than a couple of things at my Dad's either to be honest. Trying to simultaneously be signalman and two drivers. If Dad was more computer savvy I'd have set up JMRI Panel Pro so I could route set and use technology to help.
-
I shouldn't have, but I was picking up my Dad's class 91, Durham Cathedral in Intercity Swallow and bought myself a VEA in speedlink livery to go along with my now numerous other Speedlink wagons.
-
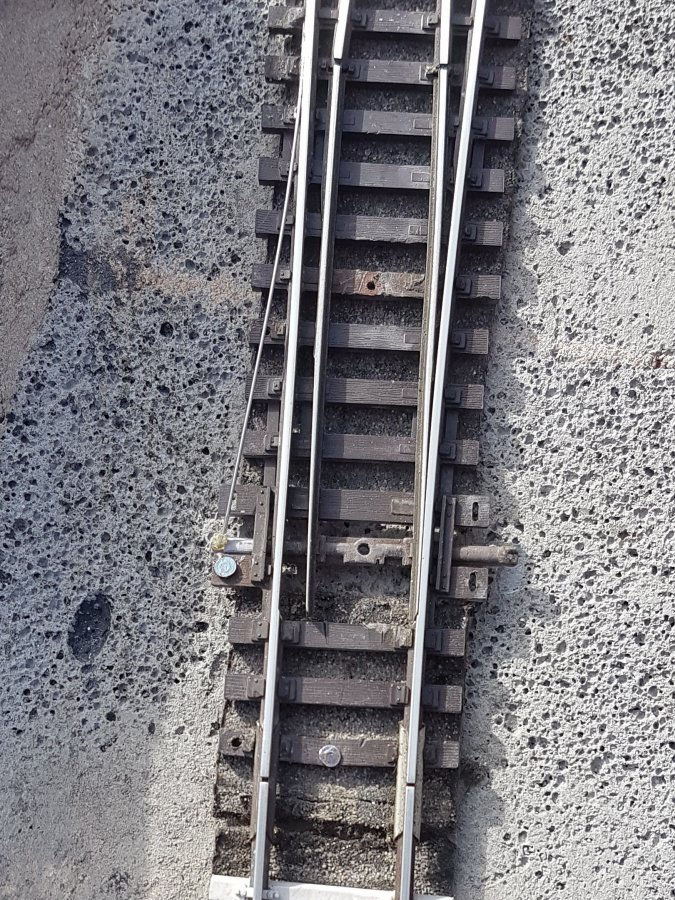
It doesn't look like it will take much spring force to keep the free end in the correct alignment.
I'm going to call the spring wire that keeps the point straight the "Main spring" and the one to keep the free end of the tie bar in place the "Alignment spring" from now on.
The issue I think I will have is the alignment spring is too short and therefore impedes the tie bar movement. I think the alignment spring will have to be a combination of spring and something else attached further up so that the pivot arc is much bigger and therefore doesn't impede the tie-bar movement.However, until I finish the blocks for the inner line of the passing loop I don't actually need the point to work, so I'm going to defer solving this problem until I have to. Mainly because I think I need more materials to solve it.
-
Variety is the spice of life, as they say.
Everyone is different I suppose and will have different wants from a layout.
The only thing I'd say to people starting out on a garden railway is to go into it with their eyes open, research first and decide very carefully what they want out of it and how to achieve that.
Part of that can be advising on how experienced people use their own garden railway differently to how they envisaged.
A general point I thought about on the YouTube thread is that there is as much bad info in some sources as there is good and little to contradict or evaluate the advice. This form of forum has gone out of fashion, but I think it is still the best way of bringing experience together and putting information in a persisting, accessible and discussable format.
-
 1
1
-
-
A bit more experimentation tonight.
On 4/26/2022 at 9:08 PM, mick said:In my experience I'm not sure that would work with my sprung points. It would just add resistance to the operation of the tie bar making it difficult (almost impossible) for the less heavy wagons to push the blades over and run through them. I think they would just ride up over the rails unless heavily weighted.
You were correct there, it does seem to be adding too much resistance to the tie bar. So another solution will need to be sought.
On 4/26/2022 at 9:08 PM, mick said:I find it is only the point blade away from the spinging wire that edges forwards because the spring wire that is soldered to the side of the rail connects into the tie bar itself and holds that side in place.
It does also seem that this is partially the case for this point too. The initial shift in the tie bar seems to be at an angle.
On 4/26/2022 at 9:08 PM, mick said:I have yet to try any modifications to prevent the blades moving forward. I haven't found it such a big issue to make it a priority but agree that over time the blades do move forward - I just slide them back into place until the next time.
Mine must be worse than yours then. Mine seems to move down and the tie bar crashes into the next sleeper very quickly; although I am simulating the movement manually it does seem that it might not be much more than one reasonable length train before it needs adjusting. Once the tie bar does crash it introduces a little resistance but more problematically the blade doesn't fully return for trains going the other way.
Other than that, even my lightest brake van goes through with only a slight wobble, the VBA and unloaded OBA have no problem. I'm thinking the only things that might need added weight will be the old Hornby "toy" stock from my original Midnight Freight set (to be honest, I'm not bothered about running that) and a few random bits of stock like the brake van which isn't the hardest thing to add weight to.
It might be a back to the drawing board moment. I'll have a think, I have a number of small springs I bought to try. Maybe I can hang one off the free end of the tie bar to keep tension on it without impeding the movement. -
I don't know if anyone else does this, but I give my point mechanisms a light spray of GT85 (it's a bit like WD40 for bikes) occasionally. Mainly to preserve the over-the-centre spring.
Does anybody do anything else or nothing at all?
-
Welcome to the forum.
I'm another like you who had a childhood interest, probably from my Dad who worked for BREL at the time. Went away through teenage years and then came back to it after my Dad retired and I got my own house.
Like a lot here, outdoors gives the opportunity to have a bigger railway, longer trains, gentler curves and , since I don't like having to create scenery, ready made landscape.
Bird droppings are a real problem for me too. I expected some, but my neighbour has moved her bird feeder close to the house so I'm going to have to take drastic action. Repellant spikes along the fence top or something. I expected a problem along the back fence and I suspect I will need a transparent cover along that bit.
Nice of you to do your bit to preserve a bit of railway heritage too. I wouldn't know where to start with something like that. -
I've seen spares being sold on an exhibition stand. It's a trader that attends a lot of big exhibitions too.
If I see them again I'll find the name of the trader.
-
Consists on dcc seem to me a bit of a faff, I find they never exactly work quite as smoothly as I'd like. There seem so many variables. I've found trains that run similarly on analogue and could be coupled, fight each other on DCC. My guess being small differences in performance are amplified on DCC or the decoders alter performance by a different factor or something like the start volt or acceleration CVs being slightly different.
Nice to see the railway in operation and a couple of shots from inside as well as out. The parapets don't look in bad condition or is that after being repaired?
I have to admit to never having looked at the 24s before, I think they'd been retired by the time I came into being. -
I suppose it could affect some points more than others
-
It isn't in my modelling era, but could you use the Arduino and a display for a programmable locomotive headcode box?
I'm sure this will be coming as a standard feature on locomotives at some point in the future through DCC, but still maybe a few years off.
Nice to see a long train snaking though a junction there Chris.
-
4 hours ago, chris said:
We've not discussed track much on here. Peco works fine, get on with it....
However. 12 years in. some of my sleepers are looking rather white.

Some indoor modelers spend hours and hours dry brushing white on to sleepers like that. 😂
-
1
-
-
In a very timely video on one of the Youtube channels I follow,
https://youtu.be/RxDOtkp6FWc?t=188There is a bit on points with their over-centre spring removed and keeping the tie bar and point blades from slipping. I think this might be useful as, even experimenting inside I do see the point blades slip. I will order some of that plastic and try it.
-
I was a bit slow diving back to the controller after setting the camera on that shot Mick, got there before the train hit the buffer at full speed though. I'll save up and make it a 7-car at some point. I wasn't going to DCC it, just because of the need for 3 decoders. But then I thought, I can just remove the blanking plugs in the driving cars so the lights won't go on but at least it will run.
The next three blocks along the back now re-settled in sand at the correct level and, most importantly, dead flat. The tip of using an old file has come in extremely handy for smoothing imperfections in the block surfaces. I've now only got one block to cut down and settle in along the back before I can join it up with the blocks for the next curve.
Once I have the level and alignment correct, I'll glue them together, cut out the arches and re-settle them before I put the stones down in that area.
From there I have three straight boards I will be able to put down the side for running to give a decent length of track until I get the garage wall and window and can put something permanent down. And while the garage wall is being done I can go back and do the inner line of the passing loop station.
I've just noticed on the photos that the fence panels could do with a lick of paint.-
1
-
-
Progress on Glen Dollar will be glacial now I'm back to travelling to work, if it wasn't slow enough already.
I have been already cutting the blocks for the top corner by the garage even though I'm not that far round.
Today I went backwards. Resettling the blocks along the back of the passing loop station and gluing them together. I only got three done, but that is still 3 more than were done yesterday. What it has shown is that I'll need to skim about 2cm off the remaining blocks to get them at the right level. If I can get that done by the weekend then after my next worktrip I'll re-settle and glue the rest of the back blocks.
I also noticed a couple of lumps in the track that should have disappeared when I embedded the feed wires. I think this was down to the fishplates retaining their old shape so I replaced some.
-
Just a thought from reading this thread or of interest. My Dad still has his childhood 3-rail layout and trains.
I was wondering if it was possible to build new 3-rail from nickel-silver flexitrack. Say by mounting another rail down the centre raised on a plastic strip to the correct height? Maybe even disguised as rail sometimes left in the 4-foot.
-
7 hours ago, mick said:
Sorry Barry - a bit late with my reply perhaps.
Yes, the points still work as intended. The one nearest the shed does require a tiny bit of prodding at times to clear away any dust/debris but other than that I've been well pleased with them.
The spring wire was bent at right angles and popped into a small hole drilled in the tiebar and if I remember correctly a small dab of glue was applied just to hold it in place.
Don't forget that you might need to add some extra weight to any very light wagons to prevent them from riding up over the rails as they attempt to push the points across but it all depends on the strength and resistance of the spring wire.
No problem with the reply. I wasn't in a hurry. I'll make a separate topic for it.
-
So the 156, I've been having a look at. I should really finish the 37 before I start this but, you know. I've also decided the 37 needs renumbered so it is the correct number for when it carried the name. As 37239 it wouldn't need the high-intensity lights either.
I have the 156 already so no cost, actually got a couple. But an intact one seems to be about £65-70 on ebay these days for cost comparison.Parts and materials roughly including postage: 12v CD motor kit £20, 8-pin DCC solder tab plug £5, 6-function decoder £25, Hurst Models Brass snowploughs £5, Hurst underframe kit £25, Eileen's pickup kit £6. The rest including LEDs, resistors, connectors, wires and solder and paint probably adds up to £14. So if we say £100 for parts and materials.
That would be a lot of effort to get to not far off the functionality and detail of the Realtrack model, which I've looked on their website and with the two decoders it needs, is £290.Given that I have the Lima model (I think we bought it second hand without a box in the early 90s), that is a saving of about £190! The extra details that 190 provides I can live without.
-
Chris, can I ask if you fitted additional pickups to the 156 or was it a Hornby chassis to begin with.
I have a Lima ringfield 156, my plan is to add pickups on both dummy car bogies and through connect.
-
On 6/2/2020 at 6:01 PM, mick said:
I've just removed the spring and elastic from the first 'sprung' point and changed it to the later method which is proving to be a big improvement. Using the short length of springy wire there's less force required to push the points across when wagons are running through them and even the lighter wagons are now able to handle the points successfully.
There's no longer an over-centre spring and there's also a big chunk of plastic missing from immediately in front of the tie-bar where the over-centre spring was located - but I found that necessary in order to get friction free travel.
I'll fit a spare sleeper in the empty void ensuring it's kept clear of the tie-bar so that it doesn't create friction.
Just looking at these. I know you didn't want to do a guide as it wasn't a tried and tested method. But two years in and you haven't done anything to them as far as I can tell? So I'm just reminding myself of what you have done and where the info is (Page 79).
Is the spring wire just glued to the tiebar end?
-
My garden line is approximately 22' x 8' in an L currently. I know it will expand but I still manage to run stuff and its still bigger than anything I could have indoors.


Glen Dollar Garden Railway
in Members Garden Railways
Posted
I had a thought. Why don't I just turn the blocks for the viaduct over onto their top sides onto a flat surface and glue them together like that. Then I can core cut the arches and settle them all in at the right height and level together. Filing any high spots after.
That would seem easier than settling in every block to the right height as I glue.