mick
-
Posts
5,221 -
Joined
-
Last visited
-
Days Won
323
Content Type
Profiles
Forums
Gallery
Everything posted by mick
-
I think I've just about located all my coaching stock vehicles and I've got 7 pages of handwritten records detailing each one. I'll type the list up and then make a start compiling the rakes I think I'll be able to make use of on Worsley Dale. I mentioned in a previous post that I thought I had approximately 20 x BR MK1's in the western region chocolate & cream livery and it turns out that I actually have a total of 23. I'm not sure what the maximum train length will be within the shed once the station area is installed but the 7 coaches used today fit comfortably so I wouldn't think that 10 would be a problem. I don't see much point in hauling any more than that so some of those western region ones may have to go. I've ordered some large radius electrofrog points for the shed. I don't mind the additional wiring and switches when it's all located inside and you can normally expect more reliable running. I've already got the point motors and switches that I was going to use on my previous layout so providing the points are delivered quickly it shouldn't be too long before I'm making headway. I've sketched a couple of possible track-plans but for some reason I always seem to do very similar arrangements to the under construction 'indoor' layout that currently resides under some clutter along the opposite side of the shed. So long as it provides some operational interest I reckon it will be okay.
-
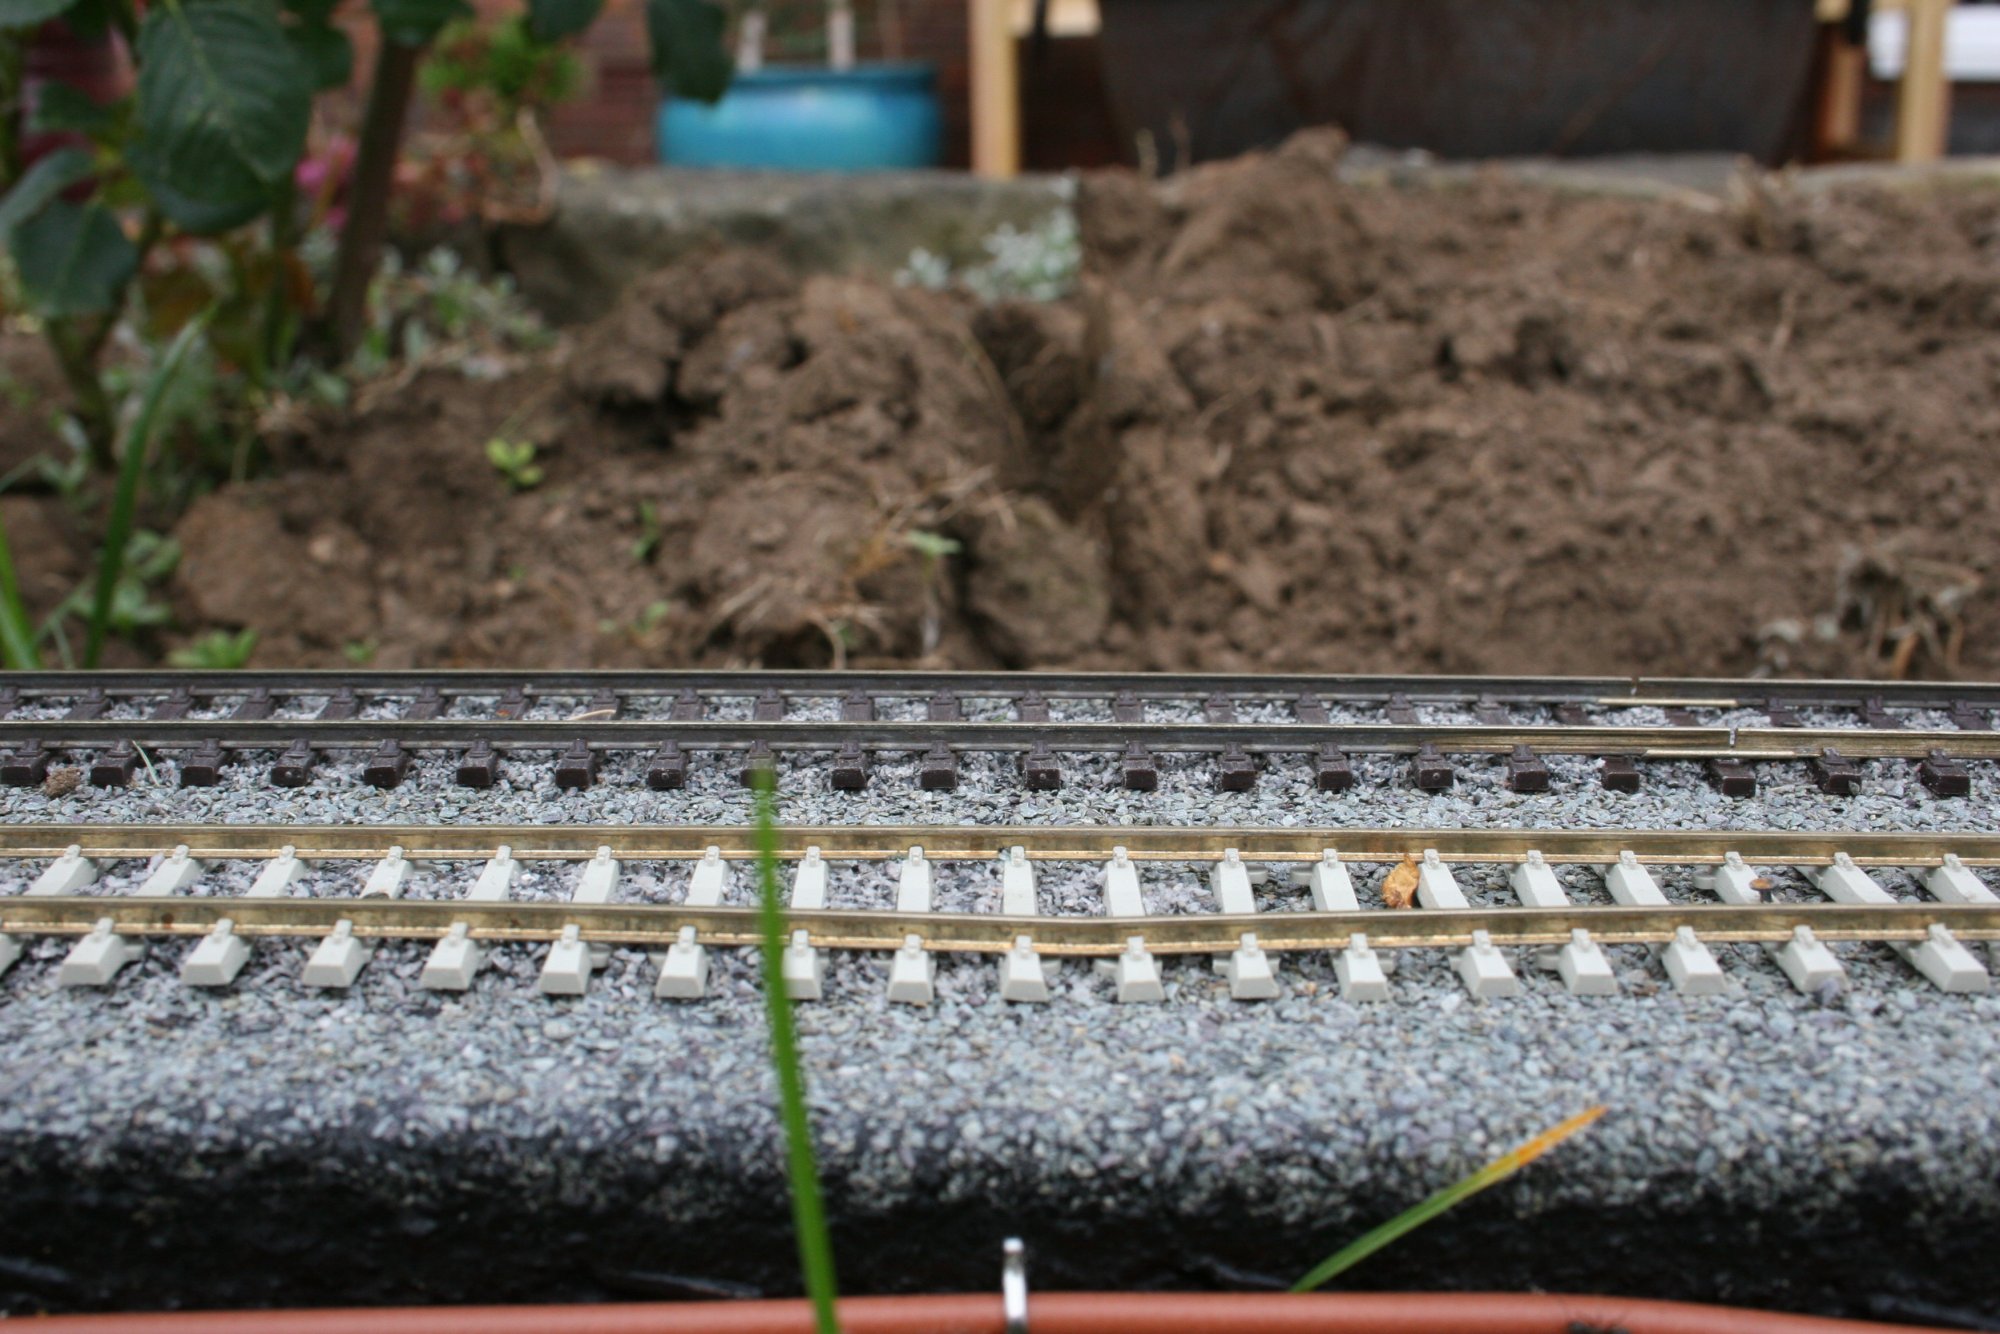
Yesterday was a bad day on Worsley Dale with nothing but things going wrong to report. But today is another day so we'll talk only of the better times. The majority of my rolling stock have been packed away for the past 10-11 months and I have never previously made a list of what I've got so today I decided to make a start with the coaches and have spent most of the day trying to sort through the boxes and pick out just the passenger and associated vehicles. I've made only a handwritten list for now so I'll type it up later. In my haste to pack everything away last year I'd obviously just put coaches I had been using in the first available box as many were in the wrong boxes. I've sorted that out now apart from one which I'm unable to identify. I discovered six loose but well wrapped BR MK1 western region coaches that I remember using back in Selby. They'd been obtained as part of the Bachmann Cambrian Coast set but I later sold the locos and retained only the coaches. There was therefore no need to take any coaches out of boxes to test the viaduct and I also found another similar coach with the same Hornby R8220 couplings that I had previously fitted to the ex Cambrian Coast coaches so I had 7 coaches to place behind 37417. Inside the shed I have loosely laid a few sections of track, just enough to take the loco and 7 coaches. I have still to decide on a final track layout for the shed. Here's a couple of photos from today.

-
A wonderful and very moving tribute Roy. I bet he's just as proud of you as you are of him. Sincerest condolences from myself and on behalf of all your many friends on the forum.
-
The 4MT isn't easy at all - I'm struggling to get a version 4 chip in. 80140 was originally a DCC factory-fitted loco but the sound chip is larger than the original standard DCC chip. There's insufficient room without some major modifications and I don't think my eyesight is up to the task. As for the speaker, the only space is in the cab and the standard speaker that comes with the soundchip is too large to lie flat on the cab floor. Possibly the only place is on the underside of the cab roof but either way I don't think you'll have room for the sound chamber too. I think this is one job, certainly in my case it is, best left to the experts. It's not an easy introduction by any means.
-
I have this same loco as well as 80140. I've spent the evening trying to dismantle 80140 in order to fit a sound chip - what a job! Finally managed to get it apart only to find there's very little room for the slightly larger decoder. I think I've found a way to fit everything in but will have to wait for daylight before doing anything else. As for my usual damage - I've got one buffer and the cab seats to refit so far - not a bad days work.
-
The bracing is for the baseboards not the shed itself. The boards are only screwed together on top at the moment, they need some bracing along the front to stop any lateral movement. I don't think that's been done on the forum yet - what a terrific idea. Promise me you'll post photos!
-
What a terrific way to go about building a layout. Could it possibly be more fun? The platforms look great and all of a sudden you have a railway again! It doesn't seem to matter which angle you take the photos from you can tell instantly that it's a railway scene. Platforms do that - poured platforms do it even more I'm going to have to work out how to do mine - I need platforms now too. What happens once they're dry? Do you sand them smooth? Will you be painting them?
-
Search engines and bots are counted as registered users (if we allow them on) and as guests if we don't. They actually use up a lot of bandwidth. No doubt we get a lot of human visitors too so I second your call "Join in and start posting details of your layouts!" Another rain break but it gives me the chance to post a couple more photos. The first one shows the benefits of painting the viaduct with water sealant. The top viaduct sidewalls to the left have been treated, those to the right hand side have not. Amazing isn't it? And so to a look inside the shed. 'Ideal Homes' it most certainly is not but it's starting to feel more like a railway shed and less like a storage hut. The shed is 12 feet long and the 18mm thick baseboards are 24 inches wide at a height of approx 400mm. It's pretty solid as it is but it does require a bit more bracing. Still, it's cost next to nothing and saved me from going to the recycling point again. That bit of storage space underneath will come in handy too. Before cutting the wood for the baseboards I did consider using my 'indoor' layout at this side of the shed. It was my intention to use it at the right hand side as a terminus station once the rest of the layout is built but it would have just needed turning for the best track orientation to fit along the left side. However, the approach track on the indoor layout is at a distance of 11 inches from the baseboard edge while the one coming off the viaduct is only 6 inches. It would have meant a complete redesign of the approach in order to get it to fit properly. I might just as well build a new one here and save the indoor layout for the opposite side.
-
I''ll see to that once I get the iron back out George. At the moment it's got the added safeguard of 2 rail joiners to get the power across.
-
The heaven's have opened - it's bucketing it down at the moment - and so I've come back inside. I've cut up some 18mm thick chipboard panels that were saved from an old wardrobe fitment. The panels have a plastic melamine type finish. Two 24 inch wide panels have been fitted along one side of the shed supported by 6 x 380mm high panels cut from the same timber. Further intermediate bracing/support will be added later. The two panels are slightly short of making the full length of the shed but I'll leave the end for now as it will require curving round slightly for the tracks to exit the rear of the shed. The base is at a more convenient height than my original layout in Selby - only by a matter of inches I admit but it really does make a lot of difference. There's certainly room beneath the base for storage and/or access. If it stops raining long enough I may get out and take a few photos so that you can see what's what. Much better than me trying to explain.
-
Well I've now made a start on the baseboards inside the shed but before that I had some major track maintenance to carry out. Although I did try bending the damaged rail back into shape it was just not going to happen. Not only has the rail been dented it had also been flattened across. I decided to go ahead and cut the damaged section out. I also took the time to take a few photos along the way. Using a cutting disc in my mini-drill I cut through the rail a few sleeper widths away from the damaged section at either side and gently slid the rail out of the sleepers. A new section of rail was cut to length to be a nice tight fit. Lifting each sleeper in turn, the new length of rail was slid back onto the sleepers. On the cut ends of the existing track I placed a new rail joiner and slid each one back beneath the existing sleepers to allow the new length of rail to be fitted. With the new rail in position the rail joiners were slid across to hold everything together nicely. Job done. And this is the damaged length of rail having been removed and replaced. Something to eat and then it's back to the shed.
-
Yes, it's the base I'm more concerned about. I'll give it a try first but failing that it's out with the cutter's torch!
-
As reported yesterday and now that I've had time to calm down, I'm going to have to look at the best way to repair the damage caused by the toppling spade. I've just been out for a closer look and took the following photo showing the dent in the rail closest to the camera. I don't think trying to force it back into shape would be very successful. Rather than cut out a complete section I think I should be able to just cut out a section from that one damaged rail and as the sleepers have no connected plastic webbing on the reverse I ought to be able to lift them slightly to slide a new length of rail in. Fishplates and some solder should hopefully sort this out. Perhaps not quite the catastrophe it felt yesterday.
-
My neighbour's will think I'm crazy coating the viaduct with yoghurt - better go for the alternative option
-
Andrew: Yes the viaduct's just about sorted now. I finally got the track base level and most of the track temporarily pinned in position. I've tested it with a single loco running back and forth to try ensure it's as level as can be but it's a preserved line and we can expect a bit of uneveness. I certainly won't be too distraught if that's the case. The real test will be a rake of coaches in a few days time. I've no regrets about making the viaduct single track. I've got the opportunity to make the next one double track should I wish I have considered coating the viaduct but instead I've gone over it lightly with some sandpaper to remove the heavier markings. I don't want to go too deep otherwise I'll lose the smooth face finish. I think it's okay and in time it should weather naturally - I hope so anyway.
-
Nice one Andy - great photos too. I've never heard of anyone being pestered with moles in their garden before. That's a first for the forum I think!
-
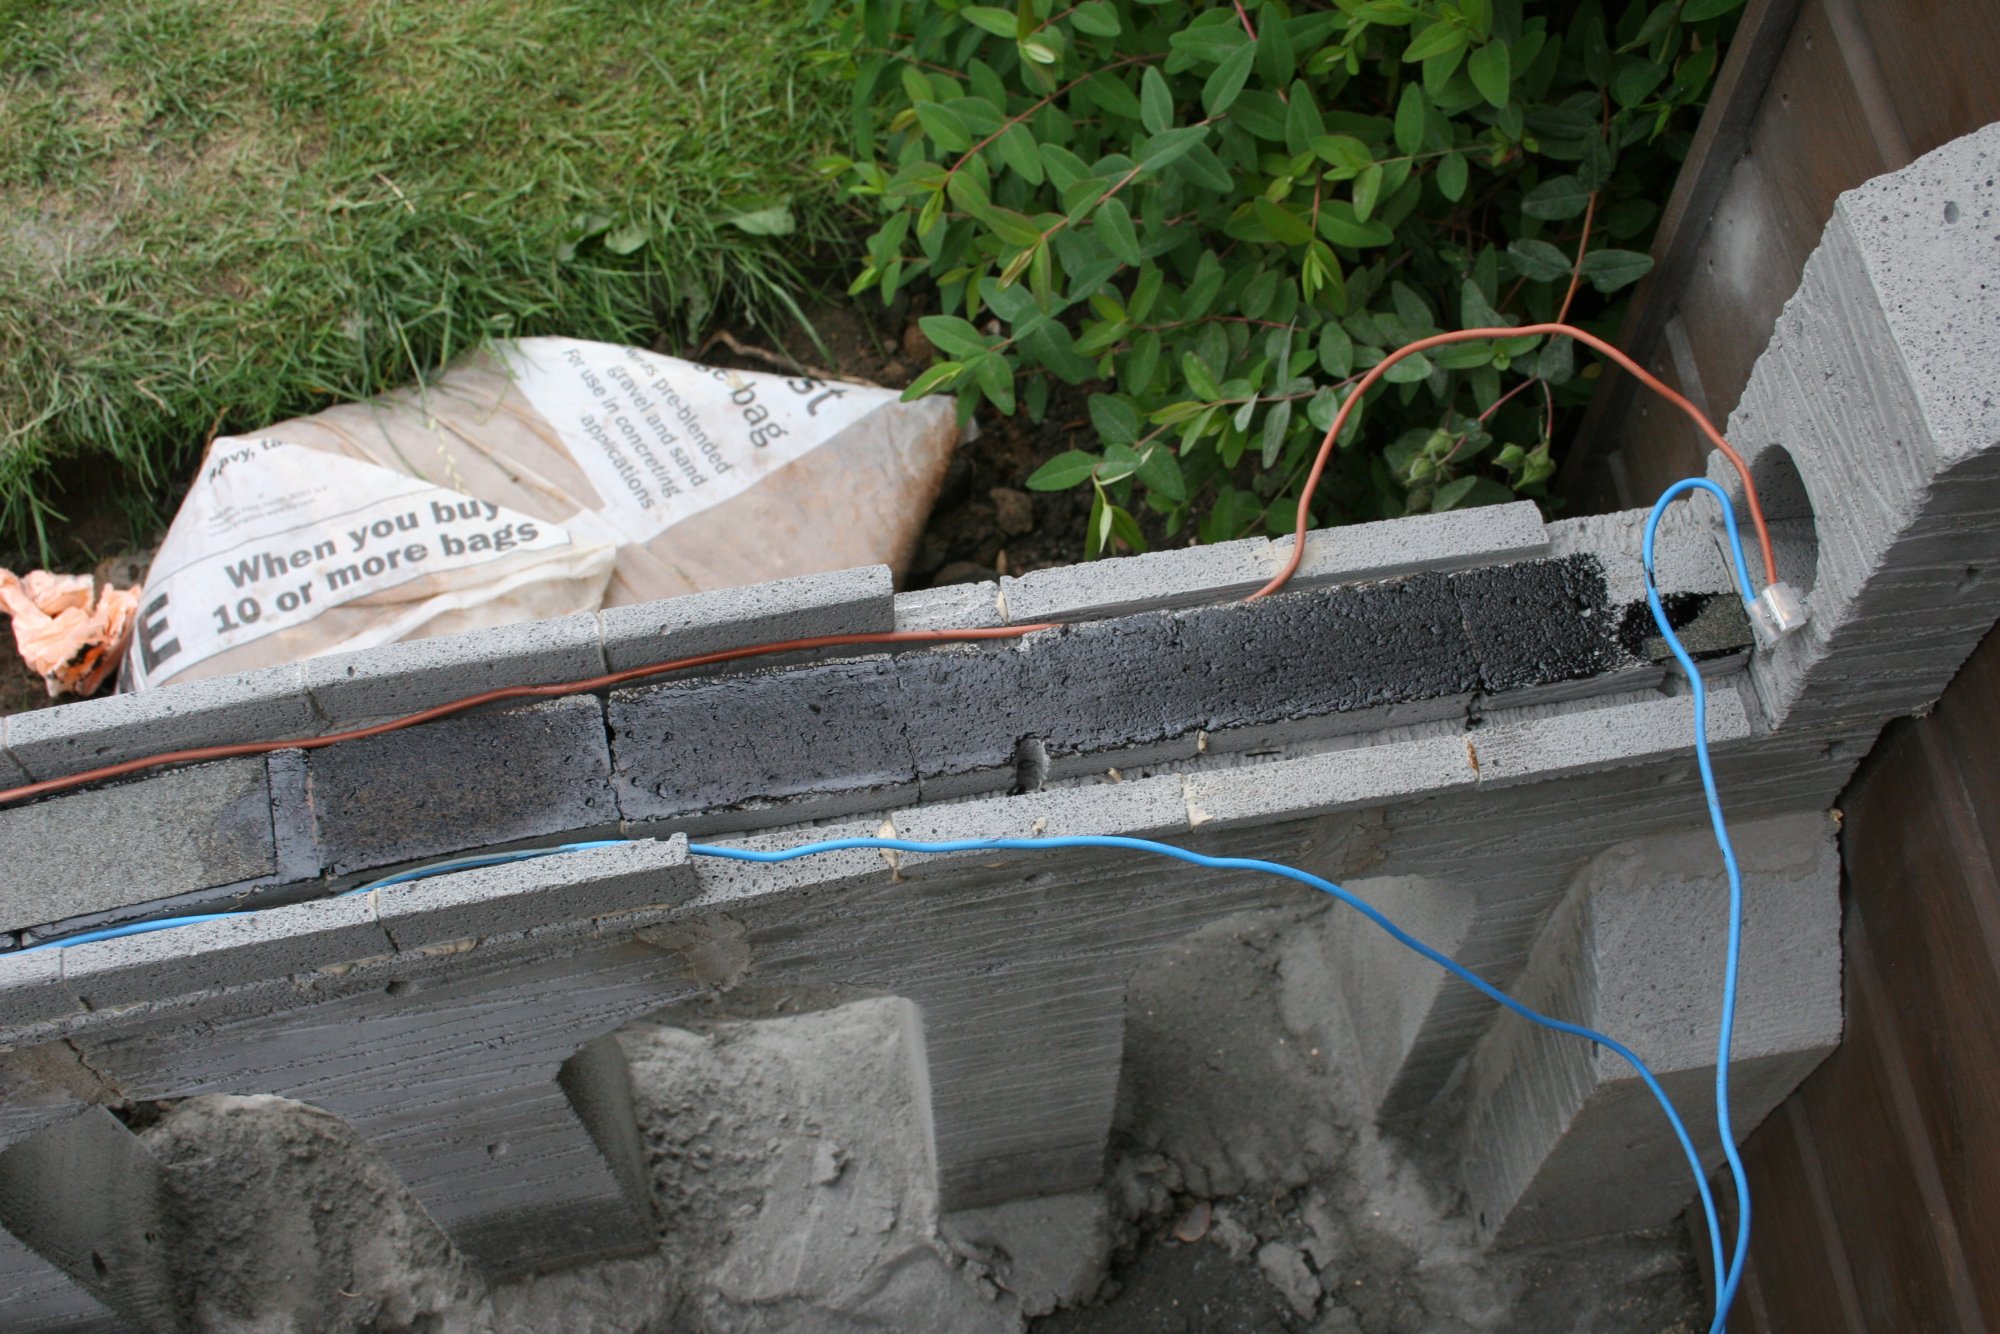
For want of a better illustration, the following photo gives an idea of what you need to do to bond your rail joins. You simply need a short length of wire soldered to the end of one section of rail that spans the rail join and is soldered to the leading edge of the next rail section. Note that this needs to be done on both rails. Some members use fuse wire, others standard track layout wire, some recommend copper wire. The simple fact is that anything will be better than no bonds at all. http://www.selbygardenrailway.co.uk/images/construction/IMG_3455.jpg' alt='URL>'> The metal fishplate that connects the two sections of track together cannot be relied upon to transmit the electrical power. Certainly when used outdoors they don't last very long at all and so it is advisable to solder wires across as depicted in the photo. Add the power feed to your track in the normal way, perhaps inside your shed where your controller will probably be situated. The soldered bonds are just to ensure the electrical feed reaches all sections of your track without interruption. There is no need to solder the fishplates to the rails, in fact you really don't want to do that. The fishplates will allow your track to expand and contract as the temperature outside fluctuates. Hope this helps.
-
Pam thinks I'm getting paranoid because a number of times when I try to do anything that's "not really what I want to be doing" something always seems to go wrong. Three times now I've cut the grass mindful of the fact that I've got a few cables running along the border, only to sever the cable connecting the anemometer to the weather station. Yes. three times I've done that. Anyway today I thought the garden was starting to look untidy and it's certainly getting overgrown so I've been thinning out the borders and turning the soil over to freshen it all up a bit instead of making progress on the layout. I've completely filled the recycling bin. On my latest trip from border to bin I planted the spade into the soil, picked up the bucket of waste greenery and headed towards the bin. Within seconds I heard the spade hit something solid behind me, turned around and it was laying at right angles across my newly laid railway track! There's a right dent now in the outermost rail of the inner concrete sleeper track and I don't see how I can possibly get it out. Looks like I'll have to completely replace a section. That's me back to the re-building phase again Griff! Paranoid?... Who, me?
-
I've referenced this before but IanR has a "http://www.oogardenrailway.co.uk/viewtopic.php?f=6&p=2823#p2815' rel="external nofollow">really useful" way of storing his loco's and rolling stock that I keep intending to copy but have yet to do so. Definitely worth a look.
-
If there's a way to keep the points working then I'm more than happy to give them a clean before any running session. I don't expect to have more than about 3 sets of points in total out in the open garden so that's no problem. Yes, at this time I'd choose insulfrog too but we could really do with taking a closer look at the point issue and see how best to use them outdoors.
-
No apologies for any lack of updates required Simon - you're welcome to visit and update your thread as often or as infrequently as you please. There'll always be someone here willing to listen and look at what you've been up to. We are a very friendly bunch and I'm sure you'll get much more from the hobby the more you share with everyone but that's just my personal opinion. I've found there's only so much model railway chatter you can share with your other half Good to see the video of the tank engine arriving - reminds me of why I never use public transport (please take that as the amusing comment it was intended to be!) I've had a quick look at the photos on your link and I assume they're all of the current layout? There's the shed in evidence and I notice many of the buildings you mention in your thread. Another thing that caught my eye was the track - what make is that? It doesn't look like the more recent Peco or even Hornby. I just wondered having read of your issues with the power supply whether the track may be partly responsible. You don't appear to have the track joints bonded from what I can see and this will certainly result in an eventual loss of power or at least intermittent power when used outdoors. You should be able to feed power to the track inside the shed and by soldering a small wire across the rail joins at each track joint, feed this power to the far reaches of your layout without problem. There's nothing worse than trailing wires (been there, got the t-shirt) so that's an area that might need addressing. There are members on the forum who use and/or have experience of PC software and the like and they'll no doubt be able to offer you some advice but I would certainly cure any power feed problems before moving on to another level. If you need help or advice on any aspect then please just ask. One final thought but again this is entirely a personal opinion. To me there's nothing better than looking back over the development of your layout. I recorded most of the construction of my first layout and all of the current one and my notes contain the generous advice offered by other members as I progressed. I am so glad I did that and have all of it to look back on. It's a complete story rather than just a set of photos. You're more than welcome to use the forum for that purpose and if you do then I'm sure you'll be pleased you did.
-
That was some ride! Mini cams are great fun and offer a perspective you rarely see otherwise. Well worth the effort.
-
Rebuilds are part of the game Griff, I just wish it would let me get something finished before I was having to start out rebuilding! It was my own fault - I put those last 5 cut sections in place without checking they were level - I just assumed with them all being all the same size that they would be. Never mind, it's sorted now. I've just had to remember to enlarge the entrance hole into the shed with raising the base by just over 6mm. Most of the track on the viaduct is now in position; just the one length that will span across into the shed to lay. The power bus is also now through into the shed. I've got a few pieces of sidewall to glue on the viaduct and then that's more or less it I think. We mentioned points earlier and I've had to clean the set of points already as the loco sometimes stalled or ran erratically over them. It's not all down to the fact that they're located outside, I've had the points for a couple of years and they've been used before and that's the first time I've done anything with them. I'd be quite happy if all it took was a quick wipe across the contact faces each time - no different from having to clean the track. We'll see how they go over the coming days/weeks.
-
It's purely coincidental, I didn't plan it this way and it was initially just going to be a temporary measure but that narrow block section with the arch tunnel opening into the shed actually makes the viaduct appear much taller. I was looking at adding something on to the sides too but I think less is more in this case and it's enough as it is. May just add a little lip to divert rain water away from the opening. Something I'm quite used to by now but it doesn't get any easier "I must take more care, I must take...." I've got the roofing felt stuck back on now but it's just started raining so I'm indoors again.
-
I'm in for a break and have some good news and some bad news. The good news is that I've finally made the entrance hole into the shed The bad news is that I've just added the remaining 5 pieces of cut block sections that I'm using for the track bed. You can see then in the above photograph lined up in front of the entrance hole. I cemented them in position, cut a piece of roofing felt and stuck it on top with bitumen adhesive. I then laid a piece of flexi across and was about to solder the droppers to the bus when I noticed the section of track wasn't level. At first I thought it was just a bump in the roof felt but on examination I discovered those last 5 sections of aerated block weren't level. In fact they were quite some way off. There was no way I could leave it like that so I've had to remove the roofing felt and clean up all the bitumen (see photo below). I was going to remove the bits of blocks and start over again but they're stuck fast and I didn't want to cause any damage to the viaduct itself so I've added some packing pieces on top of them. I'm not sure how I've got my levels so far off here. Everything's been fine up to this point but look at the following photo and see just how far they are out. It's clearly those last 2 arches in the viaduct that I've fixed on a downward slope. That largest packing piece on the right is 6mm thick! Anyway, it's a good job it came to light now rather than later. I may have to make the sidewalls a little larger here to keep the top of the viaduct looking level.