Leaderboard


Popular Content
Showing content with the highest reputation since 04/20/2023 in all areas
-
In the limited time I've had over the passed few months, I've been working on my new station canopies. These are some shots of the work in progress.
 3 points
 -
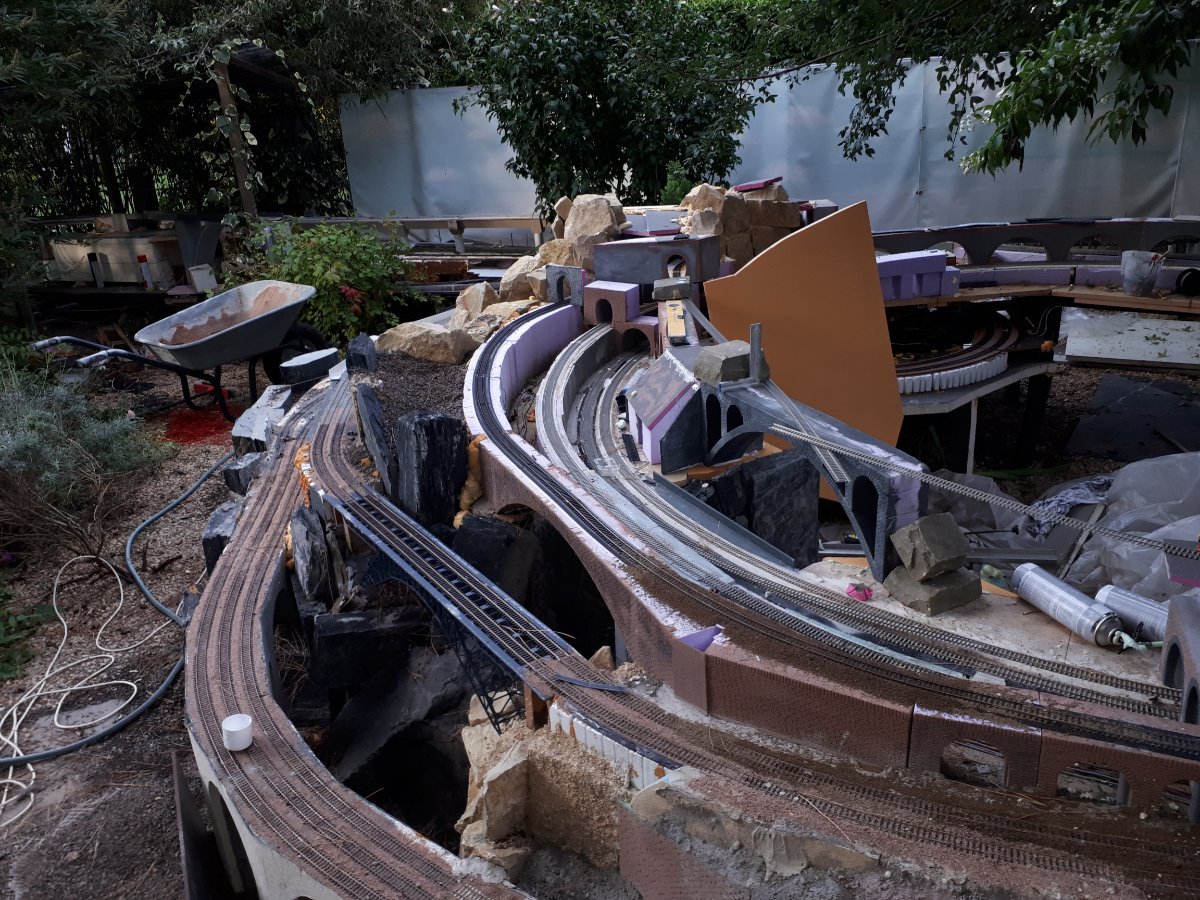
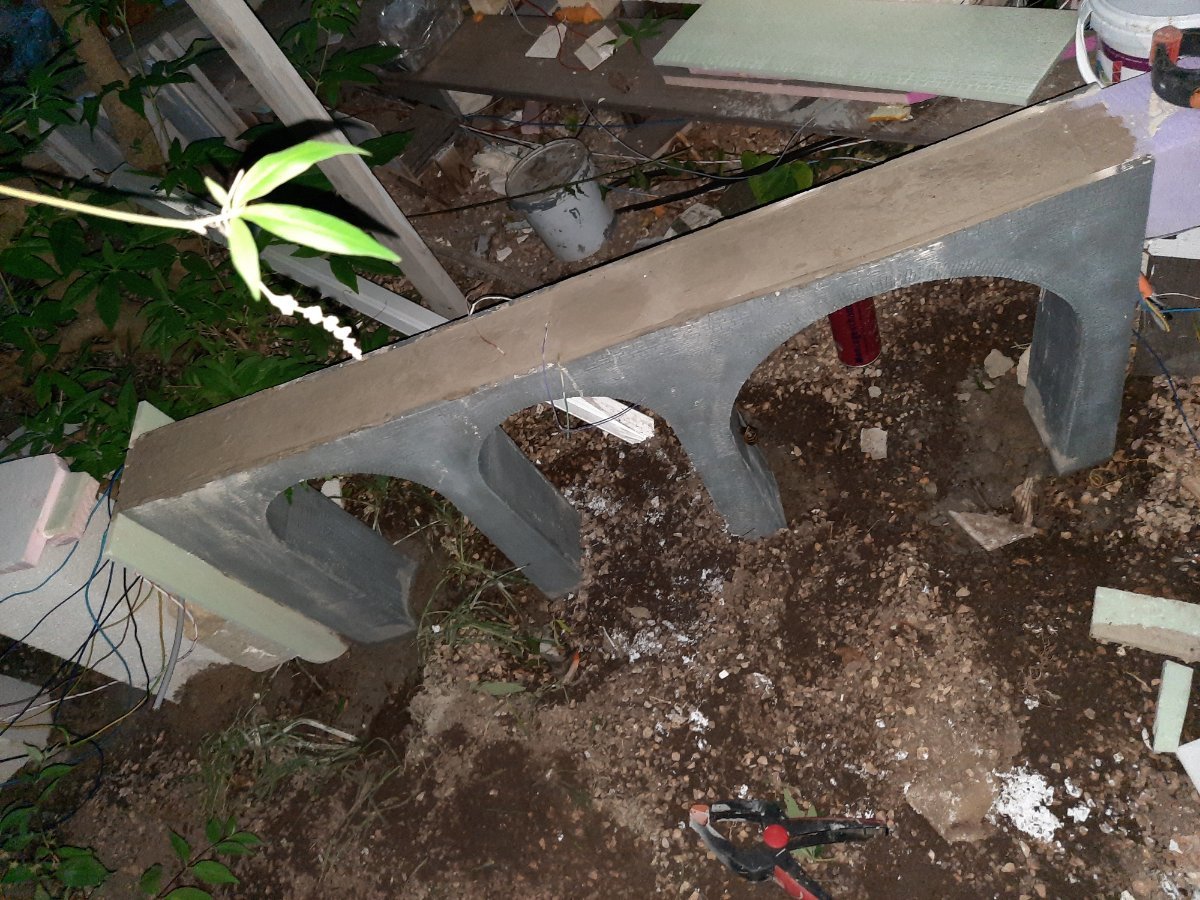
So, the last gap of the old main line closed. If the bridge from Italy would come now, I could finish the track construction outdoor. If.... Replaced one of the three box bridges in a row with a concrete bridge open on top. Reason: much better accessibility for cleaning the rails.
3 points
-
I didn't expect the viaduct to cross an actual water feature.
2 points
-
Hi Guys. Its not been the best outdoor railway weather these past weeks. Have been pottering inside shed for weeks and today was the first chance to get a little run time in. Trust your are all keeping fit and well
2 points
-
So, have finally solved the problem that the trees constantly throwing around leaves, flowers and seeds.
2 points
-
DDC Concept's track products have a higher amount of nickel content, so less cleaning is required. In the view below, the track was layed in August 2022 and left out all winter, this photo was taken in April 23. The track has never be cleaned but the rail sides still look untarnished .
2 points
-
I've still not had a running session this year and nor have I made a start on repairing the damage to the viaduct parapet walls caused by the pigeons. In fact the viaduct walls have sustained further damage since my last post and it's even affected the sections I had cemented in place which makes me think that there's something else causing the damage too - cats perhaps? Yesterday I removed a large 'miniature' conifer from the edge of the track that I had allowed to get out of hand until it was just too large and overhanging the track itself. It also blocked part of the layout from view so in a way it was another reason to remove it. I can now see a good portion of the curve towards the tunnel. I need to plant something else here now behind the stonework that I can keep trimmed and in check and that doesn't entirely block the view as it could be a good spot for video and photographs if I ever get it up and running again!
2 points
-
Last week we decided at short notice to book a few days away in Gargrave so we could revisit our walks along the Leeds & Liverpool canal. Fortunately we picked a decent week weatherwise and had an enjoyable time, though there was no sign of the Barn Owls we discovered last year. I think vacation-wise that will be it for a while now as I really want to get some things done at home. Next month will be George's first birthday and I've not really mentioned him that much recently so I'll include a recent photo taken a couple of days ago while we were out on a walk along the river Dearne. The river bank was covered in Dandelions so I just waited for him to settle among them.
2 points
-
So that the catenary can withstand the cats.... Part 2.
2 points
-
It's that time of the year again (or thereabouts) where I finally get round to reporting on how the railway has fared over the winter months and come up with plans for the coming year that I'll doubtless not adhere to. At first glance there doesn't appear to be any major damage or deterioration to the track but I'll know more once I get the chance to power up and run something round. There's the usual overgrown vegetation to cut back around the circuit, such as here on Stack Gill viaduct where this Peony has sprung into life. However, as in previous years it's not the plants that are giving me problems but the bloody pigeons who have again chosen to nest in the tall shrub at the bottom of the garden, accessing it by leaping up from the top of Stack Gill viaduct. In the process they have dislodged a fair section of parapet wall that I only repaired last year after they had done exactly the same. I couldn't say for certain how many different adhesives I have used on the parapet walls over the years but even though most of them set rock hard initially, it isn't long before the adhesive becomes pliable and the structure weakens until it's eventually dislodged. As soon as I can get round to it I'll be using the same sand and cement mixture I resorted to last year to replace all the parapet wall that is still held in place by adhesive. Plans for the coming year? Well I don't really have anything in mind other than the aforementioned repairs to the viaduct. I'd like to get certain areas ballasted, especially the ones where I tend to take most of my photos but that's something that may or may not happen this year, we'll just have to see.
2 points
-
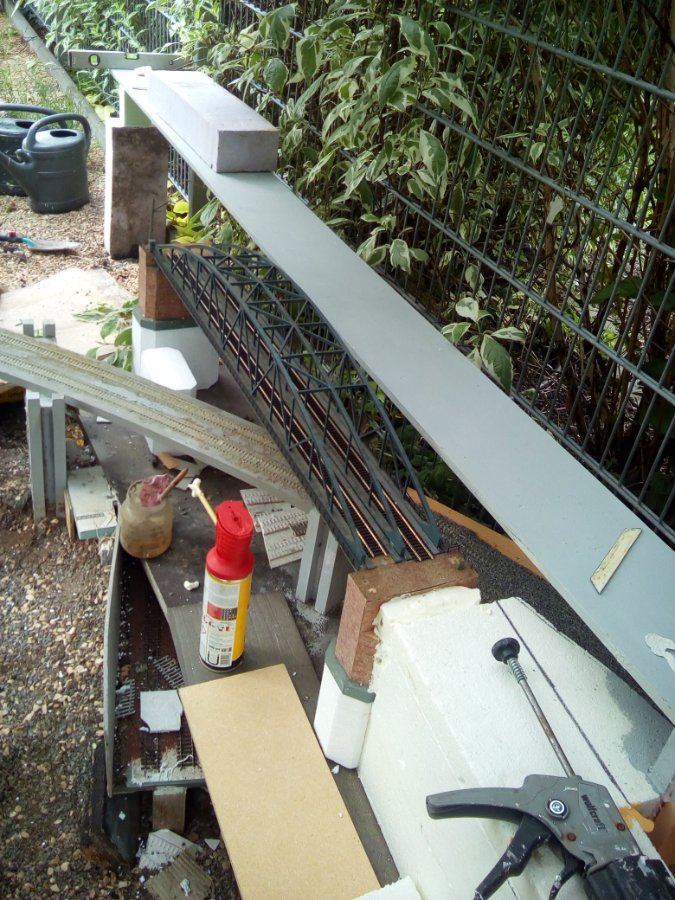
Hello everyone! Another sign of life from me. The last bridge, the one from Italy, is finally being pre-assembled. I've also replaced overhead line masts in exposed places with more stable self-built ones. Below is a picture of a portal based on the Danish model. Apart from that, this was the first winter that passed without structural damage. Greetings Thomas
1 point
-
The first set of blocks are laid so I stuck some track on top and sent a train down as a test. The roofing felt isn't glued, the track isn't glued or pinned yet and I had to use a temporary board to run off. It was really just to get something working - anything. By the time I did that, it had gone dark. So all I've got to prove it is a grainy video. I'll stick it up anyway and try to get some better footage in the light.1 point
-
Levelling Up I was recently assessing what needs to be done on the garden railway site to reinstate the front part of the circuit and refurbish the rear part where the timber base has deteriorated after eleven years service. One of the key issues is to keep the whole thing as level as possible and avoid any gradients, to ensure best running. Although I possess a small laser level, it's not particularly useful in this context as the small size reduces its precision and in daylight you can't see the laser marker light across any significant distance. Then I went shopping in Lidl and found this: Costing all of £5.99, it seems like an excellent solution to my problem. Probably easier than trying to use the garden hose (which my friend Philip had found helpful when building his garden railway).
1 point
-
A very Happy Christmas to Mick and everyone here at 00 Garden Railway, hoping for good weather in 2024!1 point
-
Hello All, As a new member on the 00gardenrailway website, I thought I would upload some photos of my Snow Hill & Valley Garden Railway.
1 point
-
So I've bought a pair of the new release TRSB coaches for the APT set. As put in the GlenDollar thread, my intention was to sell one on and make a 2-PC-5 rake. With the opportunity to take some photos of it while I have the set, it would be rude not to. I was tempted not to try to sell it having looked at it on the window sill, but looking at the photo I took in the garden in the summer, it'll be too long. My intention was that everything I run will fit through the inner line of the loop with the exception of the HST set, that means the APT can be max 8 cars total. APTs generally ran as two sets together, a full set would be 7 cars: Driving Trailer Standard - Trailer Standard - Trailer restaurant standard buffet - Trailer unclassified - Trailer First - Trailer Buffet(?) First - Non driving Motor. A 14-car train would therefore be two sets with the NDMs connected. It seems, from research, that the number of times 2 full sets ran together was actually pretty limited. The reality was that, in service, mostly they ran as one full set and a short set. The short set would be minimum DTS-TBF-NDM but could have a TRSB. Making them 10 or 11-car trains. I can't see may times they ran without the second NDM except in testing. A model railway is only ever a representation of a real train, we try to get as close as we can but there will always be compromises. So with that in mind, here are some photos of different configurations with what I have. Symmetrical 4-PC-4 3-PC-5 As I'll run it 2-PC-5
1 point
-
1 point
-
Always nice to see full-length trains being run. From the photos I can't quite see if the HST set fits into the loop, but here's hoping.1 point
-
More catenary poles, fake stones and fake grass.
1 point
-
My main projects for this summer include, up grading the top section of the railway with new rock cutting, new track using the DCC Concepts new legacy track instead of peco and motorising some points.
1 point
-
I'm on your side in that case... 🐦 -->🪦1 point
-
Hello folks! Since with the bankruptcy of Digikeijs the only supplier I know of of decoders that could handle the old Peco PL-10 and PL-11 solenoid drives has gone away AND I can't get Hornby's R8247 to run with the Z21, I have a real fat problem. Do any of you have a tip on R8247 or can say something about Gaugemaster's DCC33 decoder? Because now I have little desire to have to solder together a total of 65 switching current amplifiers from 130 relais. Edit says: It seems I found the solution for my problems with the new YAMORC YD8008 Solenoid Decoder. Yuhuuuuu! Regards Thomas1 point
-
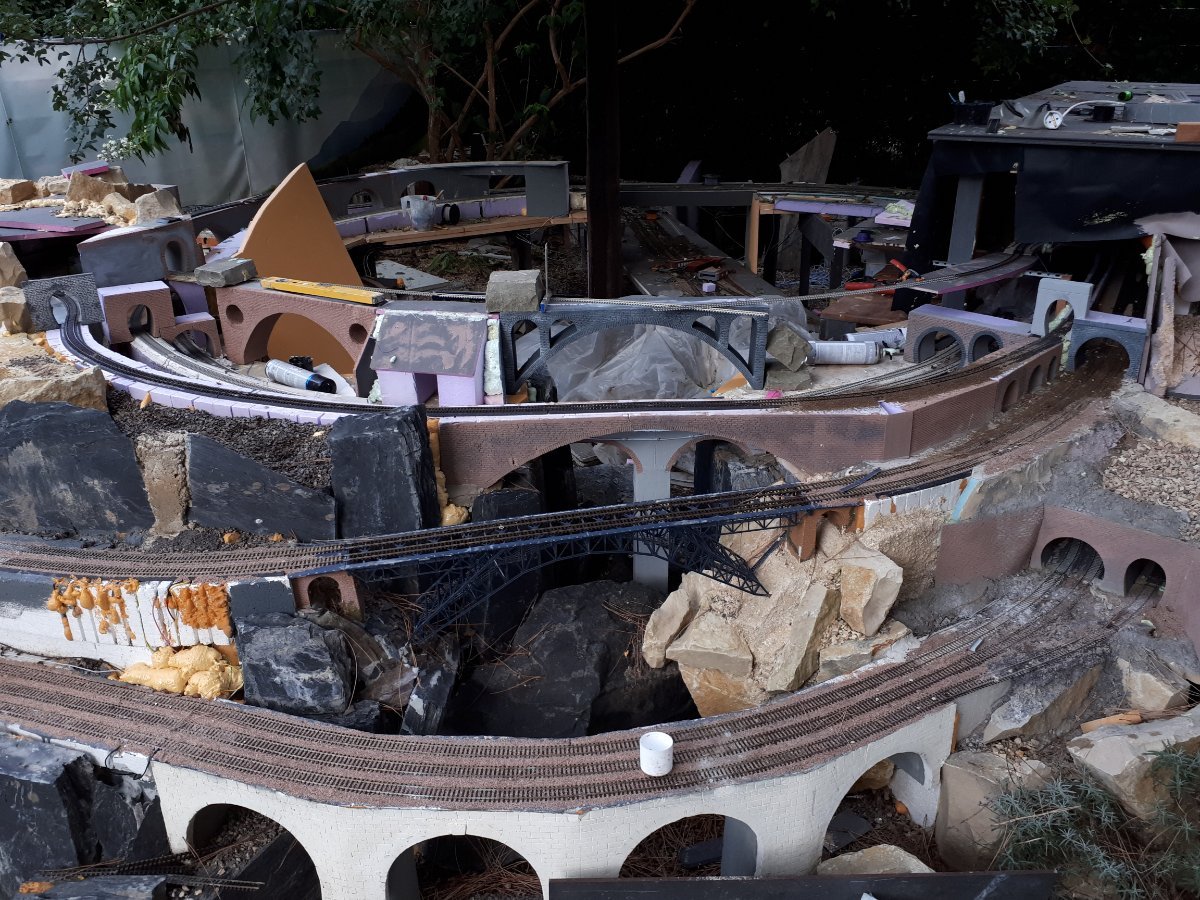
Last week I cracked on with the baseboard and bridge. The last of my trackbed aerated blocks needed realigning to create a straight run onto the bridge and to land on the new baseboard in the correct location. I had to dig out all the stones and soil base, it was't much of a chore. I used a chunky off-cut of block to create an abutment for the bridge to rest on. The bridge deck is 6mm correx with an Aluminium T girder (from a dead greenhouse) under for strength. The sides are from an old (Triang??) OO bridge. I may replace the sides and put a covered bridge on there. The track is pinned down as far as the turnout. It switches from Peco O-16.5 to OO as it passes over the bridge. I see the bridge as the end of the scenic section. Everything upstream of it is fiddle yard. I've ordered some set track for the loop and the turnouts. Everything is second radius. I've started the job of soldering the bonding wires. As ever, I'm getting as much soldering as I can done before I take it outside and pin it down. This location isn't easily accessible, so I don't want my bonds failing too often. I hope to get the return loop installed this weekend. The electronics on the return loop is relatively simple. I've ordered some train on track detection kits. These will allow me to run the system automatically, with the train changing the turnout as it goes round the loop so it is set correctly by the time it gets back to the turnout. It will also flip the DCC polarity to avoid a short circuit. I may have trains running round it in the next few days.
1 point
-
Hi John It's good to hear from you again though it sounds like you've been on quite some journey since your initial post. I'm sorry to hear that things haven't worked out as you had intended but I certainly admire you and your wife for attempting to start a new life, especially in another country. I'm sure that at a certain point in our lives we all entertain similar ideas though perhaps only a very few are brave enough to take the plunge. My particular interest would have been to have a narrowboat and just cruise the rivers and canals but after watching YouTube videos of those who have already done so I'm not so sure anymore! I think it's far better to have the security of your own home with all its conveniences and just go walking along the towpaths. Anyway, I hope your circumstances improve quickly and you are able to find a home that's suitable for you both. Looking forward to hearing that the railway is a goer!1 point
-
Hi John, Sorry to hear you and your wife have had a tough few years and I hope your building of a new life goes better and you find somewhere that suits your needs with space for a garden railway. I suppose the only thing I can advise, I guess if you were willing to up-sticks to Greece that you aren't tied to a particular area of the UK, that there are areas of the UK you can get a lot more for your money than other areas. Best wishes, Barry.1 point
-
It's understandable I suppose but it's a pity that the main focus with any type of media is almost always on the locomotive rather than the stock following behind. There are several occasions that I've come across where it would be great to be able to identify individual items of stock. I know nothing about 4-wheel Freightliner chassis but it sounds probable to me. Most of my containerised loads are on 4 wheel PFA wagons.1 point
-
Are they whiskey tanks?1 point
-
Quick video to show how much flatter the cemented in blocks are. Just a little fettling to do then on with the roofing felt. I also managed to get the damaged track in the siding on the board replaced.1 point
-
I'm sure the rear ones are TTA's, at least they look very similar to the TTA wagons I have. The front wagon looks to be some type of 'tanktainer' and I have to admit that it's the first time I've come across, or at least noticed one, on a Scottish rake. I'll have to have a closer look through some of my books and see if I've got any photos as it could be a useful model for me too.1 point
-
The garden side tunnel portals of the passage into the house are finally finished. Only the catenary poles are still missing.
1 point
-
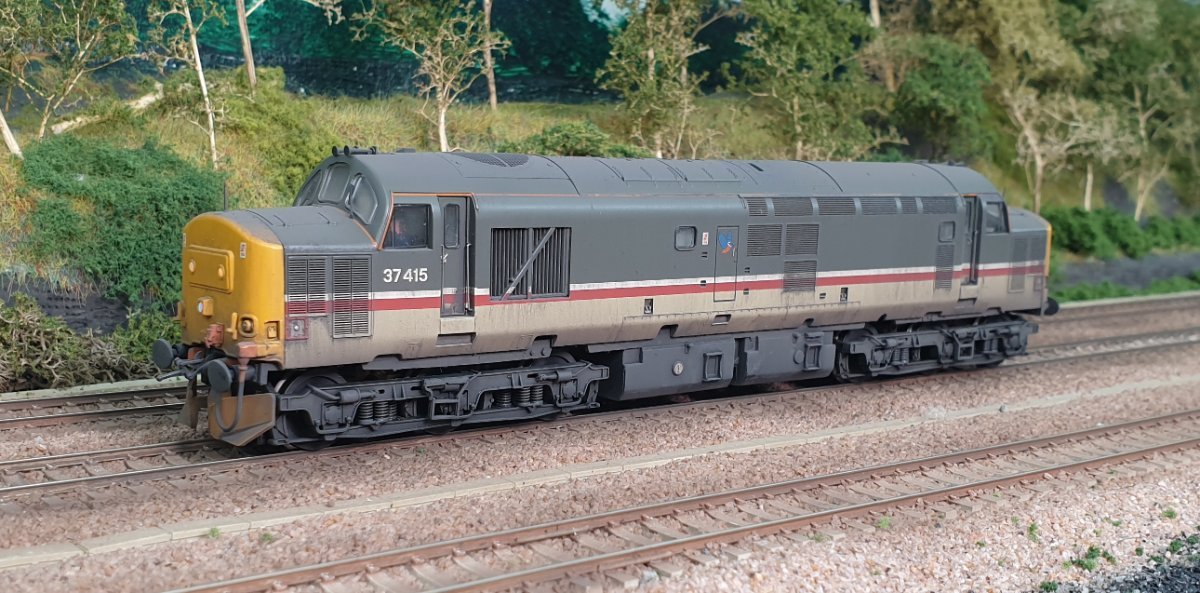
A bit later than I intended but I've now managed to get enough footage to put a short video together to mark 10 years since I began constructing Worsley Dale. It's nothing special and I don't think there's anything in there that hasn't been seen before but I was just delighted that George allowed me sufficient time to complete it! The Ingot train seen in the video with double headed 37s was filmed on 16 July but today I've been running 37427 'Highland Enterprise' on pasenger stock... ...while 37415 was on Cargowaggon vans. Video below....
1 point
-
More progress, more pics.
1 point
-
Next steps...
1 point
-
Some track cut. I think I'll need a few millimeters off the outside loop to bring it away from the fence post a little. I'll need to create a filler piece between the passing loop station and the viaduct but that is the final resting place for the viaduct. I think I'll do a straight block off the right hand side of the viaduct and then I need to decide what the structure will be going down the side.
1 point
-
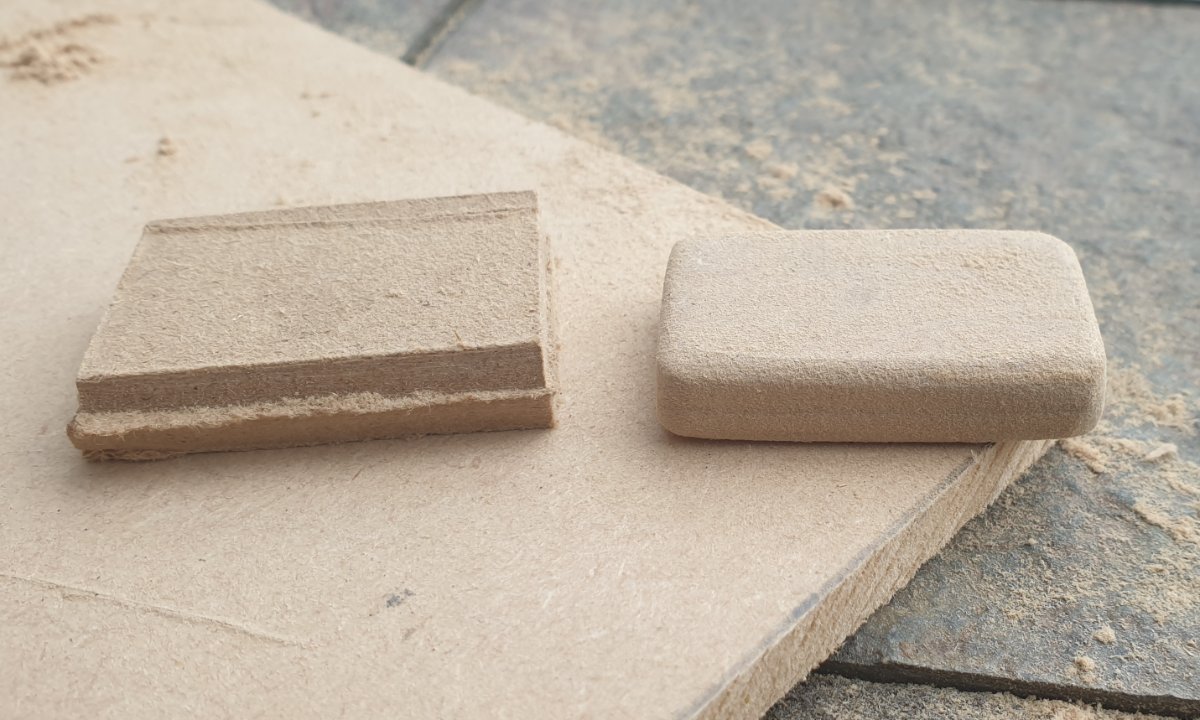
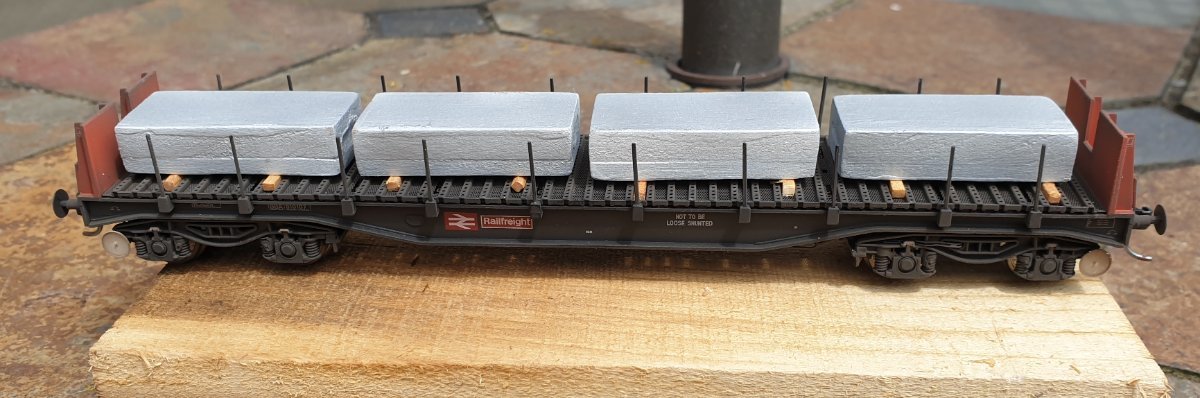
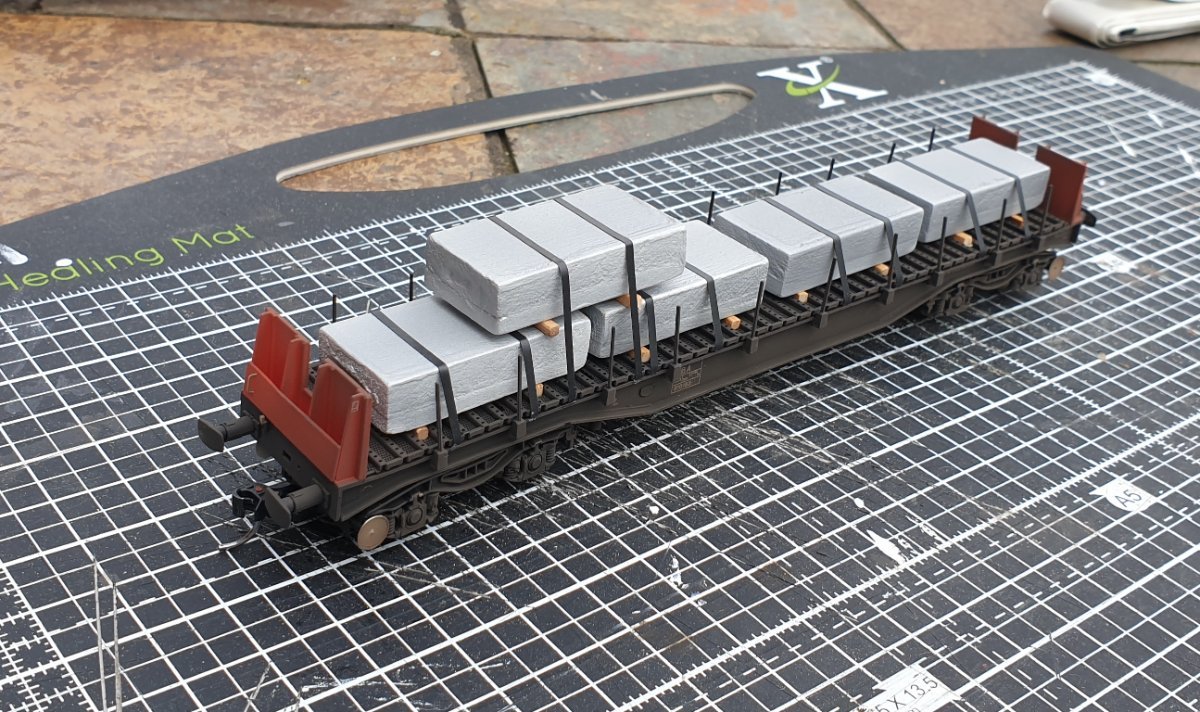
I've made a representation of some aluminium ingot loads to add to 3 of my BBA wagons. Now I know they are far from perfect, probably totally incorrect, and on the wrong wagons with securing straps that appear to have nowhere to fasten to but I think they are an improvement on the empty wagons and I'm happy to accept all the errors. I began by making a batch of ingot shaped loads from some left over pieces of MDF but having completed the 12 I required I decided that they just didn't look right. Compared to some photos I've seen they were too thin and too wide so I decided to add another thinner piece of MDF and cut them down slightly so they were narrower and chunkier. After several coats of MDF sealant I gave them a quick spray with some aluminium coloured paint. I should probably have sanded them further to disguise the join between the two MDF sections and remove some of the paint accumulation along the edges but it's only a representation and not an actual replica load. I placed the ingots on lengths of timber as in the photos I was referring to even though the wagons are not the same types. Short lengths of electrical tape were used to make securing straps though whether this type of wagon had provision for that I really don't know but I wanted to mimic the layout on the photos as much as possible. My main reference photo shows 2 wagons with the rear most wagon having an additional ingot and so I have attempted to replicate that too. One particular detail I tried to include was the dimple on each end of the ingots which you may be able to make out on the one below. From a distance I think they look okay but obviously they wouldn't stand up to close scrutiny. I'll see if I can get a photo of them behind a loco or two shortly.
1 point
-
Hello together! I wanted to give you a sign of life from me again. At the moment I'm finishing the wiring of the layout with the 10 boosters. I've also reached the last level indoors. With kind regards Thomas
1 point
-
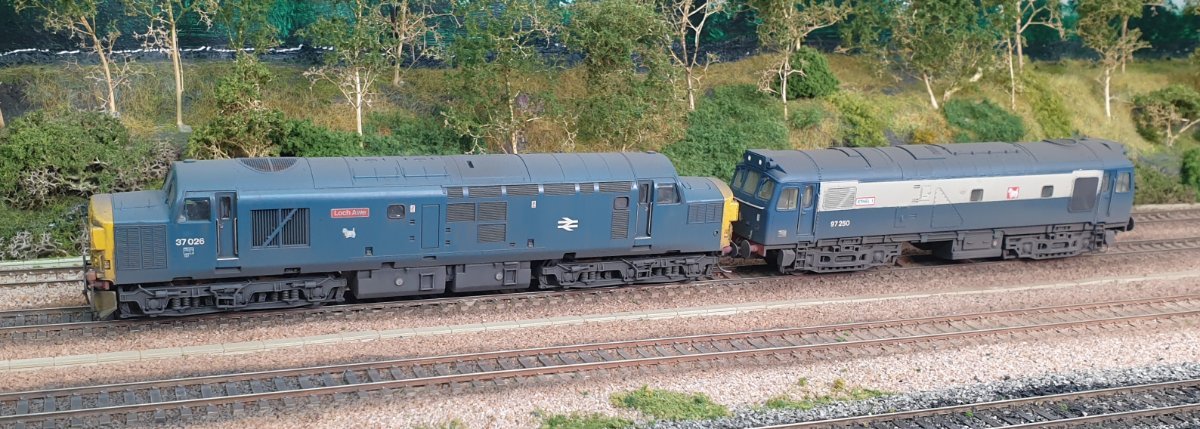
I've had a break from running trains today as I've been doing a bit of renovation to some areas at the side of the track. The photo below shows one such area just beyond the spring points closest to the shed. The log roll that was previously butted up to the track base had rotted away and so I removed it and replaced it with some pallet timer, coated in preservative and set into a bed of mortar. I've installed it slightly further from the track and infilled with stone chippings. I've also done a further section of parapet walling on Stack Gill viaduct using the same mortar mix as before. I am quite pleased with how the first section turned out and it feels nice and solid so hopefully it will stand up to the attention it receives from the pigeons. Moving on to this evening and I've been up in the attic with the airbrush finishing off the batch of locos I started weathering the other day as well as some coaches. First of all is 37026 LOCH AWE in BR Blue followed by 37415 in Inter-City livery 37427 HIGHLAND ENTERPRISE in Regional Railways SCOTRAIL livery and the superb sounding 37248 LOCH ARKAIG in West Coast Railways livery I've also done the 6 coach West Highland Railways rake, a BR Parcels van and ETHEL 2 seen below behind 37026.
1 point
-
I'm pleased to see some of our members' garden layouts have been up and running over the past few days and I'm also pleased to report that Worsley Dale can be counted among them. It's not yet fully up to speed but I'm working on it! I'd actually made plans to run something today and made prior provision by cleaning the track thoroughly in readiness the evening before. It started well this morning as without doing anything further, 26024 made it round the first circuit with the track cleaner and went on to do a few more. I then decided to change direction so that it would clean the inner part of the double track section (with the spring points at each end) but it abruptly came to a halt as soon as it crossed the first points. I discovered a broken soldered joint cutting power to one rail on the inner track. Out with the soldering iron and it was soon back in order. The set of sprung points nearest the shed then started playing up as they wouldn't spring back after a train had run through them. The steel 'spring' wire had lost some tension and had insufficient strength to push the point blades back across. I tapped a track pin into a sleeper forcing the wire over slightly and it's been fine ever since. You just have to ensure that not only is it able to push the blades back across but it also has to be free enough for small wagons to run through the point without them riding up onto the rails. I should really have taken a photo of the modification because I'm sure no-one can understand what the hell I'm going on about! Anyway with everything running fine I went up into the attic for the umpteenth time this morning, this time to bring some 'Worsley Dale' stock down. I didn't manage to bring any additional locos so 26024 was the only one in action today because there was other work for me to do.....later. Here's a few photos of 26024 in action with some freight. So, more work to do was there? Well yes, something I should have been doing a long time ago but it got started and then left. So out with the cement and some remnants of cloth and the remainder of that section of rock face has been covered. I probably need to go back and make the top much less level but I had planned on getting some greenery to fasten to the face of the fence panels and drape over. I'll think about that. On the opposite side of the track(s) will be a much smaller rock outcrop and I've begun adding the chicken wire former ready for plastering tomorrow hopefully. I say track(s) because I'm still undecided about double or single track here. I bought the points a while back to double track it but I'm wondering if it will be worth it or not. I intended 'springing' the points again to save on point motors. I've done nothing further with the IWA log carriers outdoors and they've been returned back to Skew Bridge where they are able to run properly.
1 point
-
What a day! On the one hand it's been totally frustrating while on the other it's been quite enjoyable. With it being calm and sunny outside I decided I would attempt to make a short video of the log train running on Worsley Dale. It wasn't going to be something I could do straight away because there was firstly the track to clean and then of course everything needed bringing down from the loft. It was also lunchtime by the time I came up with the idea so no sooner had I begun cleaning the track and hoovering away the debris it was almost time to break off for something to eat. Dinner over with I got cracking and sent the track cleaner round to do a few circuits. Everything going well so far. I started placing the log carriers on track and thought it best to just run a few of them first to see how they fared but they made it out of the rear of the shed and as far as the first curve before one of them came off. Thankfully I was being cautious and had them running very slowly. I placed the offending wagon back on track and sent the train on its way again. On the curve just before Stack Gill viaduct it came a cropper again so I decided to take a closer look at the track. The track on this curve has been ballasted using exterior varnish to hold the ballast in place and placing a spirit level across the rails it was clear that they were not level. So it was time to dig out some of the ballast using an old screwdriver (it's an old one now!) and place some packing beneath the sleeper ends to level the track out. The following photo is an indication of just how far out the track was. I had to do a fair length of track in order to get it something like level. But while it was certainly an improvement I am still down to two particular wagons that refuse to run over it without coming off the road. I've read of some other owners having problems with the log carriers derailing and everyone seems to accept the fact that the problem lies with their track laying rather than anything to do with the wagons. I think the track has got an awful lot to do with it and my track laying skills leave a lot to be desired but I'm going to have to take a much closer look at those two wagons because something isn't right. Our demands for finescale detailing means that wheel flanges are ever so small and these on the log carriers are some of the smallest flanges I have ever seen on a model (don't allow your mind to drift!). Still, I accept that on level track they should be quite capable of staying on the road. For what it's worth the train managed to run round the remainder of the layout, crossing both sets of spring points, without any further problems. I never did manage to get round to taking any video and by the time I'd grabbed the following photos it had turned bitterly cold so I retired indoors to sulk. I mentioned at the beginning that it had been both a frustrating and an enjoyable day and that was definitely the case. While I would have liked things to have run smoother it was great to be back in 'maintenance' mode, trying to remedy areas of trackwork that require attention. I've always enjoyed that funnily enough. Keeping things running is all part of the attraction of a garden railway.
1 point
-
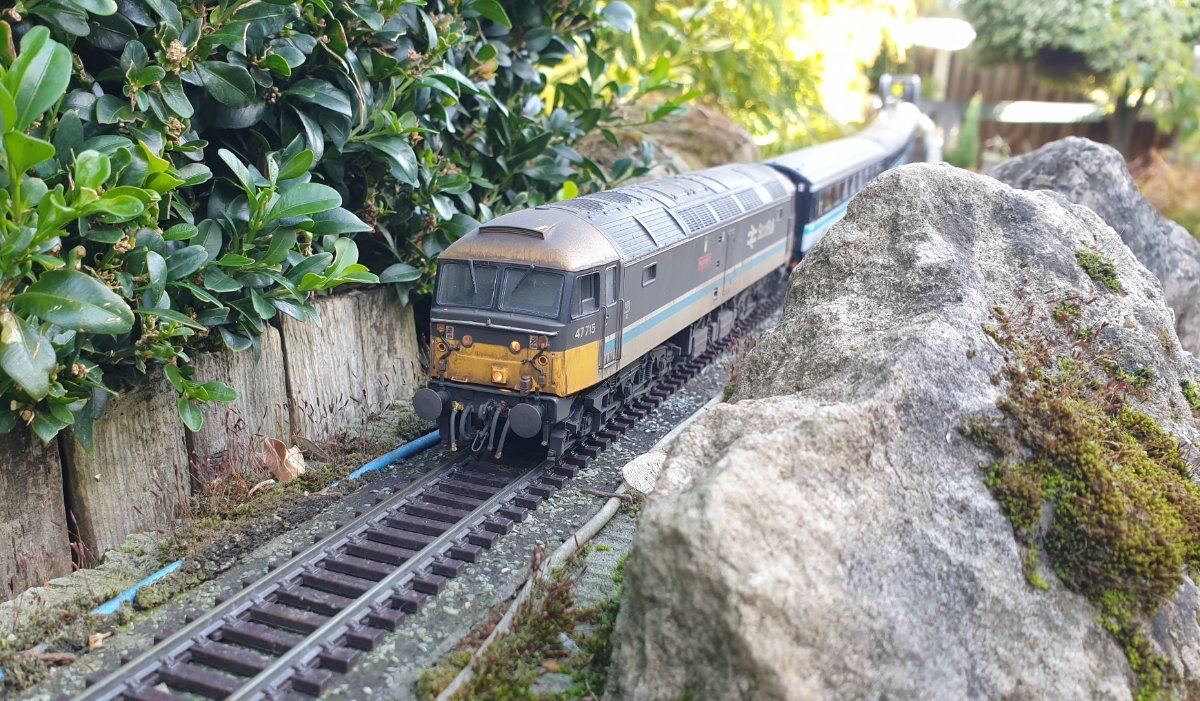
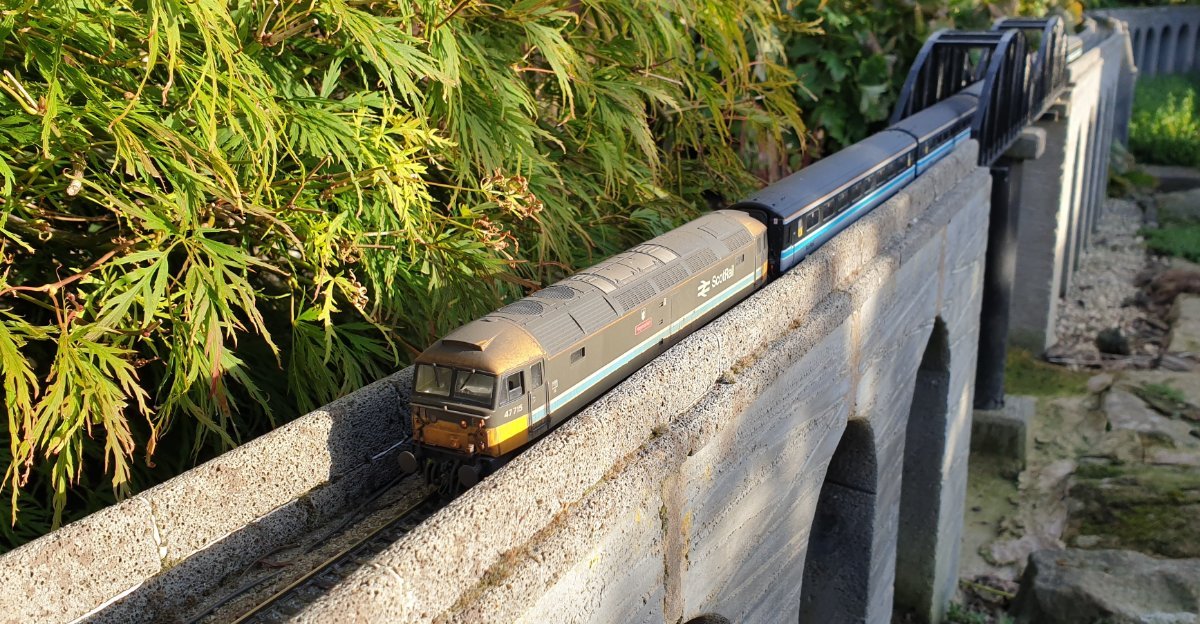
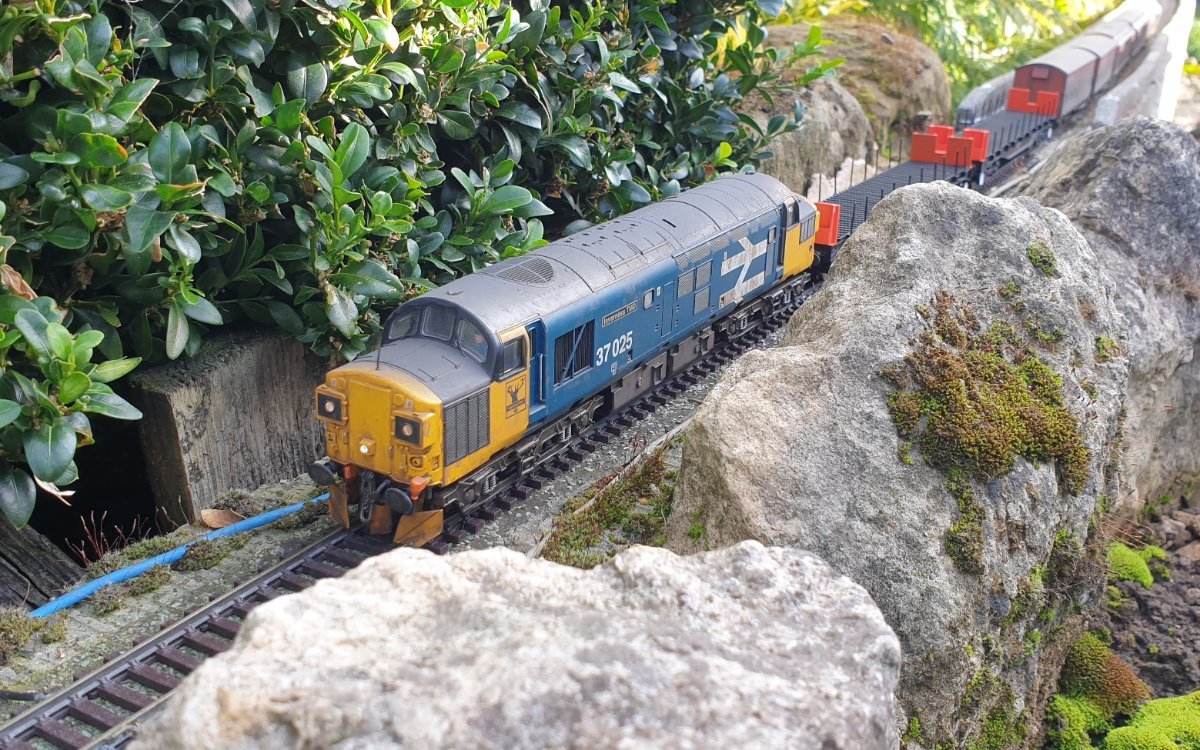
It was such a glorious morning that I decided I would try another running session today because I was disappointed with some of the results I obtained on video yesterday. Opening my stock boxes to select some wagons for the session I was amazed by just how many there are that I have yet to get round to weathering and to be honest, in my opinion the ones that aren't weathered look well out of place. I was going to run some Heljan Cargowaggons but the bright silver and blue livery really does need toning down so instead it was a few vans along with 2 brightly coloured BBA's which I don't think I have run outdoors yet. I'll certainly be toning these down shortly but I wanted to see how they performed, though first of all I had to fit some Kadee couplings - number 20s in this case. However before the wagons got a run out I began with the push-pull set hauled by 47715 'Haymarket'. The coaches were already out in the shed so it was just a case of choosing the loco and although the coaches are in pristine condition, the loco is certainly not. I'm pleased to be able to say that it runs perfectly in either direction, something I was a bit concerned about though I needn't have worried. I had half-expected the coaches being pushed off the track but they've behaved impeccably. The only other loco working today was 37025 which began the day hauling the 3 coach passenger set,seen yesterday, to which I added a couple of TTA wagons on the rear. Later in the day it took charge of the vans and the pair of BBA wagons which is how it's been captured in the photos below. One other point worthy of note is that my two spring points are still working perfectly, 37025 having just passed over the set furthest from the shed. They certainly make operating the layout much easier. I've published a couple of videos from today so I'll post links to them here shortly if you haven't already seen them.
1 point
-
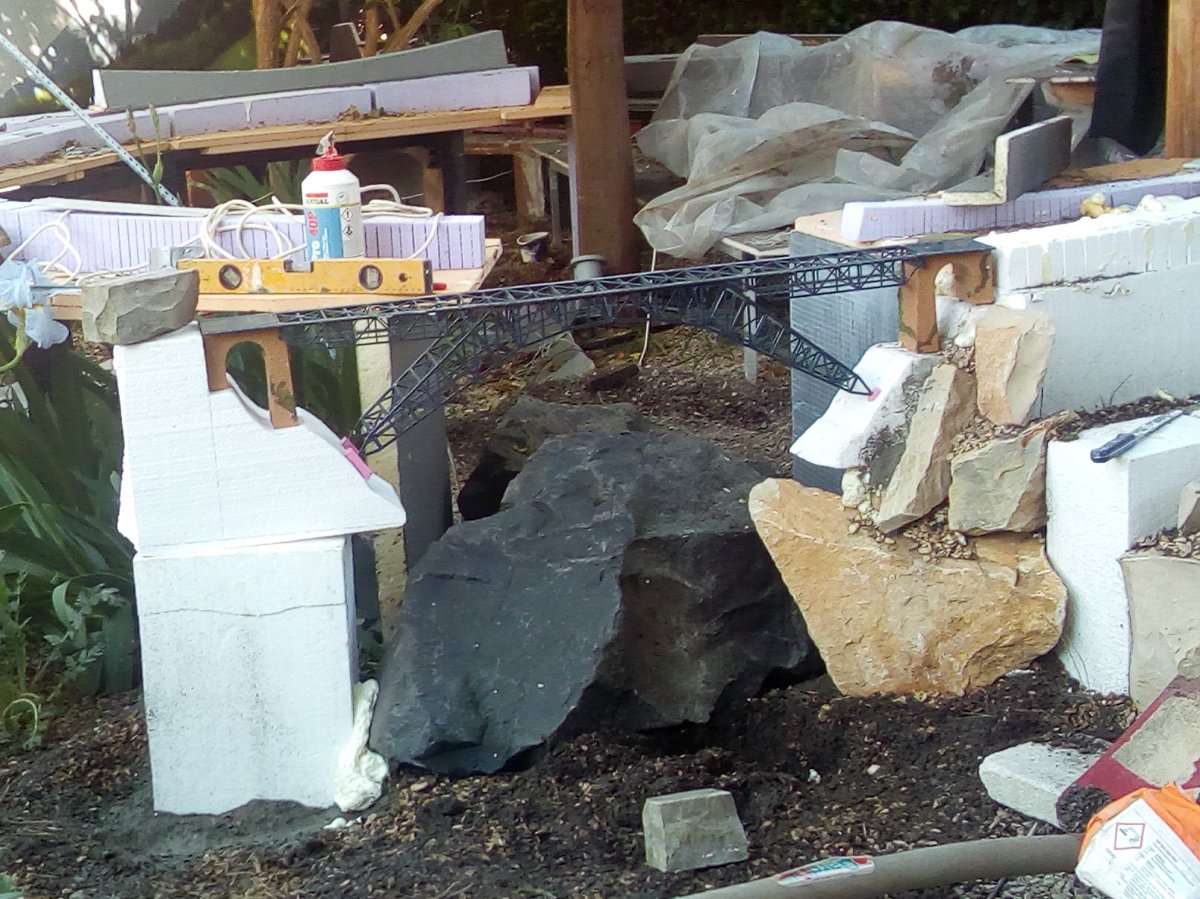
The last of the bridges over this gorge is completed.
1 point
-
I can run a train AND work on the layout at the same time, I'm really happy about that.1 point
-
Just some pictures...
1 point
-
I mentioned that I like bridges? 😎 Faller kit "Bietschtalbrücke" revitalised.
1 point
-
Hi tony! The white stuff is simply smoothing filler. Otherwise the bridge consists of Styrodur and weatherproof MDF. Regards Thomas
1 point
-
It is also wet and cool in Germany again. ☹️ But I think I found the best translation for 'Schattenbahnhof' now, stabling yard or invisible stabling yard seems most correct. Regards Thomas1 point
-
Great Western delight What a pleasure to have the first visiting locos of the year, especially Julian's finely wrought models. And some visiting lower quadrant signals too. King William IV enjoying the sunshine: Earl of Mount Edgcumbe pauses near a shunting signal: Details of the Earl's cab and tender: A small Prairie drifts down Bamboo Curtain Straight: and Resolven Grange heads home with a coal train with a glimpse of the driver, eager for supper: The end:1 point
-
Just a few pics from today's 1950s running session Nothing too unusual in the locomotive department: this Black 5 on Foxdale Bank and here on Bamboo Curtain Straight And a couple of shots of the 9F on a coal train at Throstlebeck I've just noticed one of those junction signals is facing the wrong way. Wonder how that happened!1 point
-
Only one train today, and no sunshine to brighten up the photos. At first I thought it might be the Thames-Clyde Express, but research shows it can't be, as that had a restaurant car in the 1950s. So this is just an anonymous express with no refreshment facilities, pulled by a very clean Jubilee. Here it's seen passing Black Ghyll cavern, and then beyond. There seems to have been a lineside fire on Foxdale Bank, presumbly caused by the proverbial stray spark from a locomotive.1 point
-
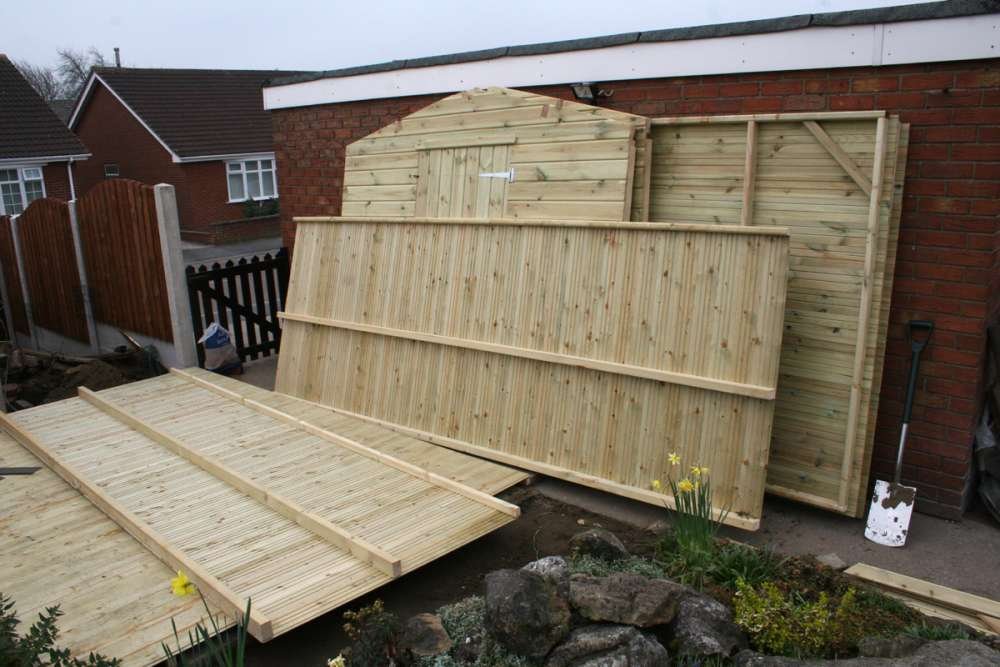
Things haven't gone quite to plan. My shed duly arrived on time but as you've probably already determined, in order to save on the cost I had decided to erect it myself, having done the previous one in Selby without too much trouble. I've done as much as I can on my own, such as getting the base rested on timber bearers with pads of roofing felt to create a damp proof barrier between the timbers and the base itself, but now I need some assistance and everyone's (perhaps understandably) made themselves scarce. The sections are currently standing on the garden path and blocking access to the rear gate and have had to be left there overnight. I kept getting up just to have a quick check and make sure they were still there. This is the shed base in situ with one roofing panel taking temporary residence on top. It looks nothing surprising when laid on the ground but it looks a heck of a size when you see it standing on end. I thought they'd delivered the wrong one when it was lifted off the delivery lorry. I bet once it's finally ereceted I'll be wishing I'd ordered the next size up! And here are the other sections all waiting patiently for some willing volunteer.
1 point


copy.jpg.ae7bf5762f8c597600c09b85bc56c353.jpg)
copy.jpg.4ebe0af5ec2a7bb3b6c6c7ce4c13a6aa.jpg)


copy.jpg.8f03d41152ac057bea8a9867510d00c8.jpg)
copy.jpg.afc8f8cddb06e36389534a661ba08abb.jpg)
copy.jpg.cd1af805ec54d1529c87bac9fa3fd1f0.jpg)