Leaderboard


Popular Content
Showing content with the highest reputation since 01/15/2017 in Posts
-
I've been trying to make the most of the glorious weather but at times it's been unbearably hot. I really wanted a BR Blue day today so got out a mixed lot of MK1 coaches along with a selection of Mk2's. In the morning I had 26024 hauling a rake of 6 Mk2's, capturing a few clips on video but forgetting to take any photos so I had to return to that later in the afternoon. Here (below) 26024 has just exited the shed onto Low Shott viaduct. (below) I've been trying for some different angles for photos and this next one is a bit awkward to access but seems to work well, though I maybe should have moved the bird bath and stand in the background. Later I had large logo BR Blue 37401 'Mary Queen of Scots' hauling a mixed rake of 9 BR Mk1 coaches in BR Blue/Grey livery. (below) A rare shot from inside the shed as 37401 departs Shieling Bridge. 37403 'Isle of Mull' is a ViTrains model and although it looks the part it's not a very good runner, in fact it takes ages to move off from a standing start. The MK1's are in need of some weathering although I had actually thought of selling them in order to thin my collection down a bit. There's no rush to do anything just yet. It did take me some time to get the MK1's running reliably. I fitted them with Hornby R8220 bar couplings and had to do a fair bit of swapping coaches round before I was able to keep them all coupled together.
 7 points
 -
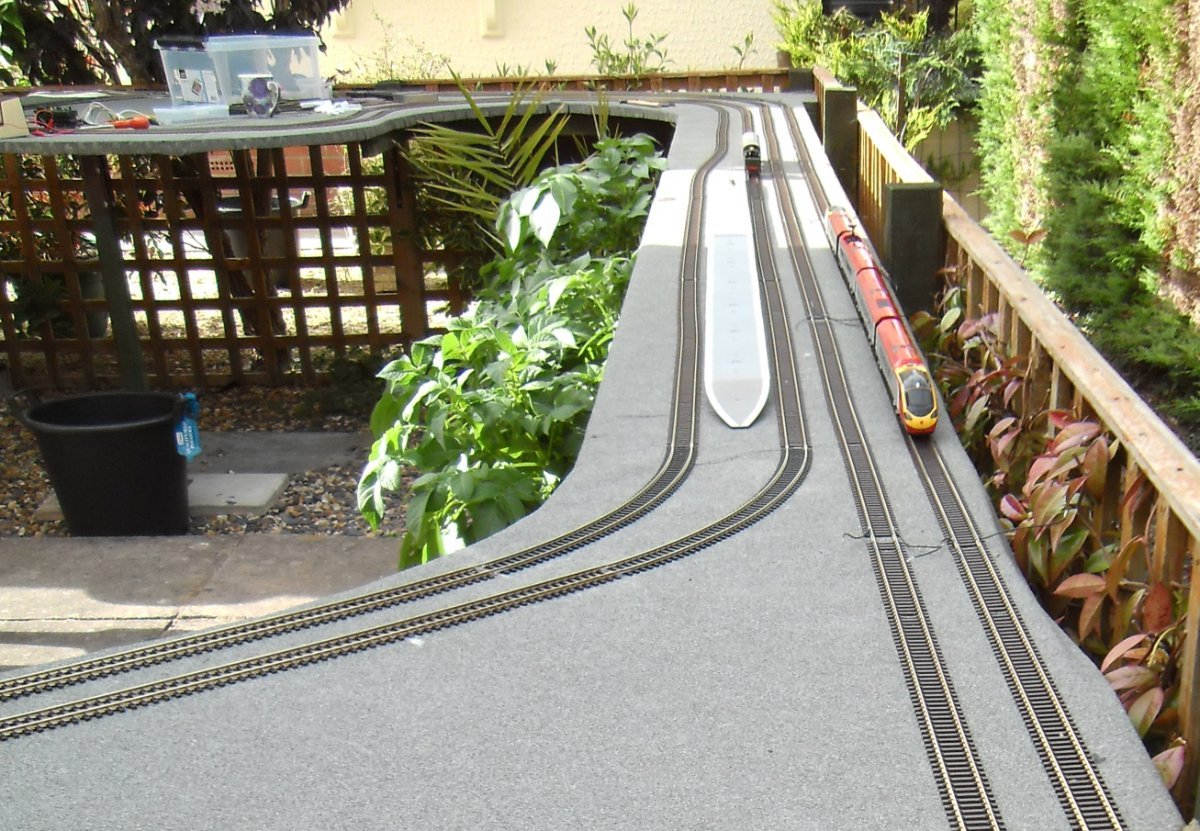
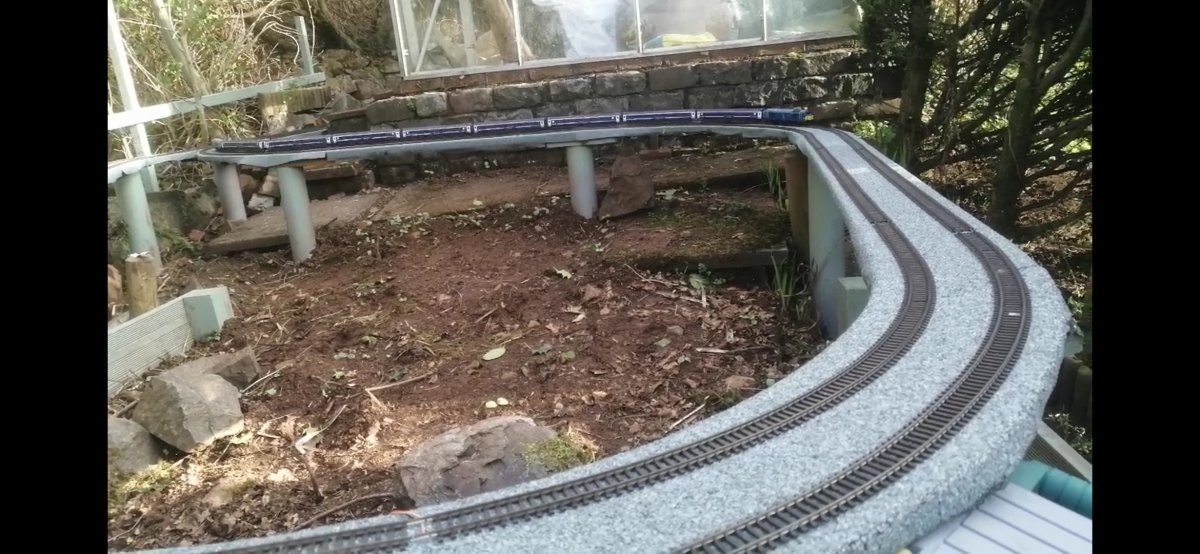
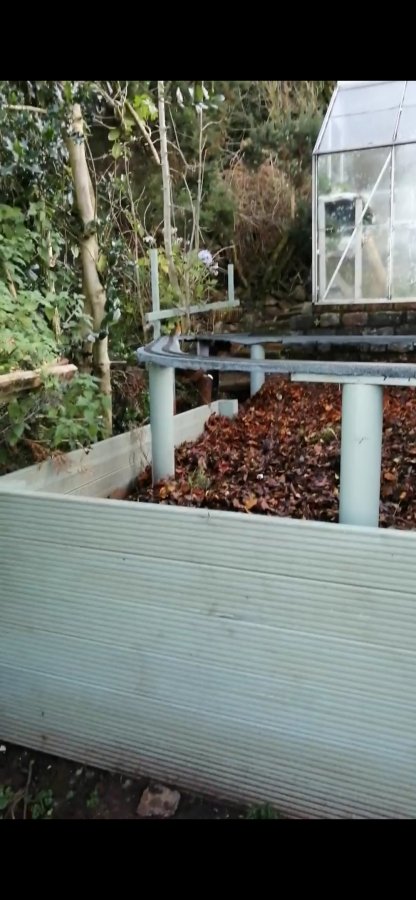
Afternoon, Well I thought it high time I shared my garden railway with you all. It's approx 70' x 30' double track main line, and features several challenging gradients which requires some trains to actually be driven as opposed to being left to run themselves. All controlled by Lenz DCC, with a wifi connection. This allows me to utilize a couple of old iphones with touchcab software giving me total fdredom to control trains from anywhere in the garden (and the top garden when SWMBO calls!) Era is mainly BR Blue but with the occasional foray into the modern day. Loco's are the usual mix of current manufacturer with some older Lima stuff being slowly restored to service. 90% of the rolling stock is Lima which I find runs fantastically outside. So just to give you all a taste I uploaded my first video to Youtube today with a pair of sound fitted 37's on a heavy enterprise working.5 points
-
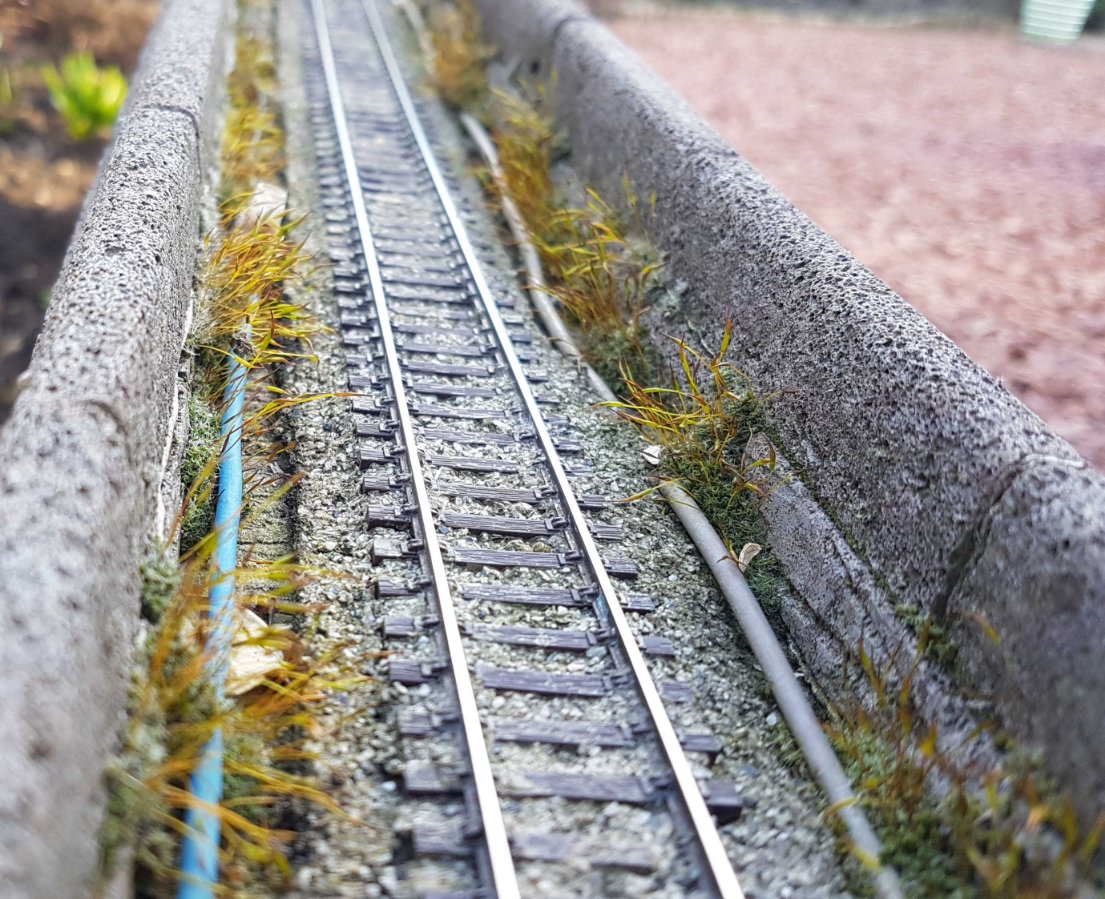
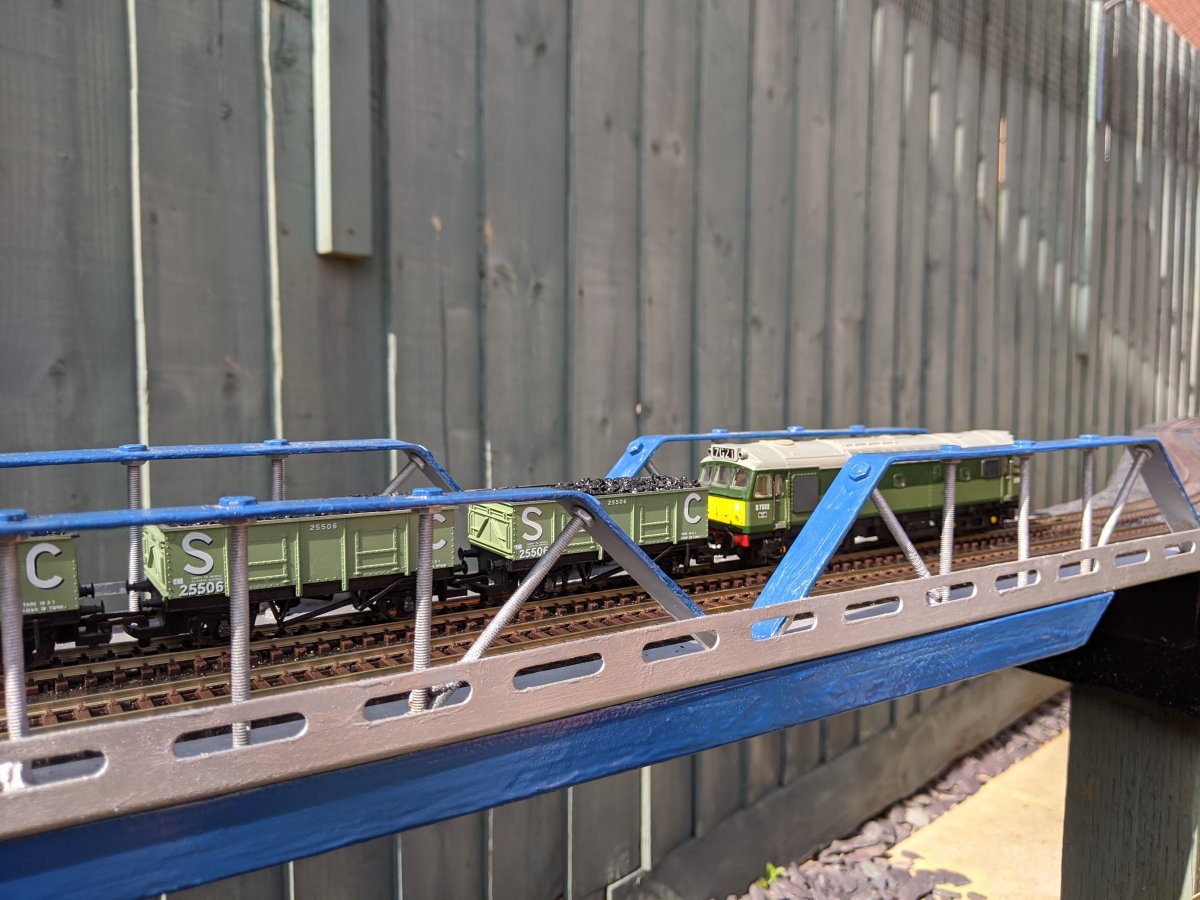
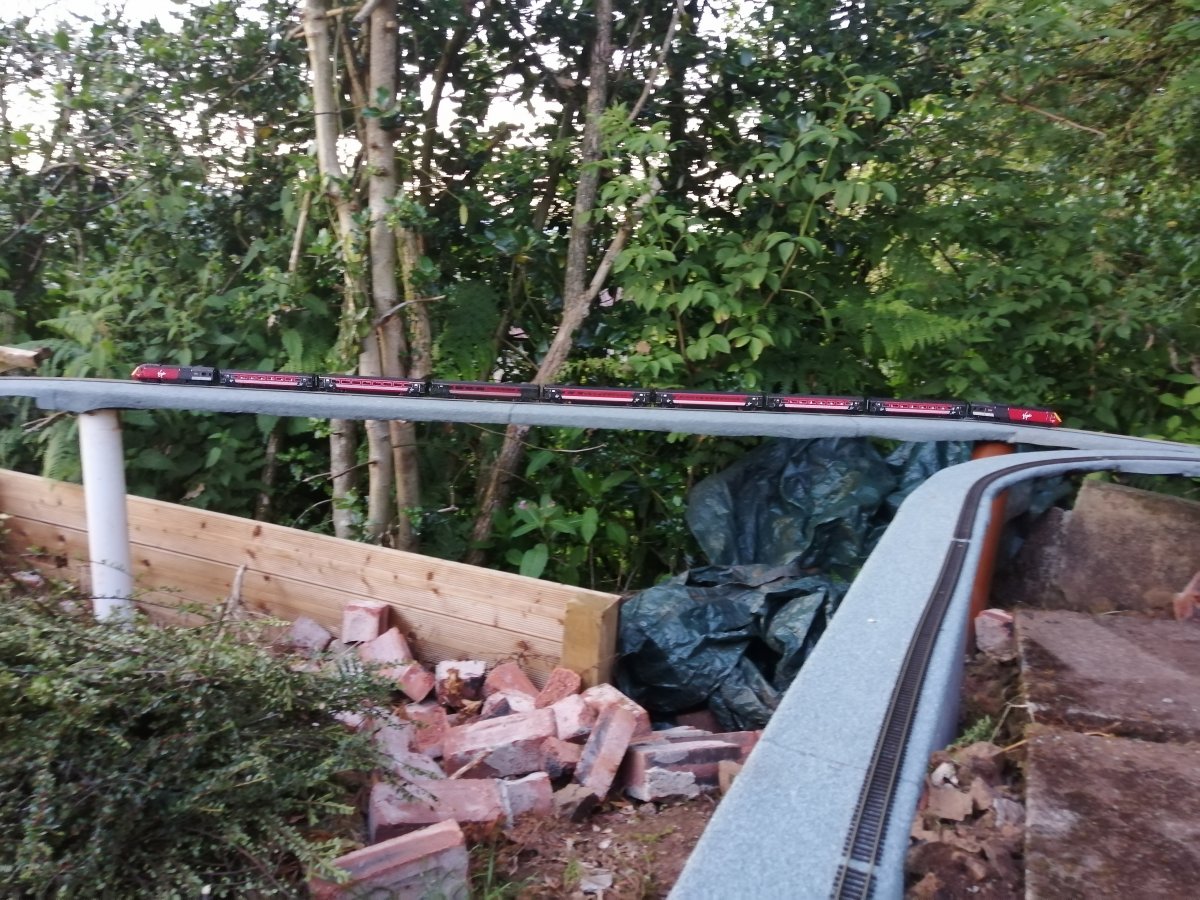
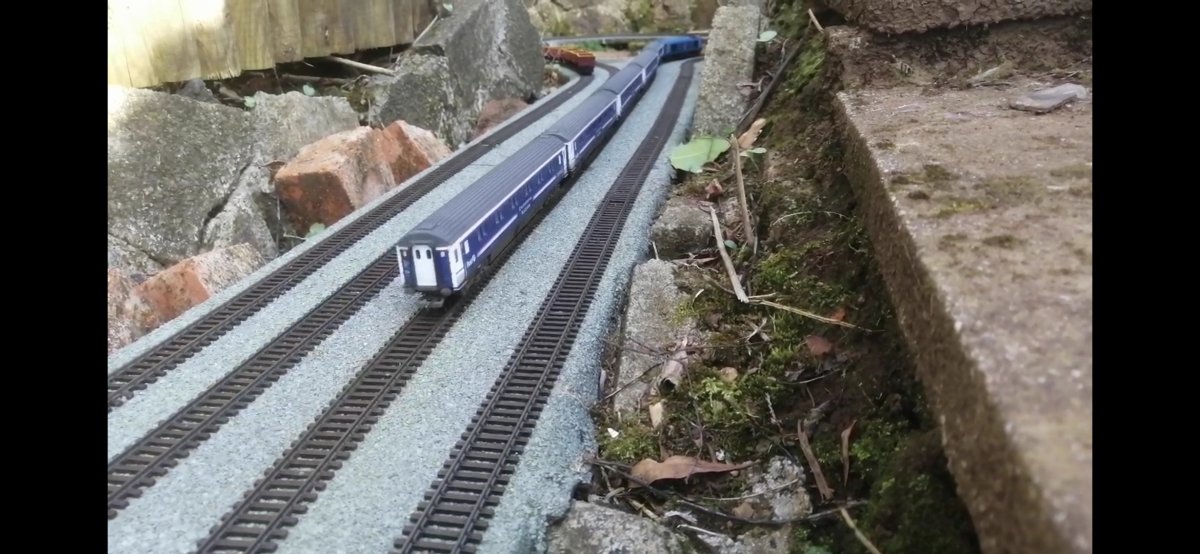
I've gradually been getting some more stock out onto the layout though it's all ones that have been seen previously. I don't expect there being anything new anytime soon although I do have two RevolutioN Cargowaggons that haven't yet been seen either on Skew Bridge or Worsley Dale. They arrived along with my IWA log wagons a few weeks/months ago now so I might give them a run in the coming days and see if they perform any better in the garden than the log carriers did. I attempted to do a bit of filming today but I find it gets in the way of actually enjoying running trains. I'm not sure it's worth it to be honest as you can't sit back and relax when you've got a controller in one hand, gopro camera in another and nowhere left to hold your phone. I never was any good at juggling. 24009 was never intended to be a 'Scottish' loco for Worsley Dale. It was one of many impulse purchases I made and I only recently discovered that it actually spent time in Scotland between 1971-75 so that's good enough for me to add it to the roster. Being a Sutton Loco Works model fitted with sound and stay-alive it performs brilliantly and sounds as good as any loco I've heard. Saying that...I'd had it running for probably 30-60 minutes before I just happened to notice something by the side of the track near Low Shott viaduct and it turned out to be a sandbox & pipe. I hadn't had any mishaps so it had obviously just fallen off. I consider myself extremely fortunate to have seen it. 37401 'Mary Queen of Scots' is one of my 'go to' loco's along with 37025. I tend to grab the weathered ones before the pristine ones although I haven't yet dared tackle the SLW 24's. 37401 is seen here at one of my favourite locations for photographs as it exits Stack Gill viaduct and runs along Stackgarth Gill. Another of my favourite photograph spots is by the side of Low Shott viaduct and 37401 is seen crossing the viaduct immediately before entering the shed and Shieling Bridge station hauling one of my favourite wagon rakes - the OTA log wagons. And although the weather today has been extremely pleasant, during the early part of the day it was almost impossible to get photos or videos that were not affected by sun shining directly in the camera lens or that didn't have the shadow of the camera itself (or worse..me) in the foreground. 45010 had direct sunlight to contend with as it hauls the West Highland excursion rake across Stack Gill viaduct.
5 points
-
Hi All, Well, I'm back again, can't believe it's been over a year since my last post! This time I've got a video, it's not great camera work, but it will do! As I realised the good weather was coming to an end, I was determined to get some filming done. I hope you enjoy it? Many thanks Mark.5 points
-
It's heart-breaking news. Someone who contributed so much to the forum but who has sadly been taken before he could realise his layout dreams. We've shared Tony's ups and downs for over 7 years, and the poor man has endured his fair share of downs during that time, but he somehow managed to keep smiling and 'moving ahead'! I will miss his presence greatly here as I am sure the majority of our members will. My heartfelt condolences go to his wife and to all his family. Rest in peace Tony.5 points
-
Just some pictures...
5 points
-
Dear Thomas, since a lot of Years I thought I'm very alone with the idea to bring HO scale trains outside. I searched Youtube and the www to all this topics, with some small results. Yesterday Evening I found your link and got here and I'm totally impressed by your work. This is absolutely amazing... Since 2 Years I got back to my childhood hobby (where I gone also outside with Roco Line/ but just for 1 day) and since that date I'm testing with DCC and Roco Line all over my house (but so far just inside). Some rails of RocoLine are stationed since over a year in my garden for testing for the weather influences. First of all I want to build some parts inside to get more in detail with all the electronic and computer stuff to know what is the goal when I wanna go outside. Your explanations and experiences here are helping me... (I cannot put in words how much) Keep it up and I'm looking forward to see more. Kind regards Bjoern5 points
-
Been a while, hope you are all well. The Z21 arrived today so we can finally run a few trains around at the same time. Impressed with the system so far and I've managed to set up the supplied router as an extender for our home WiFi which means I don't have to manually connect to the Z21 network and now have home WiFi coverage in the garden.5 points
-
My first turnout completely built by myself.
5 points
-
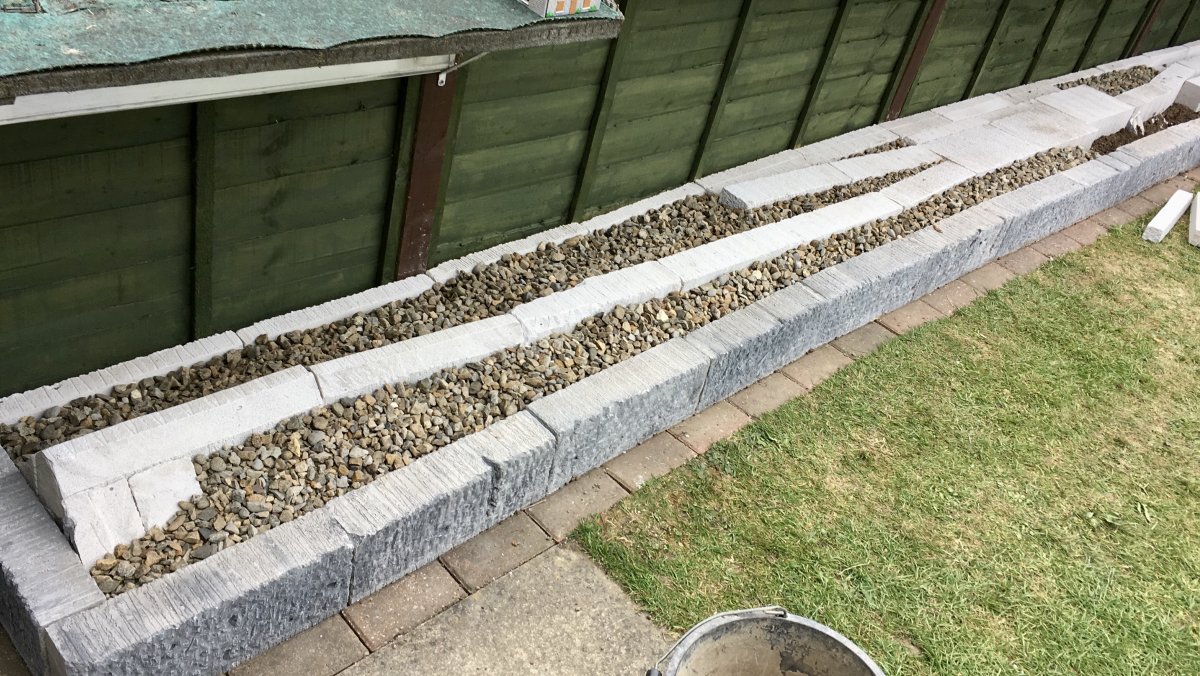
Ballast! Probably a bit overkill in the garden, but I did say I wanted to take my indoor railway outside!
5 points
-
Found this video of a really great H0 garden layout based on US motifs. Probably from the Czech Republic, but it really gave me new ideas. Have a look, it's worth it.5 points
-
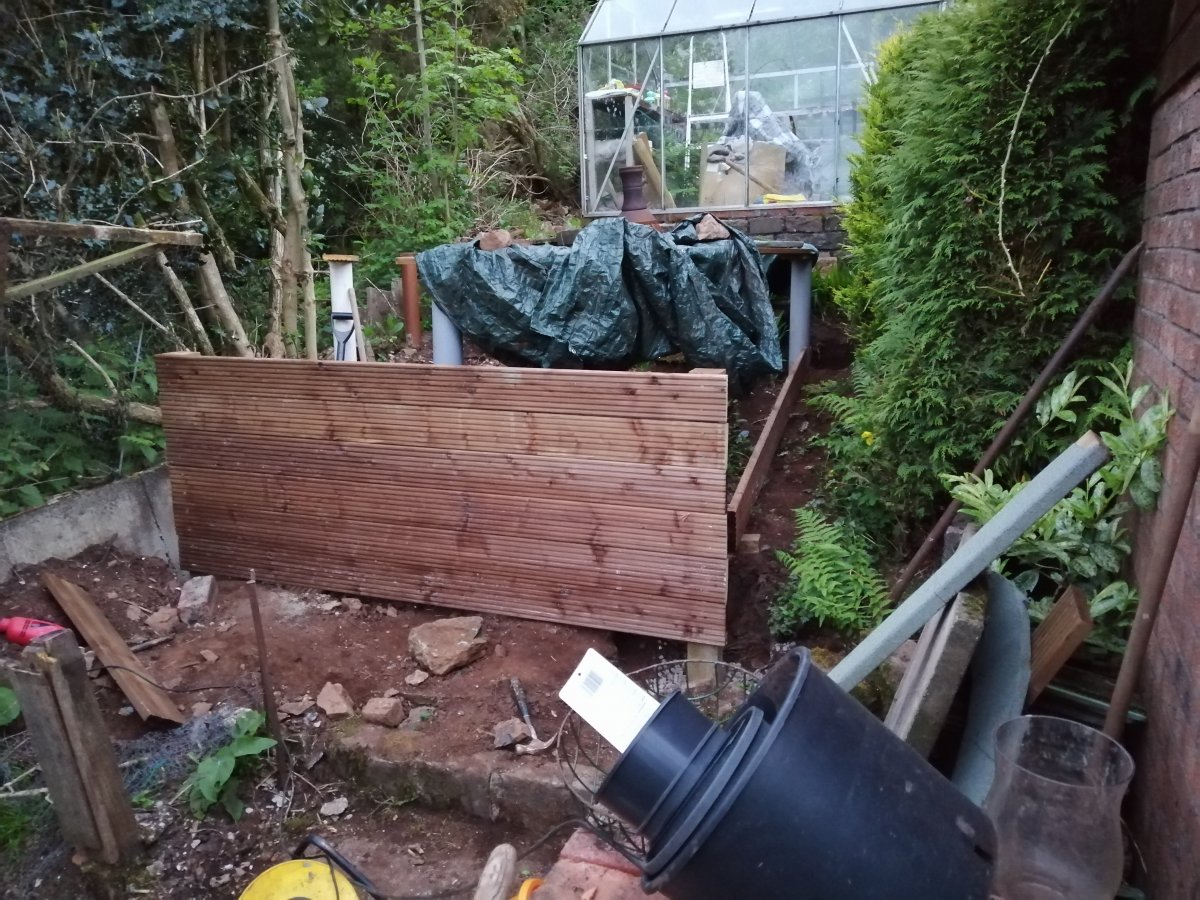
So with the ‘Brio’ blocks assembled and checked, the next stage was to put some tops one them. These arrived in the form of some 9mm ply....which was reclaimed and free! ...and then some upvc cladding to the sides, and some roofing felt on top.... ...and finally, some nice GWR Green (current livery) to tidy everything up... I’ve started painting the posts a stone colour so that they bland better with the garden. It’s surprising just how sturdy the structure is! This brings my work up to date, with all of the main sections done bar the felt, and once I’ve done that, I’ll make the frames up for the station area. Watch this space....
5 points
-
Despite getting the sprung points working I just knew there had to be a better, perhaps much easier way. I kept going back to what @ThomasIsaid about fastening a spring to the points and to a screw alongside the track - it's most simplest form. I'm just making things far too difficult for myself! So overnight I'd come up with a couple of methods that I thought I'd try this morning using materials I have to hand - well materials is hardly the word because what I've now done requires just one thing - a short length of springy wire (and a soldering iron!) It really can't get any simpler than this. This is the other point that I've tested this out on and the reason I've soldered the springy wire to the rail ahead of the point is because it's a left hand point and the stock rail curves round. I just couldn't get it to work the same as on a straight length of track. You can fiddle with the wire itself to adjust the tension and it requires little effort to move the points over. This is an old point and there's a bit of resistance between the point blades and sleepers that I need to ease before I'll be satisfied it's good to go. Just occasionally the points don't move fully back across but I can see which sleeper is causing the problem. I think I need to do this with the first point now as it's a much more reliable way to spring the points.
5 points
-
The first set of blocks are laid so I stuck some track on top and sent a train down as a test. The roofing felt isn't glued, the track isn't glued or pinned yet and I had to use a temporary board to run off. It was really just to get something working - anything. By the time I did that, it had gone dark. So all I've got to prove it is a grainy video. I'll stick it up anyway and try to get some better footage in the light.4 points
-
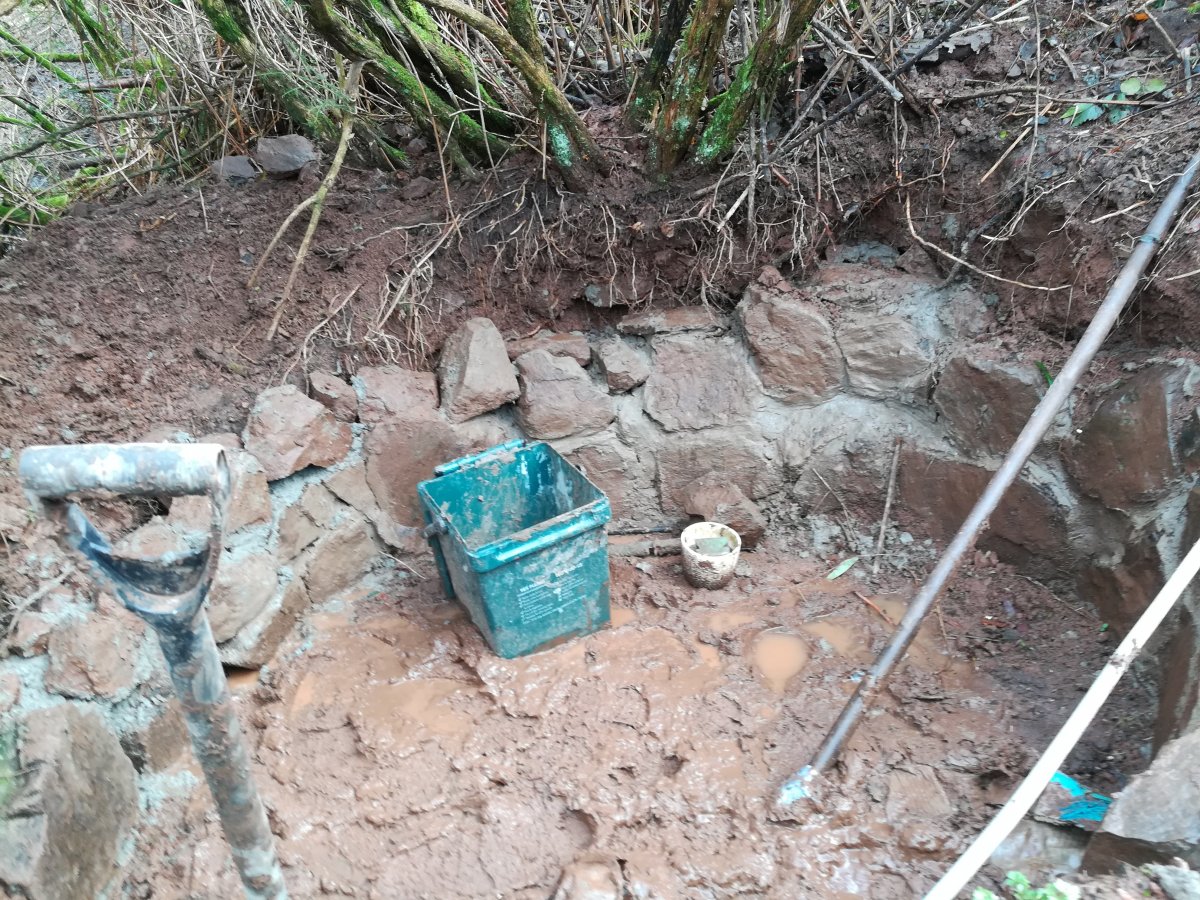
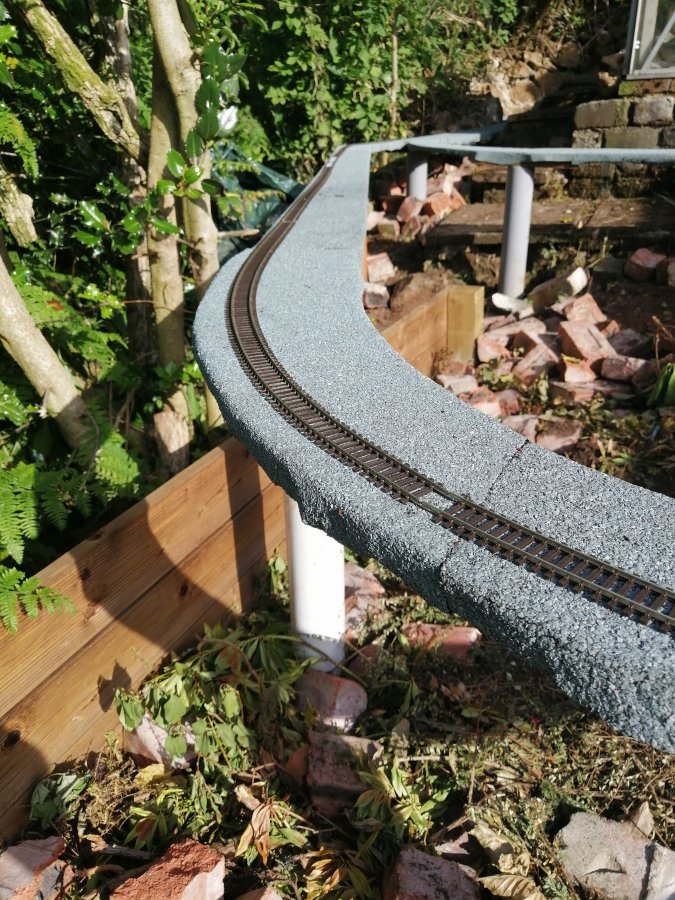
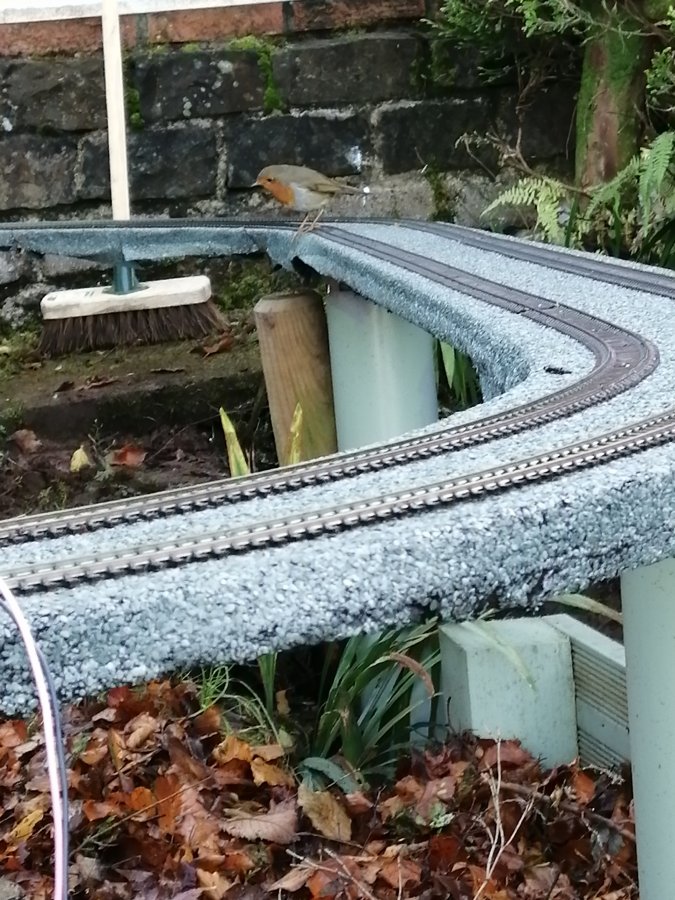
It's that time of the year again (or thereabouts) where I finally get round to reporting on how the railway has fared over the winter months and come up with plans for the coming year that I'll doubtless not adhere to. At first glance there doesn't appear to be any major damage or deterioration to the track but I'll know more once I get the chance to power up and run something round. There's the usual overgrown vegetation to cut back around the circuit, such as here on Stack Gill viaduct where this Peony has sprung into life. However, as in previous years it's not the plants that are giving me problems but the bloody pigeons who have again chosen to nest in the tall shrub at the bottom of the garden, accessing it by leaping up from the top of Stack Gill viaduct. In the process they have dislodged a fair section of parapet wall that I only repaired last year after they had done exactly the same. I couldn't say for certain how many different adhesives I have used on the parapet walls over the years but even though most of them set rock hard initially, it isn't long before the adhesive becomes pliable and the structure weakens until it's eventually dislodged. As soon as I can get round to it I'll be using the same sand and cement mixture I resorted to last year to replace all the parapet wall that is still held in place by adhesive. Plans for the coming year? Well I don't really have anything in mind other than the aforementioned repairs to the viaduct. I'd like to get certain areas ballasted, especially the ones where I tend to take most of my photos but that's something that may or may not happen this year, we'll just have to see.
4 points
-
A small update - Some pictures of how the outside section is looking, the plants are growing nicely and really help bring it all together. Inside work continues on the station area with a Metcalfe kit almost finished. I decided to add lighting to give some extra interest. Chris
4 points
-
Hi Guys, not to bad a weekend. Have been out laying track for two days . My finger nails are a mess, with working on top of roofing felt. I have still got about half of the wires to join between rails yet. Unfortunately promised the C E O we would go away for a couple of days. Of cause its going to be dry and when we are away and come back rain. Still she deserved a treat for allowing me to proceed in our limited garden we have. Here's a picture of a Dapol Virgin Pendolino EMU. got for a cheap price. Runs nice to say the track a mess, but oh those fiddley copulins. Not made for my saw fingers and poor sight. (men in white coats here for me tomorrow) I not finish and thinking of stage 2. Thankyou all for your very useful articles about your railways its a enjoyable way to spend a odd wet hour looking at all the ideas
4 points
-
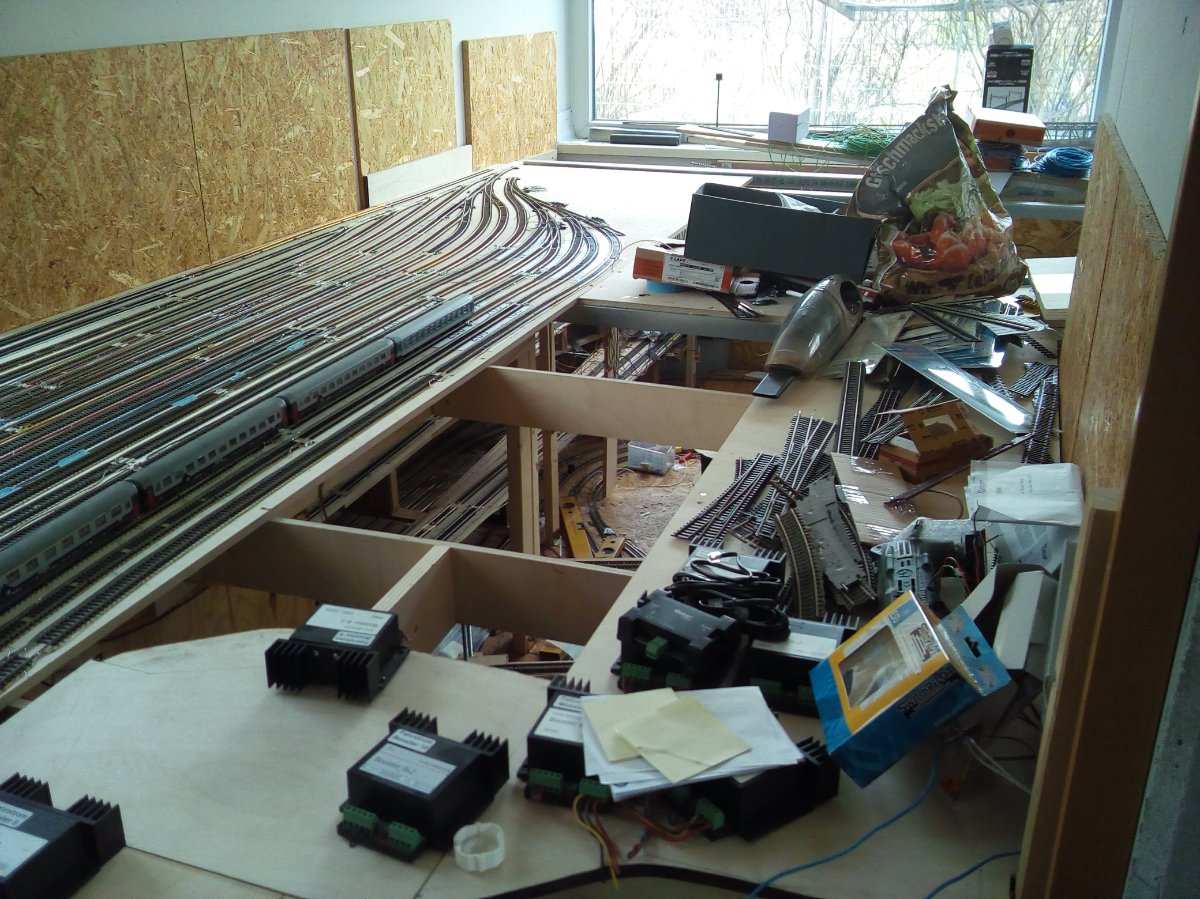
Hello together! I wanted to give you a sign of life from me again. At the moment I'm finishing the wiring of the layout with the 10 boosters. I've also reached the last level indoors. With kind regards Thomas
4 points
-
Well at last I have started on the baseboards. I have completed the two straight boards, just have to cover with roofing felt. I am fortunate that a neighbour is going to give me a hand as far as raising them off the ground, about 2 feet high. I just got the two loops at each end to sort out. So still a lot to do before anything runs.
4 points
-
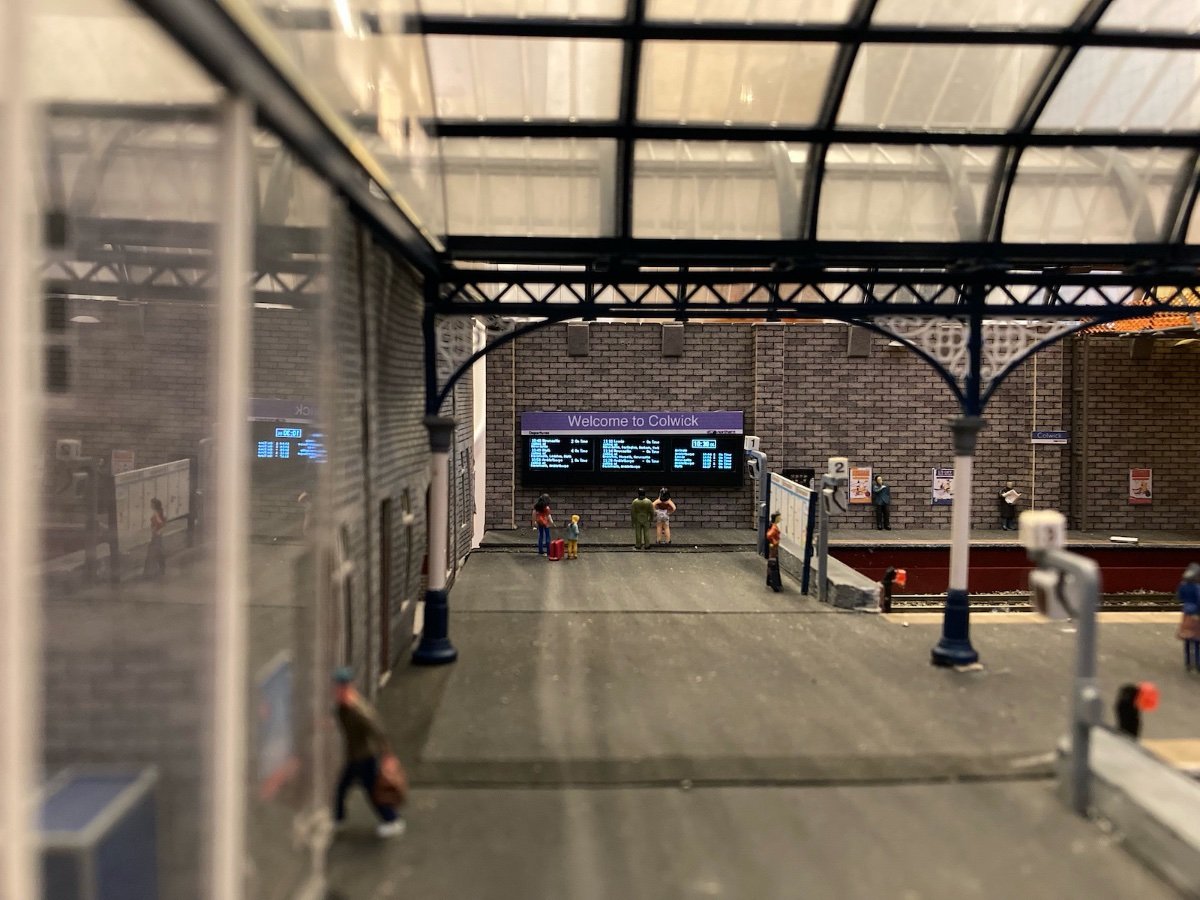
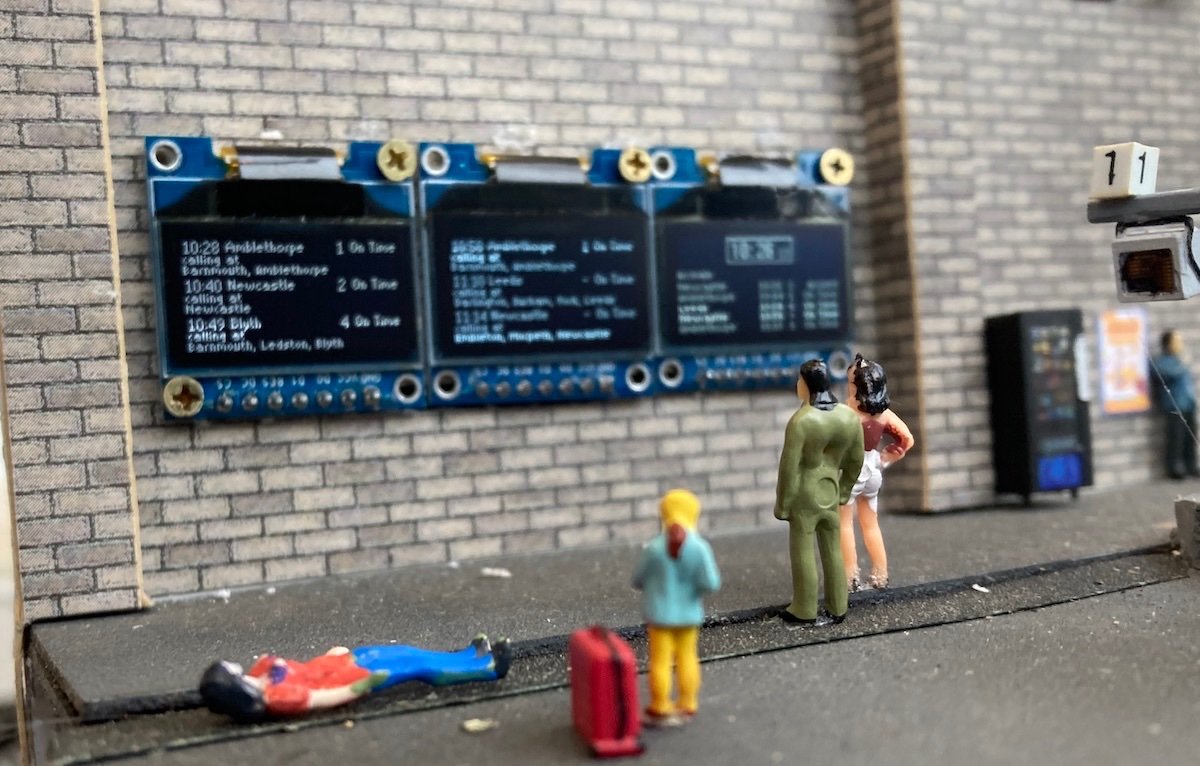
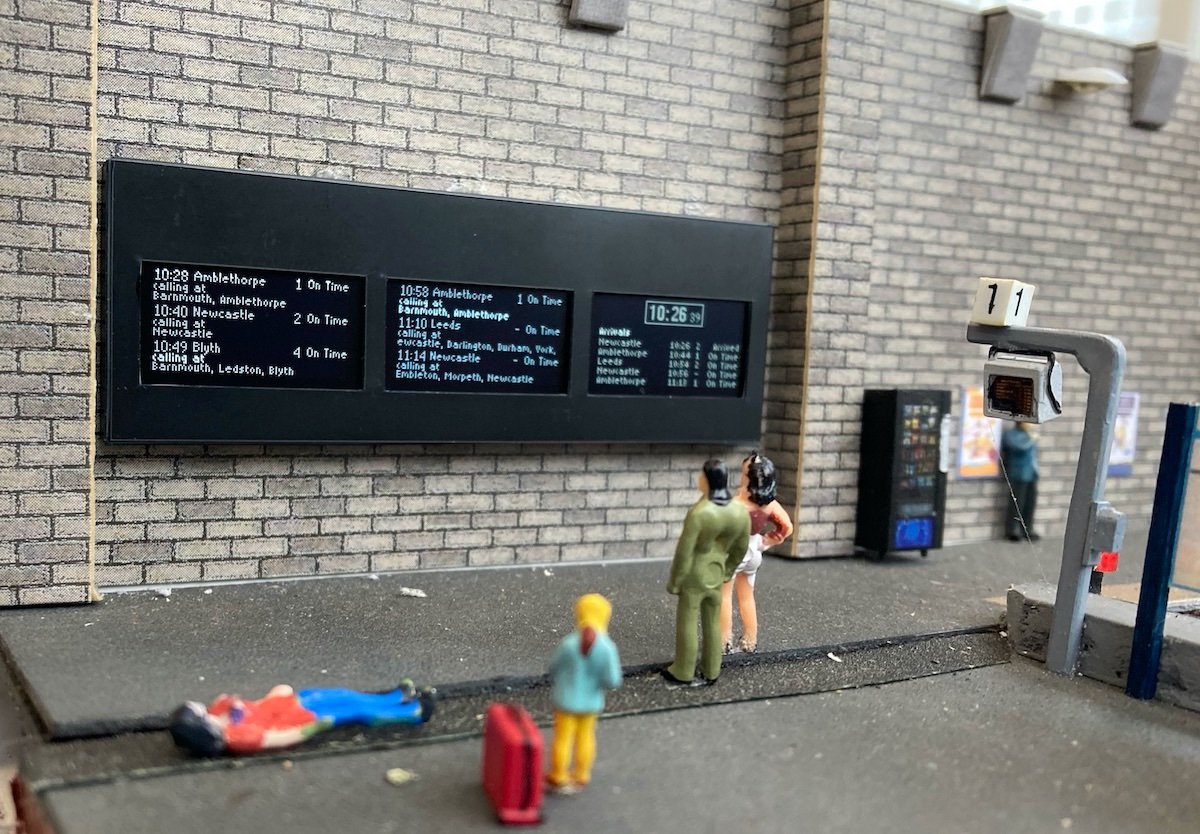
Throughout 2021 I was working on the electronics side of our hobby. Although I have a background in electronics I was out of date, and the Arduino revolution had completely passed me by. I've been playing catch up. But this has mainly been on my indoor projects. My first project on Amblethorpe is a passenger information display for Colwick Station. It shows "live" train information, but it's of fake trains. I've not connected it up to sensors on the track so it is not triggered by the coming and goings. This is possible, but I don't run Amblethorpe to a timetable so there is no point trying to do it. There are 3 screens each 22mm by 11mm with 128*64 pixels to play with. The type is tiny, either 6px or 5px high. They cost £6.50 per screen. They are dynamic, with some trains randomly delayed or cancelled. The clock ticks off the seconds minutes and hours. The destination stops scroll across the screen when required. These 3 are driven by a single Arduino micro controller, which cost £3.50. it all runs on 5 volts, and this can be pulled off the DCC track bus using a two quid voltage regulator. So the whole thing cost £25. I used my plotter cutter to make a hosing out of black styrene. It's a bit bulky, but I hid most of it by placing a Welcome to Colwick sign on the top. This year I'll get round to motoring the points on the Paltyville Ridge & Peak Railroad using and Arduino to provide the control and frog juicing.
4 points
-
Spotted this on my bike ride today. Not sure what class it is, but definitely a 3-car EMU.
4 points
-
Stabling yard # 2 is finished so far, only the last points still have to be connected to the (still missing) decoder. And then next to # 2 there will also be the stabling yard # 3, which will have 9 tracks with a usable length of about 1500mm for push-pull trains and railcars. But two points are still missing for the beginning with #3.
4 points
-
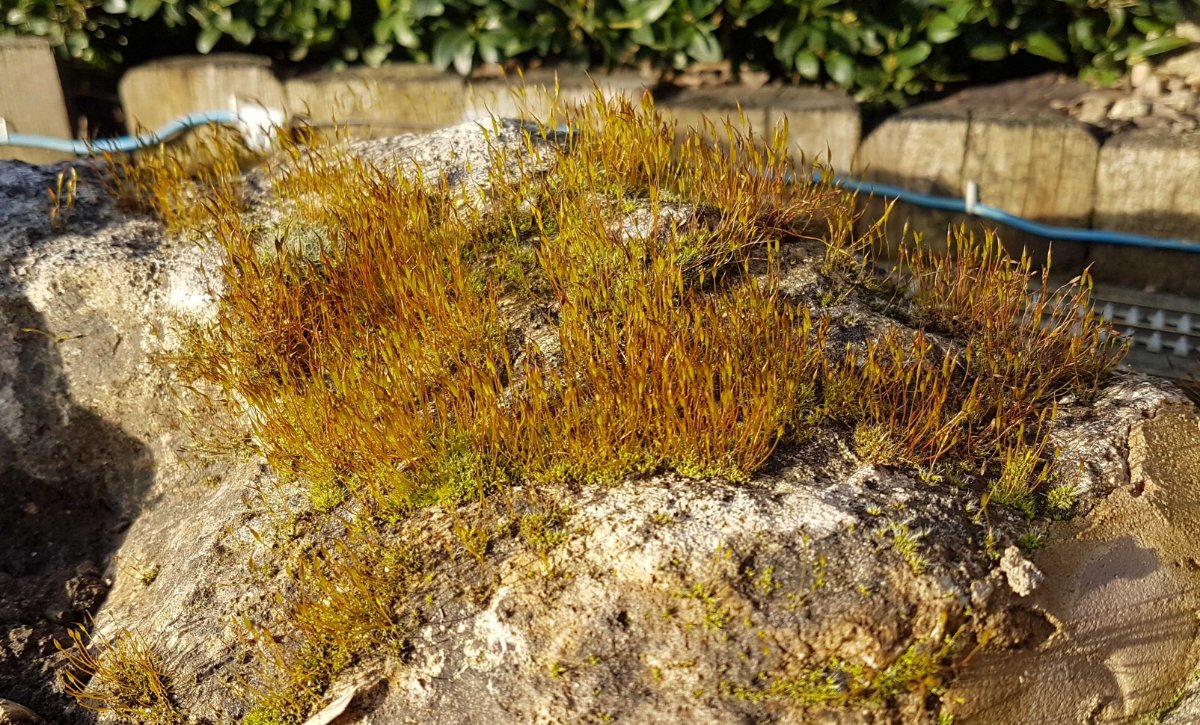
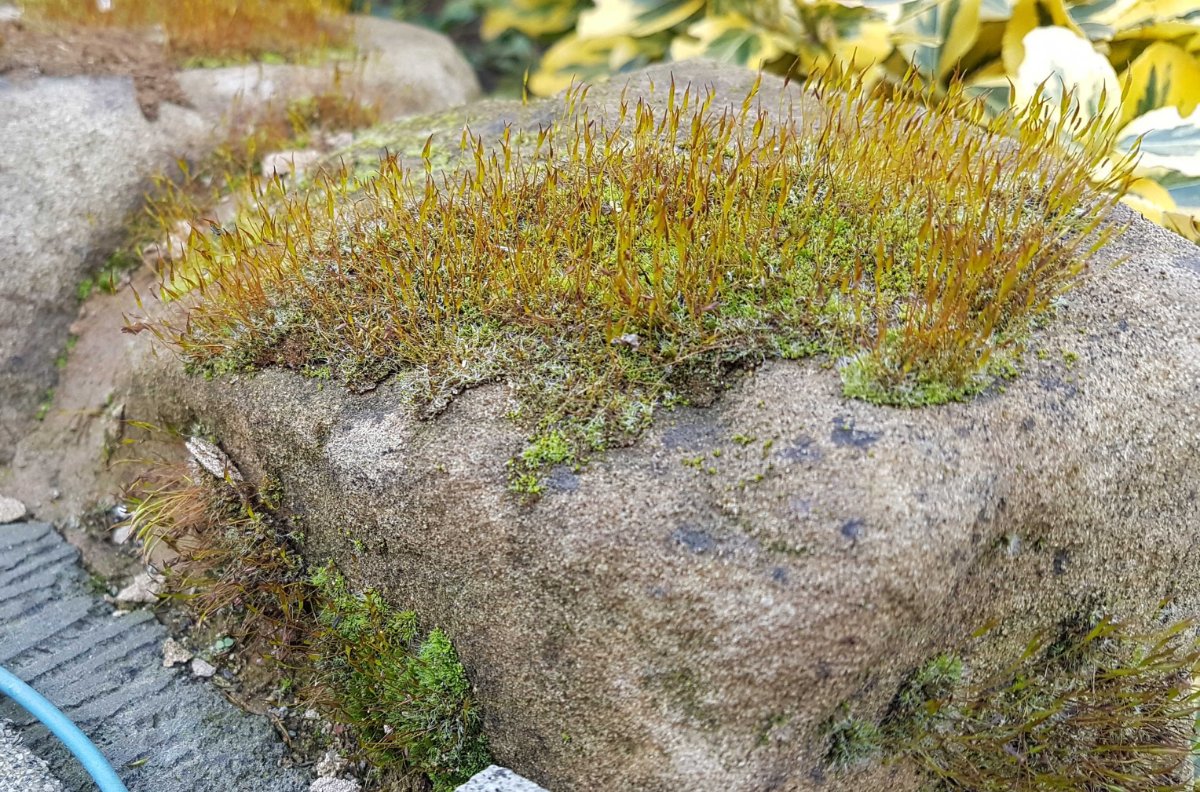
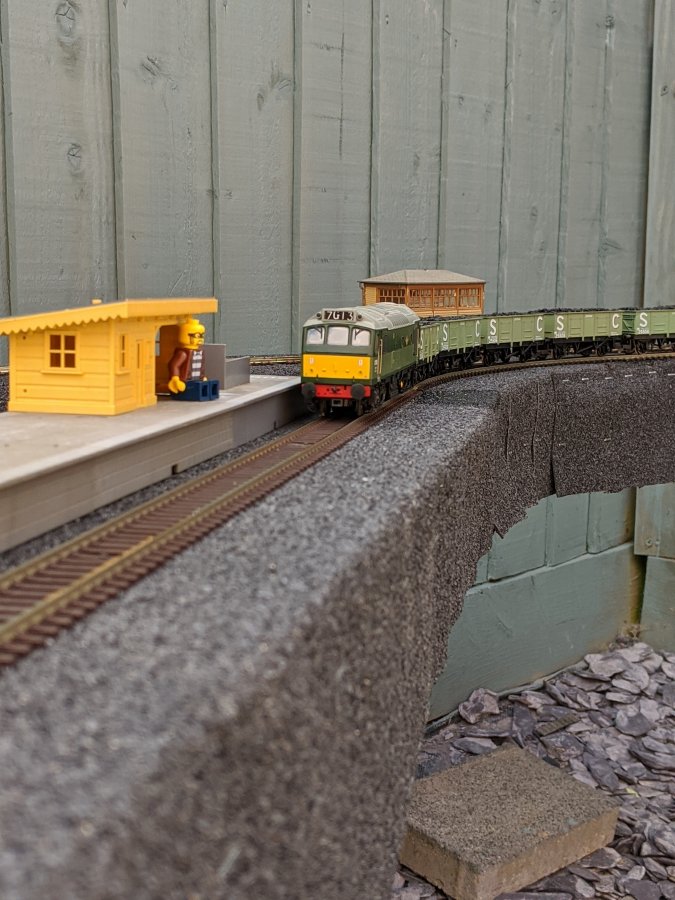
Worsley Dale is officially open for 2021! Tracks were cleaned and cleared early today and power was applied shortly afterwards. I was immediately greeted with a short circuit! There's nothing really complicated on Worsley Dale, it's little more than a circle of track so what could possibly be the problem? I checked from one end to the other and found nothing amiss so it wasn't something just across the rails so that leaves just the two sprung points which each have frog juicers fitted. I should really have removed them before winter set in but they are housed within plastic boxes, cushioned with foam, and then placed within another structure but the one near Low Shott viaduct, a Tam Valley frog juicer, had failed. That's the third one I've bu**ered up! The Gaugemaster ones are fine. This may be partly to blame as I mentioned yesterday. The frost and ice has obviously got to this though the interior where the frog juicer is located within its plastic box was completely dry. While the damp conditions may have cost me a juicer they've created a wonderful garden of colour on some of my stonework which appears to be thriving... And it's even spreading along the lineside on Stack Gill viaduct. Who needs static grass! So here's a short video of 37425 hauling a short rake of coaches around today. It's the only train running just now - the sun may be shining but it's still a bit cool out there.
4 points
-
Thomas and the snow Annie and Clarabel were delighted to see the snow, but Thomas wasn't so sure. "I don't think we'll be able to get out of the carriage sidings" he said. Even when they turned round to face the other way, the enormous depth of snow defeated them: "If we try to move from here, we'll just get stuck!" said Thomas. Annie and Clarabel were very sad. "Isn't there anything you can do, Thomas?" they said. So Thomas jumped everyone across to another track, but still the snow was too deep to risk. "It's no good" said Thomas. "There's too much snow today. We'll just have to stay at home." So he blew hot steam into Annie and Clarabel's pipes to keep them warm and cheer them up. The Fat Controller told Thomas that the whole line was completely snowed-in, and even the girder bridge was impassable. But as he said, things like that don't happen very often in Dorking, so we hope the trains will be running again soon.4 points
-
I use "Typhus corrosion" from the Warhammer paint range, which has a sand type substance in the paint.
4 points
-
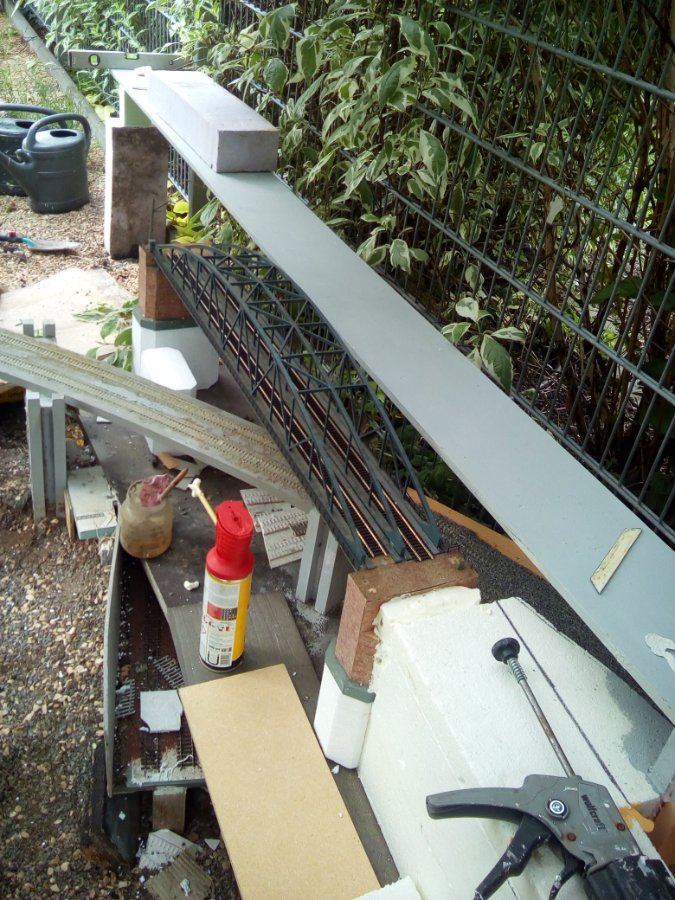
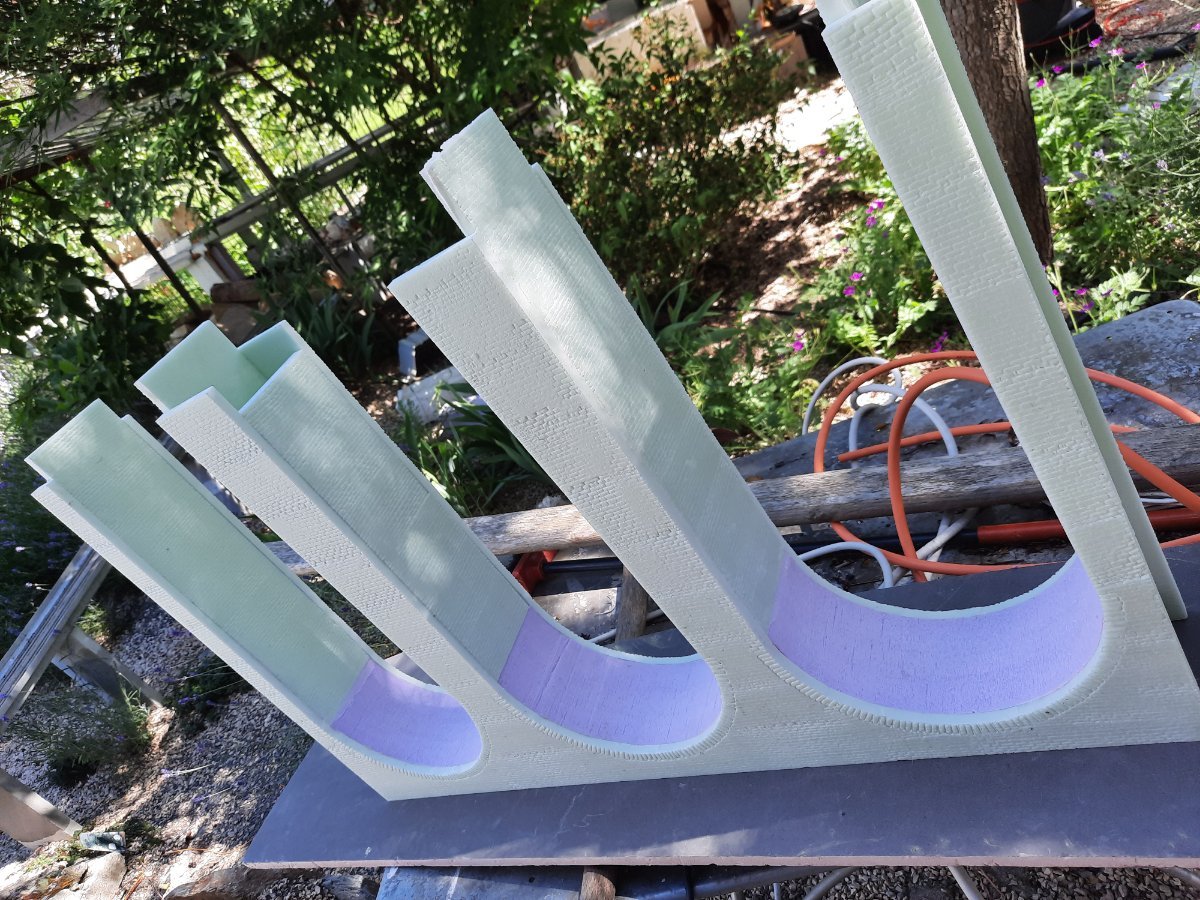
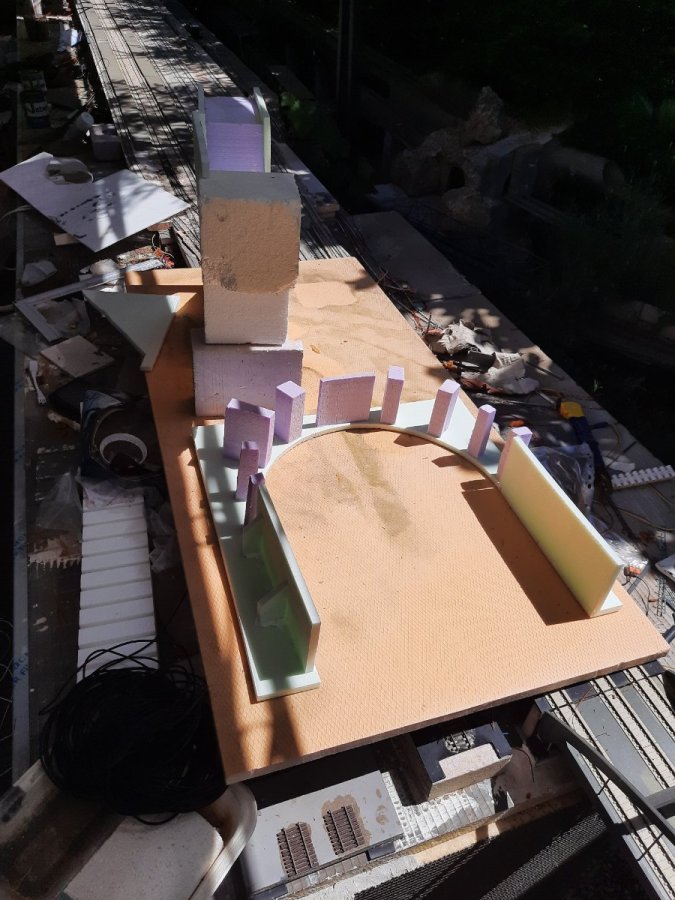
nearing completion ok my skills not not great but it will do with just a bit of 60git to sand it flat just need to cut some keys stones now to complete a 50 mm gap in span 7 of the viaduct
4 points
-
Here's a very brief video made up of clips taken during yesterday's running session, the final clip showing the train passing over the sprung points before crossing onto Low Shott viaduct.4 points
-
Here's a few more updated pics, I've been trying to work away over lockdown on the landscaping, 30 bags of soil went in to the main section to bring it up to a higher level, I had a garden gazebo that had been wrecked by high winds so I cut the patterned curves from it and painted them with hammerite to make the bridges. They probably aren't perfect scale wise but I think they look quite good. Been plodding away all summer when I get a moment, planted a few plants in the rockery so it's getting there..
4 points
-
Selection of clips with the few mineral wagons I have running on the Garden Railway. Must invest in some more freight wagons! I have also started making some false floors for the wagons with coal loads on top. I'll show these in a future video. No progress yet with the platforms. Link to my You Tube Channel - https://www.youtube.com/channel/UCYmxyrVYHbKF0NODKlqzh6A?view_as=subscriber
4 points
-
Some running today
4 points
-
A little later than planned but here finally is a video with action over the past 2 days mainly featuring the SLW class 24 quartet in yesterday's bright sunshine.4 points
-
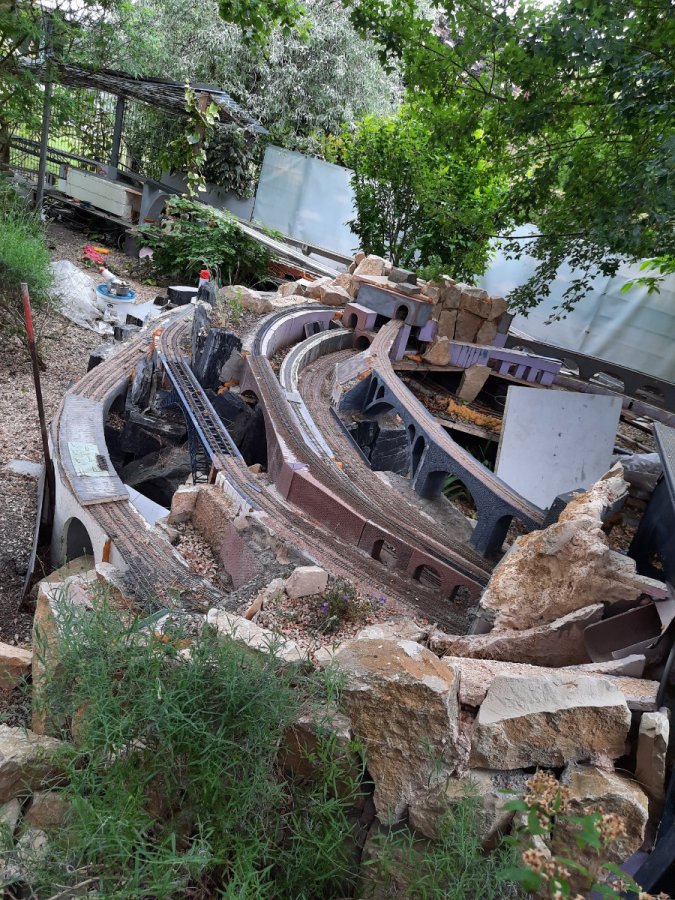
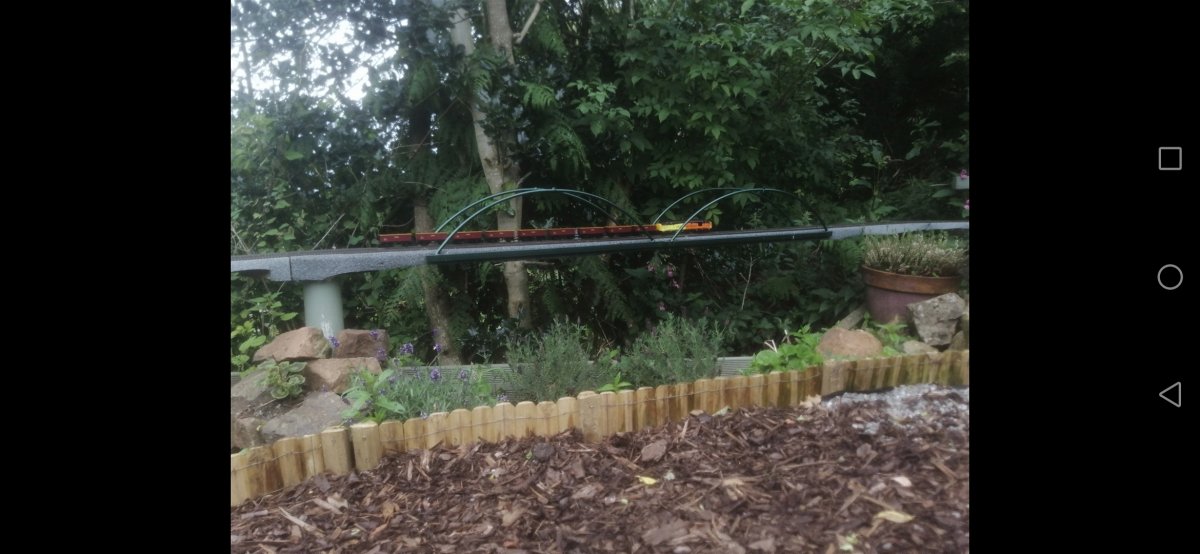
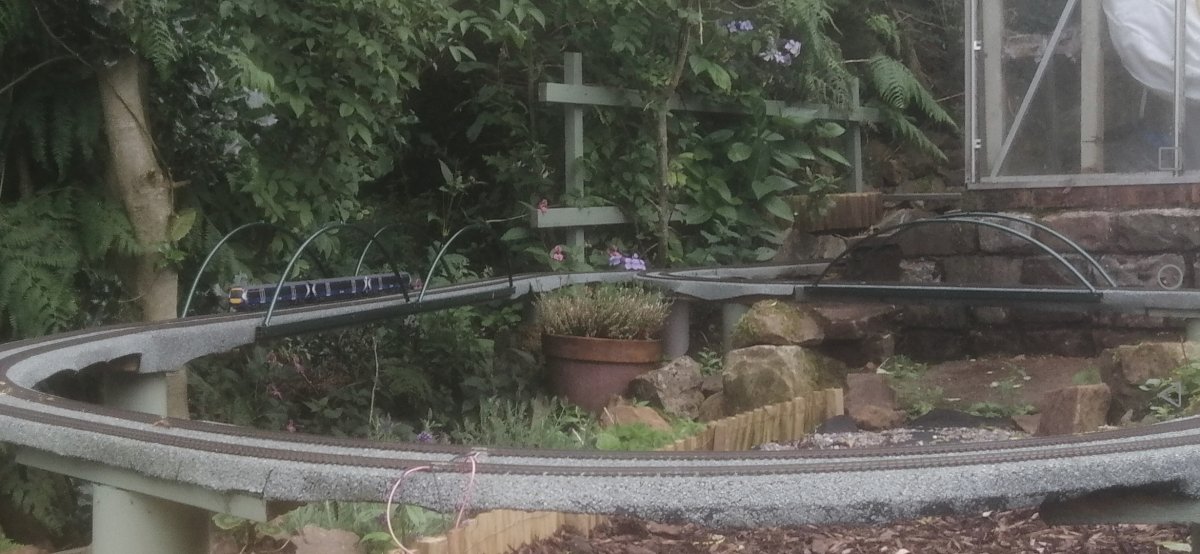
Yes Mick, the two viaducts are still there! Both are in need of repair, I should rebuild them, but that's too big of an undertaking to stomach, just the thought of replacing 8 metres of viaduct in-total......! I will have to put a speed restriction on the trains crossing! WEAK BRIDGE! Only half of the line is at ground level, after the pond the ground drops away so the track is about 500mm above ground, running over elevated rockeries before entering the garage. Here are some photos of the extension to the garage, which includes two tunnels (one has an oversized ventilation shaft, but it's fun to look down and see the trains pass through), and yet another viaduct.
4 points
-
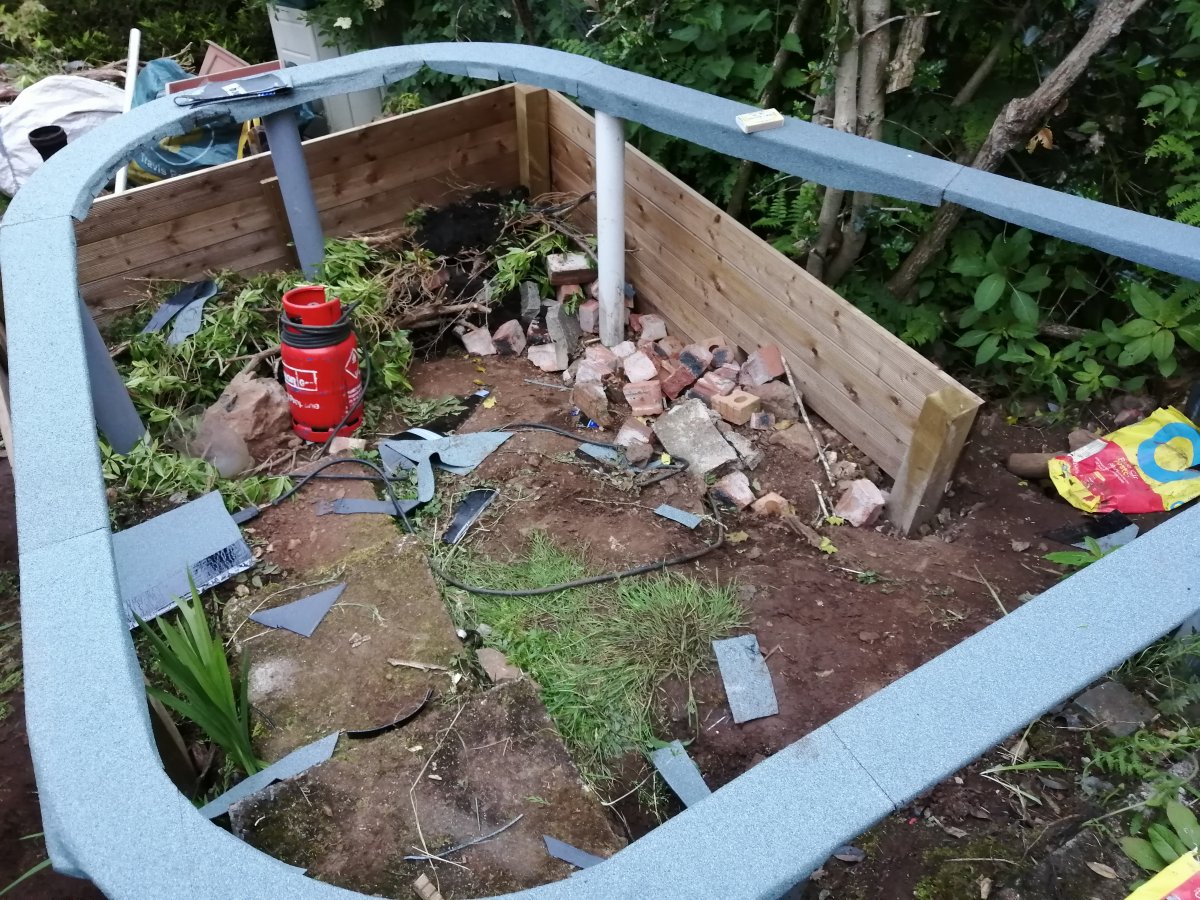
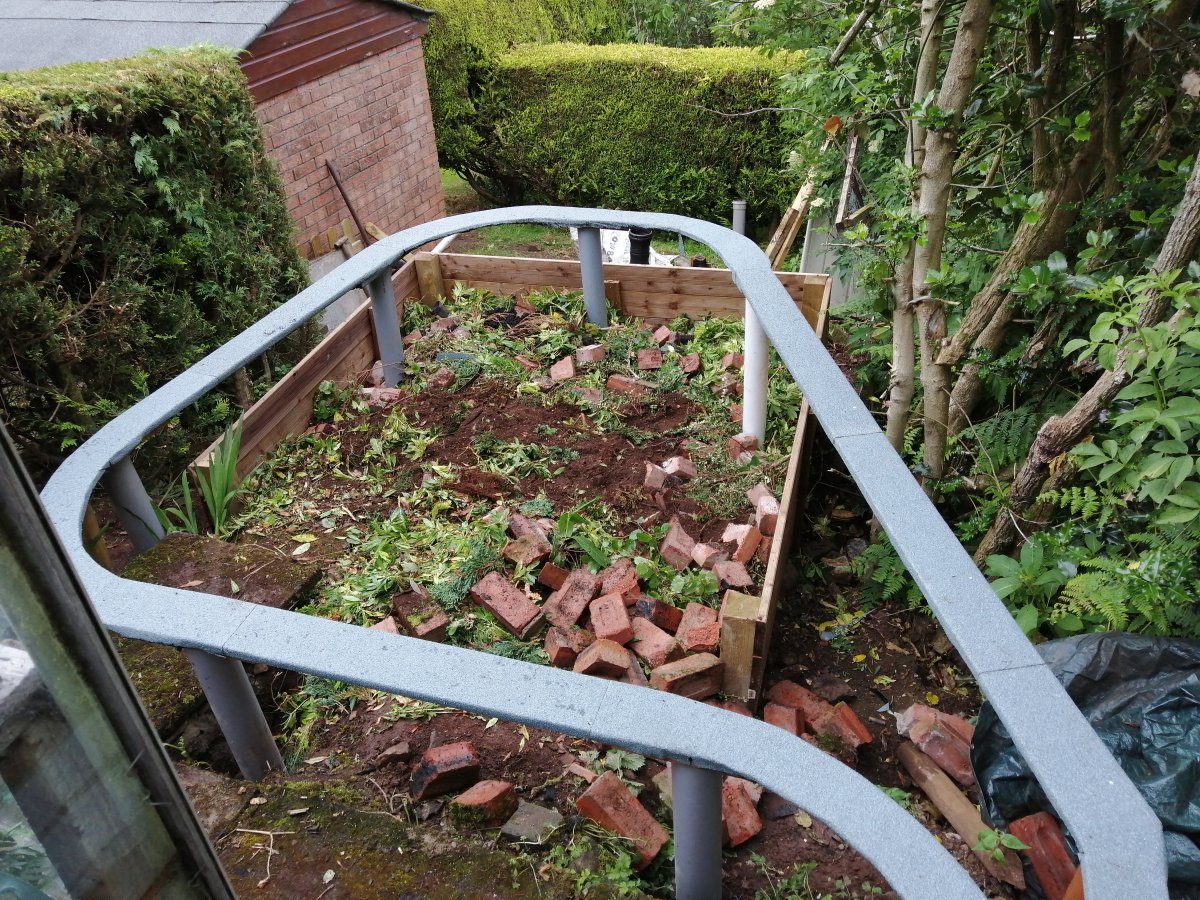
Yesterday I began the process of filling the gaps with earth and stone. Months ago I rescued the stones form a friends driveway before she had it tarmaced. I didn't know if I had enough, which meant it was guess work as to how much earth I'd need to fill with first. We did about 72% of the filling. Getting the point where the final position of the trackbed blocks has yet be decided. This morning I placed some track down and, for fun, popped some coaches on. This turned out to be helpful, it shows me how long my passing loop will have to be, allowing for a loco on the front. Up shot is that I can'y make it any shorter. I'm still uncertain which point to use where. I have two right hand and two Y. I've started thinking through how I can create a connecting line to the Snicketway baseboards. I'm going to use some 18mm ply which should be ridged enough for the 70cm length it will span. For the radius I'm following the track that came with train set, which ensures that it won't be too tight. This afternoon I'm going to have to lower a couple of the ridge blocks by 18mm to allow for the linking track to be able to pass over them while the track stays on the level. Feels like real progress now. Should be sticking down roofing felt and laying track soon.
4 points
-
First trains of the year About time too, I hear some say. Well, up till now the weather hasn't been great this year, and there's always real life which conspires to get in the way of running trains. But with this recent spell of fine weather - and no social obligations intervening(!) - I was able to make the most of today. It was a Southern day in honour of the sunshine, and the first train past was a coal train hauled by an N Class 2-6-0: Then a West Country appeared with a passenger train, seen here running past the goods train at Northdown Sidings: Running across the Northern Viaduct and past Foxdale Carr Hall: Heading past the new footbridge on towards Foxdale Bank: And past the commemorative platelayers hut: Just caught a threequarter rear view as she passed: Then the N Class reappeared on a local passenger train: Rumbling past empty coaching stock in the sidings:4 points
-
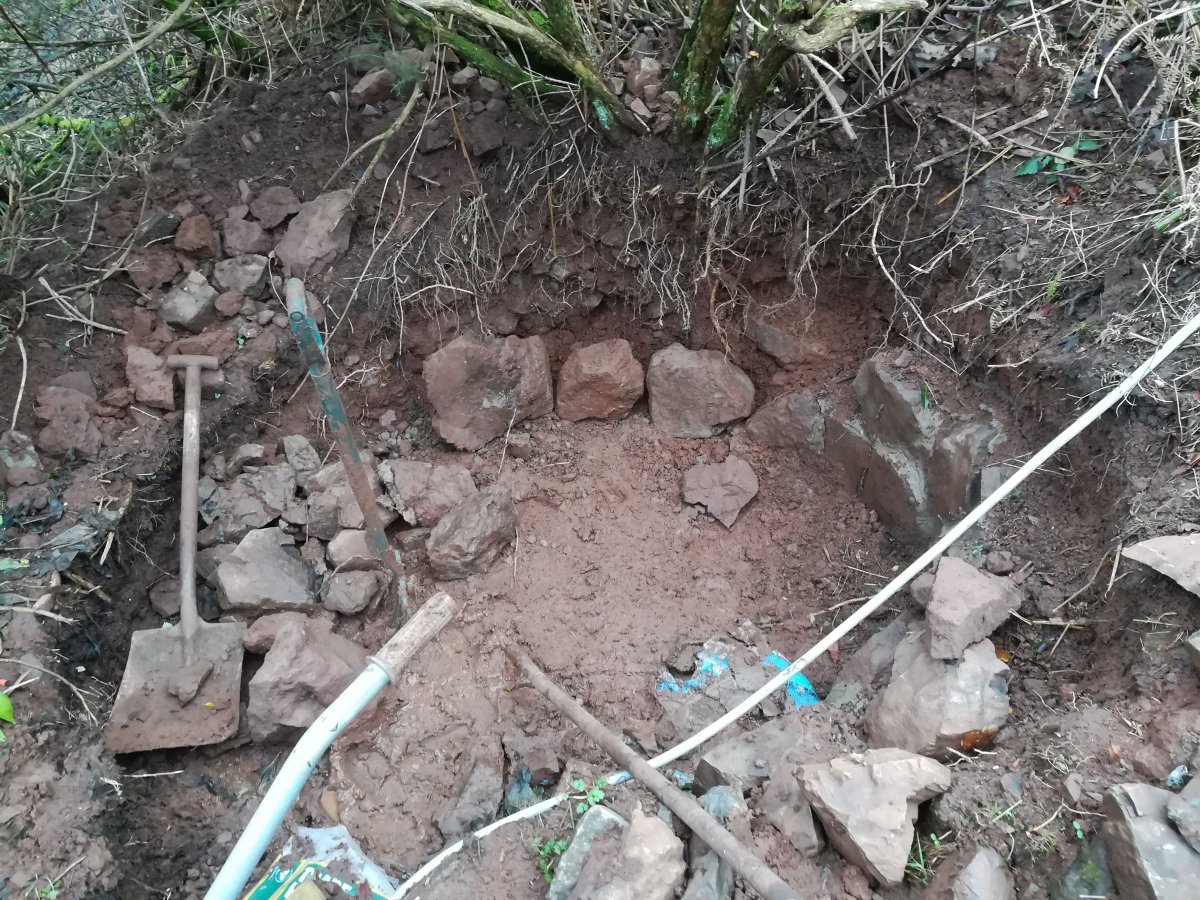
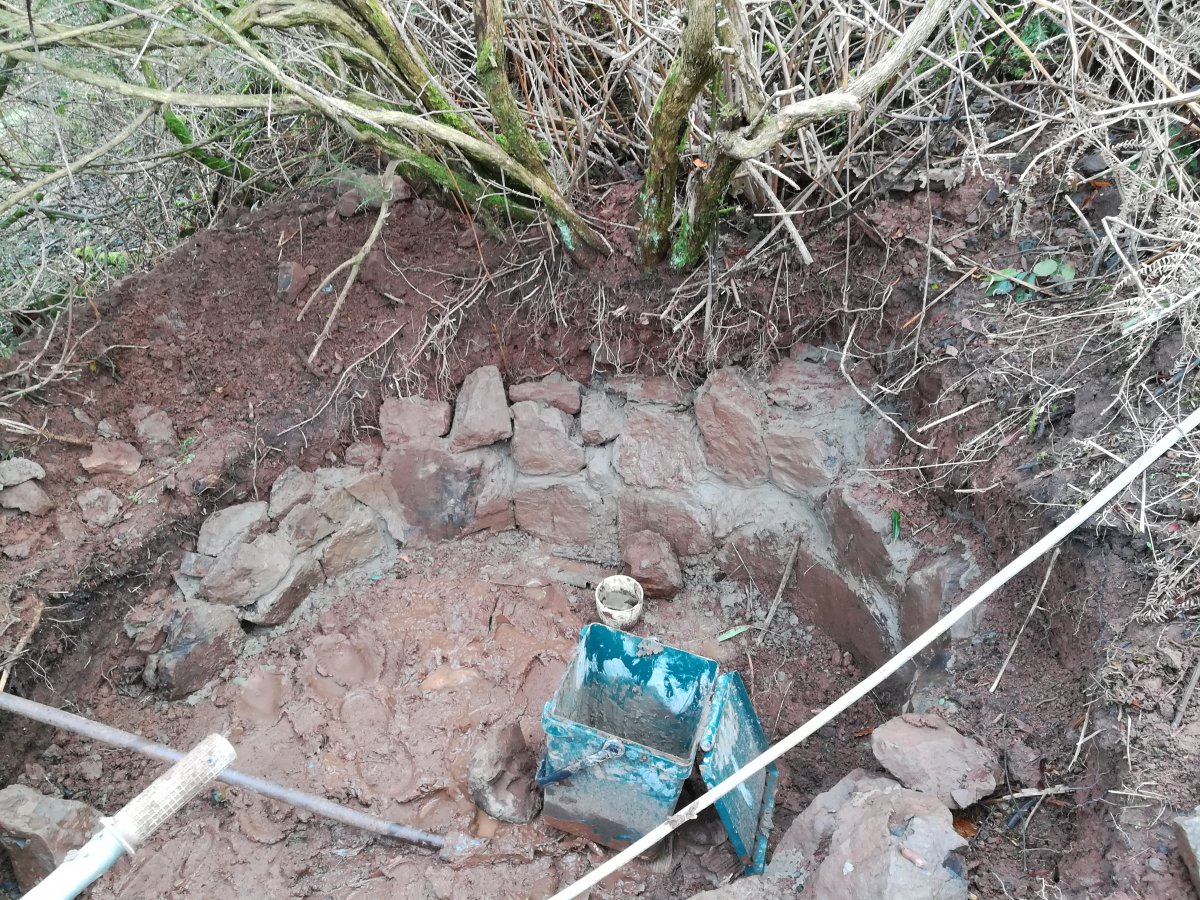
Joined this forum what I thought was a couple of years ago, and when I checked my email yesterday I couldn't believe it was actually 5 years ago. Have been having a look for ideas etc and have managed to convert a hidden corner of the garden into an outdoor layout. There were various challenges along the way, the land ran at a gradient so some deep digging was required at one section and then elevated supports at the other, so all in all its taken about 2 years to build. It's still a work in progress, I have work to do to try and raise the ground to make it look less high, all garden cuttings etc have been put in last few years, and it's still ongoing. I'm planning to build a rockery and plant flowers to bring it just below track level, and had a first attempt at soldering the track yesterday but a bit to learn on that front still. My father in law helped with the cement work, and he also blowtorched the roof felt on to give it a great finish. First trains ran July 2019, after a good track clean it's running again no problem so far. It's still a work in progress with a few imperfections so I'll try upload some pics below.
3 points
-
3 points
-
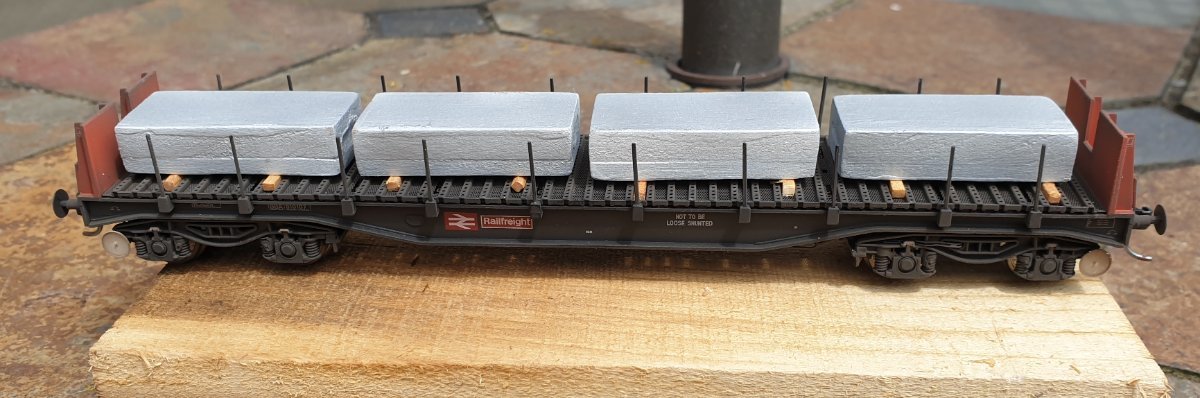
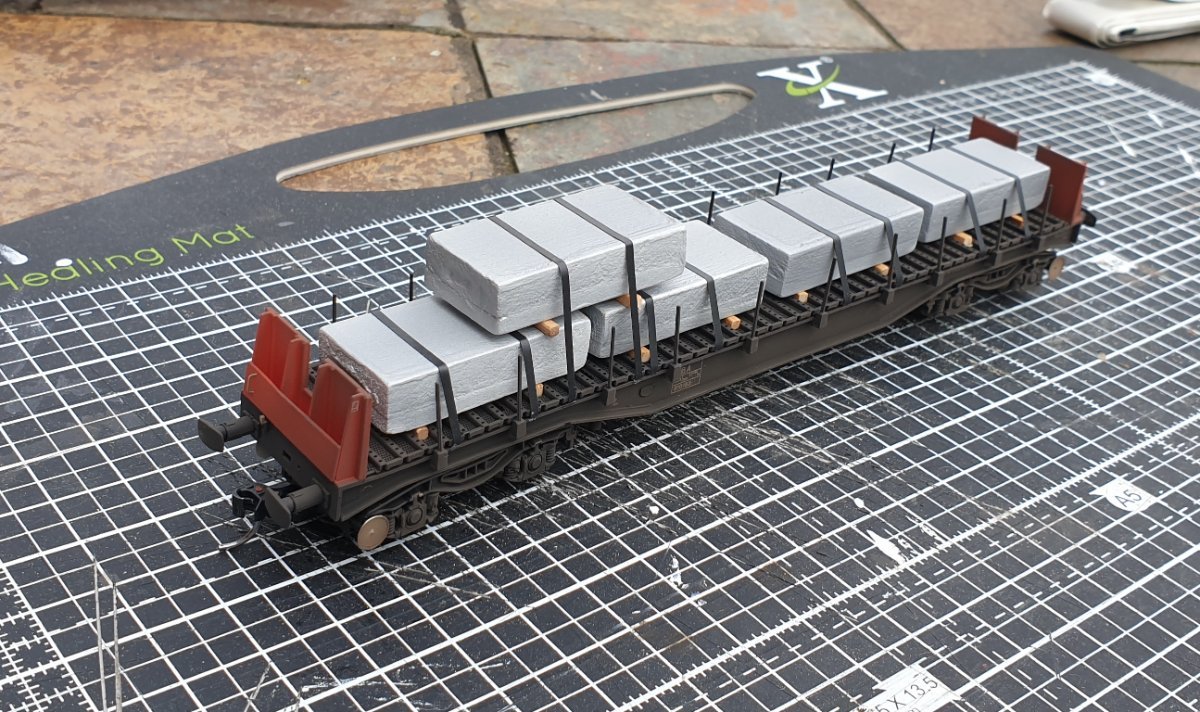
I've made a representation of some aluminium ingot loads to add to 3 of my BBA wagons. Now I know they are far from perfect, probably totally incorrect, and on the wrong wagons with securing straps that appear to have nowhere to fasten to but I think they are an improvement on the empty wagons and I'm happy to accept all the errors. I began by making a batch of ingot shaped loads from some left over pieces of MDF but having completed the 12 I required I decided that they just didn't look right. Compared to some photos I've seen they were too thin and too wide so I decided to add another thinner piece of MDF and cut them down slightly so they were narrower and chunkier. After several coats of MDF sealant I gave them a quick spray with some aluminium coloured paint. I should probably have sanded them further to disguise the join between the two MDF sections and remove some of the paint accumulation along the edges but it's only a representation and not an actual replica load. I placed the ingots on lengths of timber as in the photos I was referring to even though the wagons are not the same types. Short lengths of electrical tape were used to make securing straps though whether this type of wagon had provision for that I really don't know but I wanted to mimic the layout on the photos as much as possible. My main reference photo shows 2 wagons with the rear most wagon having an additional ingot and so I have attempted to replicate that too. One particular detail I tried to include was the dimple on each end of the ingots which you may be able to make out on the one below. From a distance I think they look okay but obviously they wouldn't stand up to close scrutiny. I'll see if I can get a photo of them behind a loco or two shortly.
3 points
-
The APT has had a run in the garden. I shoved a 2 minute video together very quickly, I didn't have the time to edit it properly with intro.3 points
-
The sound of Class 66 music Josh, who is a regular visitor to the DGR, has very kindly fitted my Class 66 with top quality sound. Here's a video of it running on his layout - which is well worth a listen. Looking forward to letting her out on the DGR again...3 points
-
Oops, I did it again...
3 points
-
One just sat on the track and happily watched as it ran in to him, daft as a brush3 points
-
I've managed to salvage the following footage taken over the past couple of days although there's nothing featuring the new Scotrail HST worth adding. I need to sort out those wobbly coaches at the very least before it can be seen.3 points
-
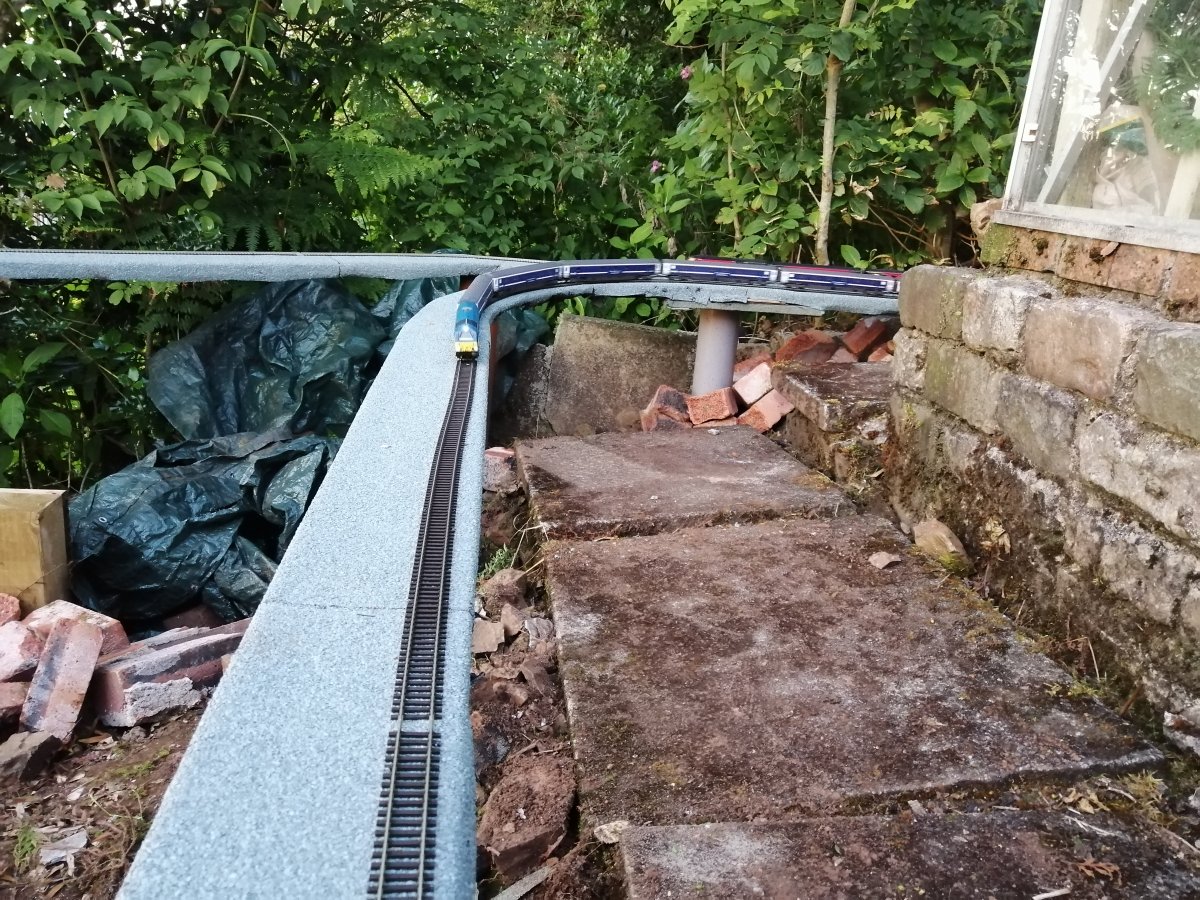
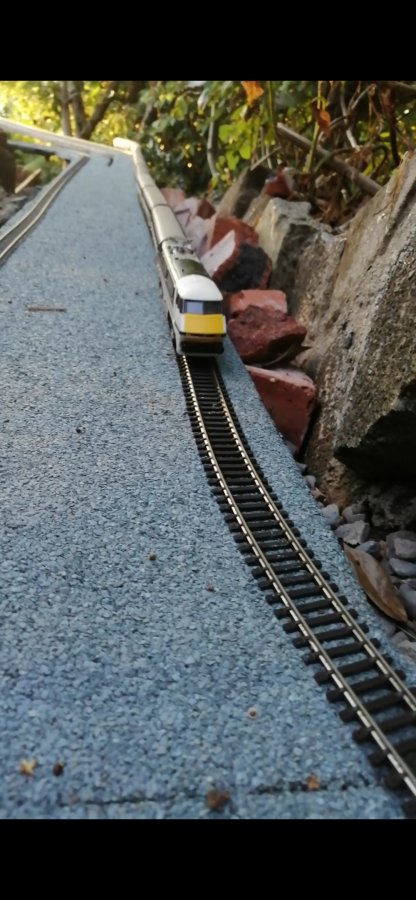
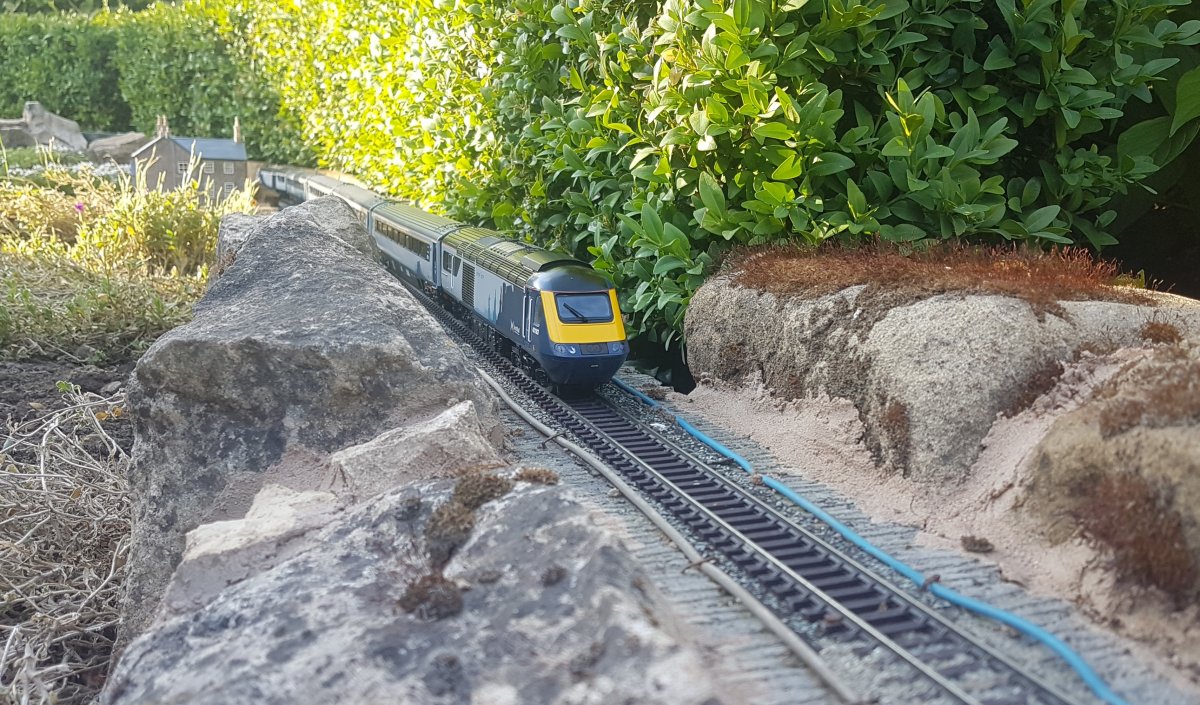
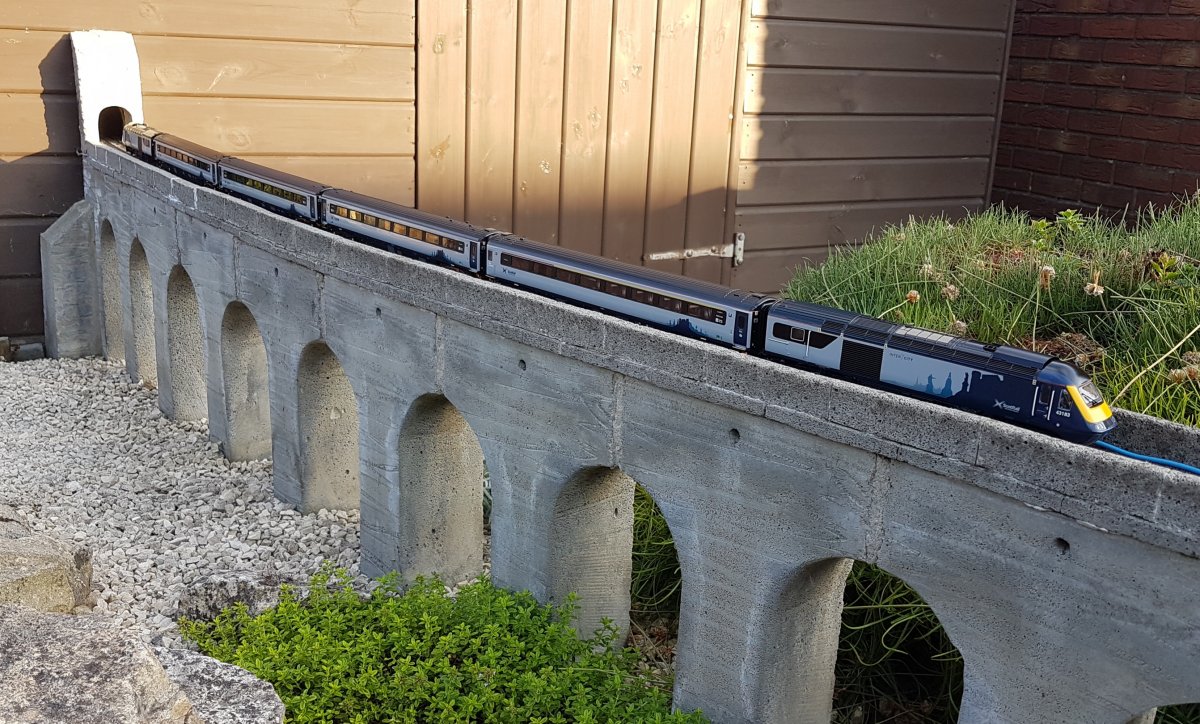
I was looking forward to posting some footage of the Scotrail HST and my latest class 37/4 but typically it's been a day spent faffing around trying to get things working properly. I'm sure Hornby are well chuffed with their Scotrail HST power cars and reasonably priced matching coaches but unless you're prepared to accept a massive gap between coupled vehicles you are going to want to change the couplings to bring the coaches closer together. I was delighted to see the coaches now have NEM sockets so it's a simple matter to pull out the tension locks and replace them with my preferred Kadees but how on earth do they expect you to couple them to the power cars? Pull the tension lock from the power car, replace it with a Kadee, and it ends up much lower than the adjacent coach - so low in fact that the Kadee trip pin is between the sleepers. I've had to fashion a scrap piece of plastic, drill through the shank of a Kadee coupling and the plastic, glue them together and insert a track pin through the previously drilled hole for additional strength and then secure that on top of the power car coupling drawbar so that the height of the Kadee is correct. It's a £400 rake of vehicles and I'm drilling and gluing bits of plastic to them just so they couple closer together. When I eventually got it coupled together it would run for a while and then stop abruptly as if there was some resistance in the motor. I ended up removing the body only to find one of the pickup wires had come adrift on the PCB. Out with the soldering iron this time! £400? Anyway, all's well that ends well as they say and from there on in, apart from a slight annoying wobble from coach B, it's run perfectly for the best part of two hours. There's clearly going to have to be diversions in place for me to justify this on Worsley Dale but you've got to love the HST's haven't you? It's fitted with twin TTS sound decoders that make quite a noise even outdoors, though I'm not sure how prototypical it is. Next job is to fit corridor connectors to hide the remaining gaps between vehicles. I've never been entirely happy with the alignment of the track coming off Low Shott viaduct and onto the points where the track changes to double. The track on the viaduct really needed moving over slightly but because it's been ballasted it's always seemed too much trouble however, today was the day I decided to do something about it. I cut the track on top of the viaduct and removed a section probably 15 to 18 inches in length which I replaced with a spare length. I'm really pleased with the exterior varnish I used for the ballasting - it was still solid but not too difficult to remove, even from the strip of roofing felt which I was able to reuse.
3 points
-
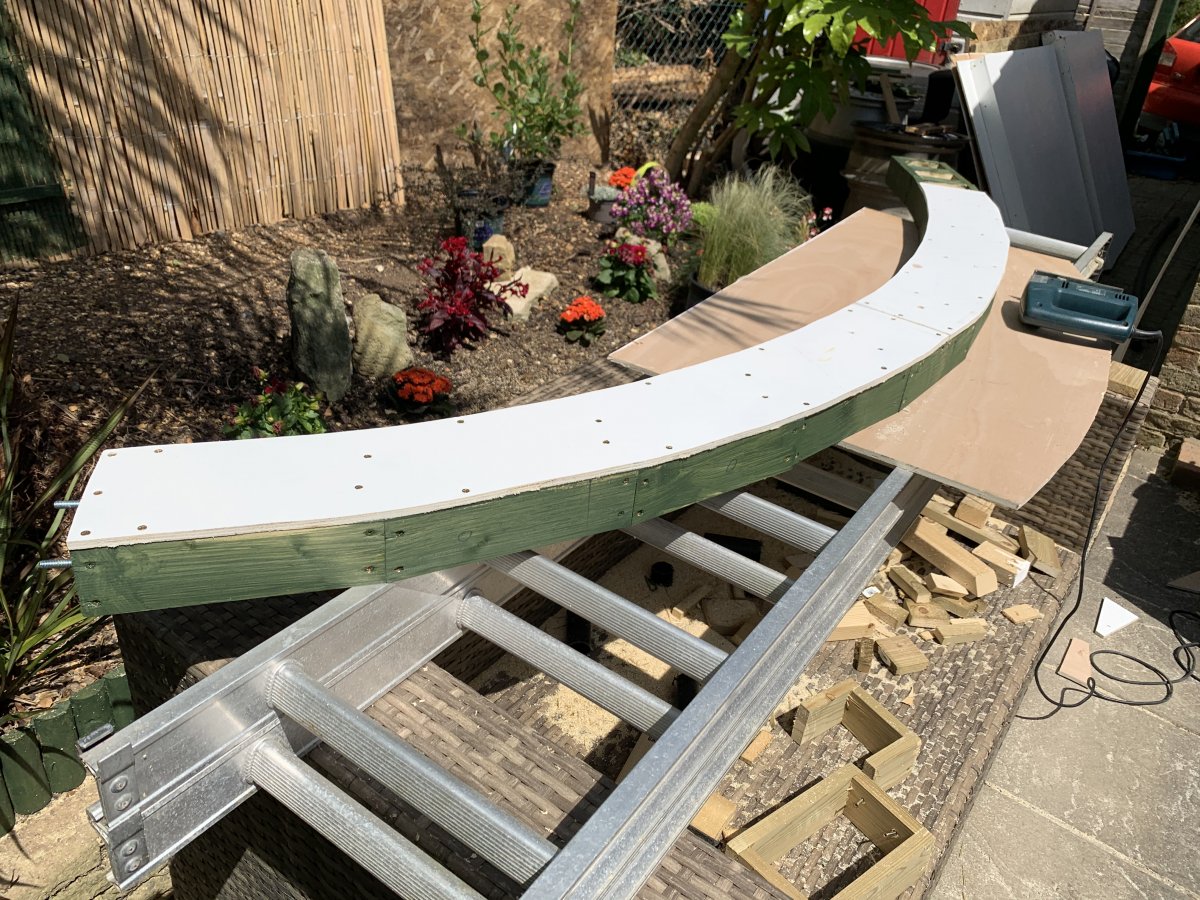
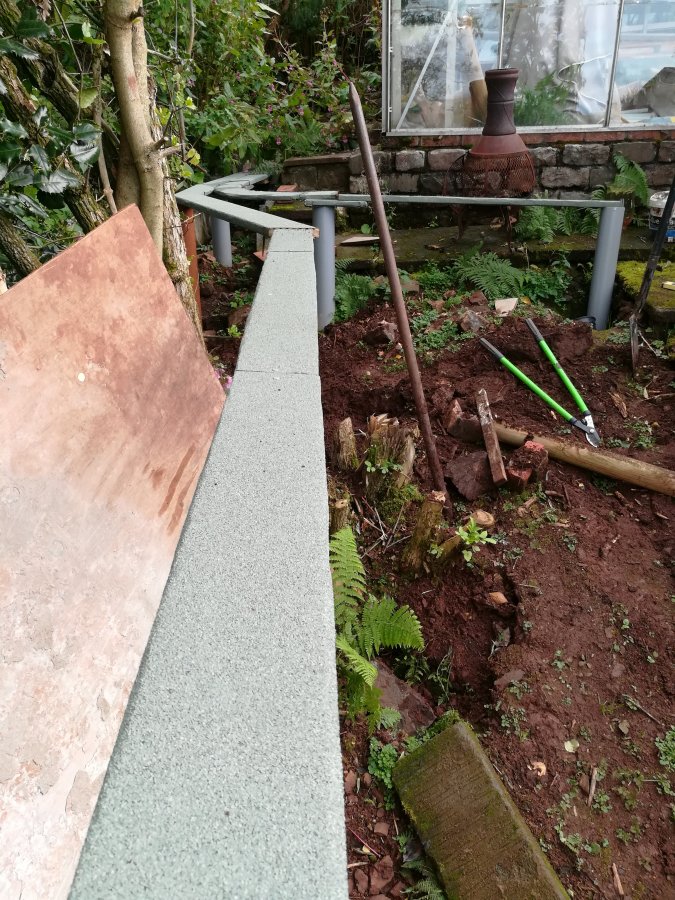
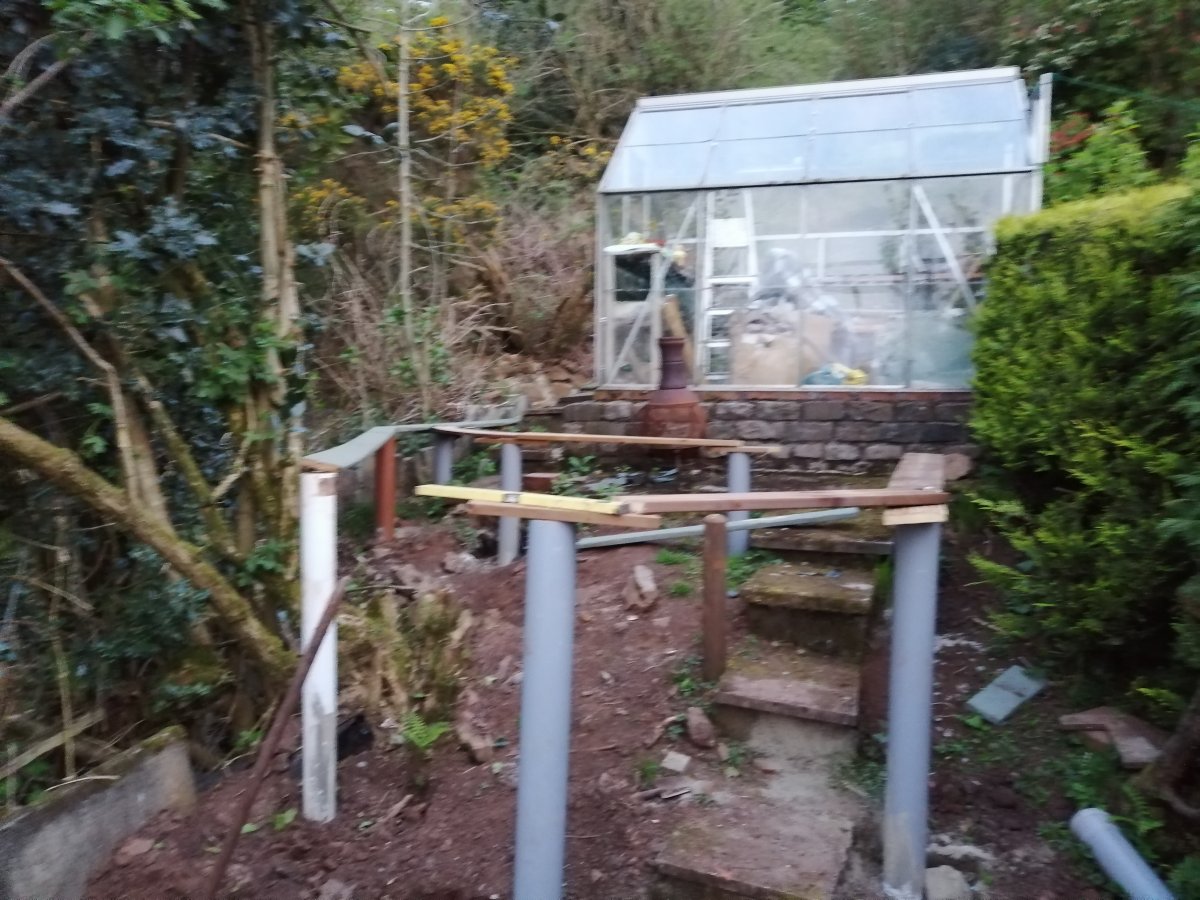
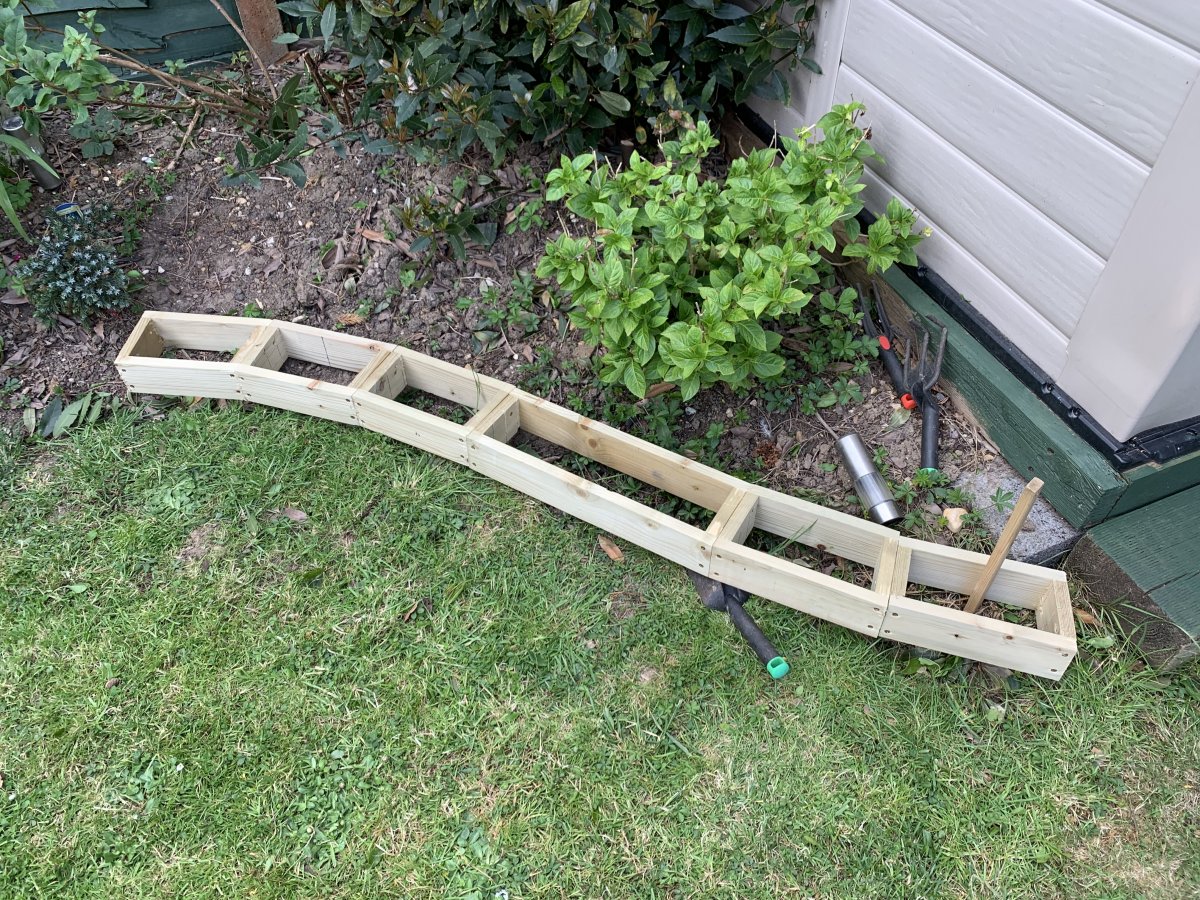
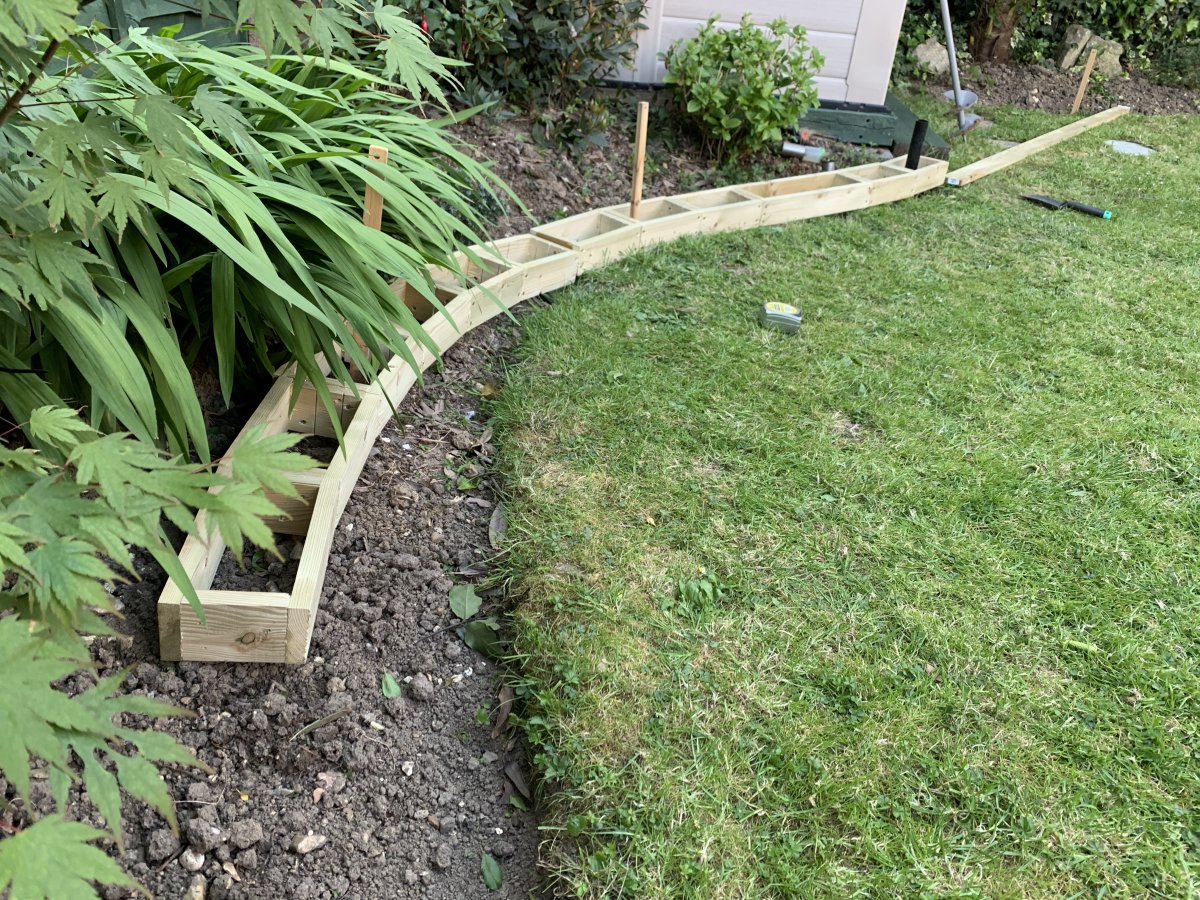
So now you’ve seen the plan, it’s time to show you what it looks like. The whole thing is built like set track, wooden blocks of varying angles 4/5/6 degrees screwed and glued together to make a frame... The frame is bolted together in 6ft-ish sections and sits on top of PVC pipe posts, sunk in to 8” of concrete. The frame is treated 75x22 timber and once assembled, it’s given two coats of wood protector.
3 points
-
No. The felt needs securing properly. Track pins will not stop it from moving with extremes of temperature, or even lifting in a wind and ripping the track out with it.3 points
-
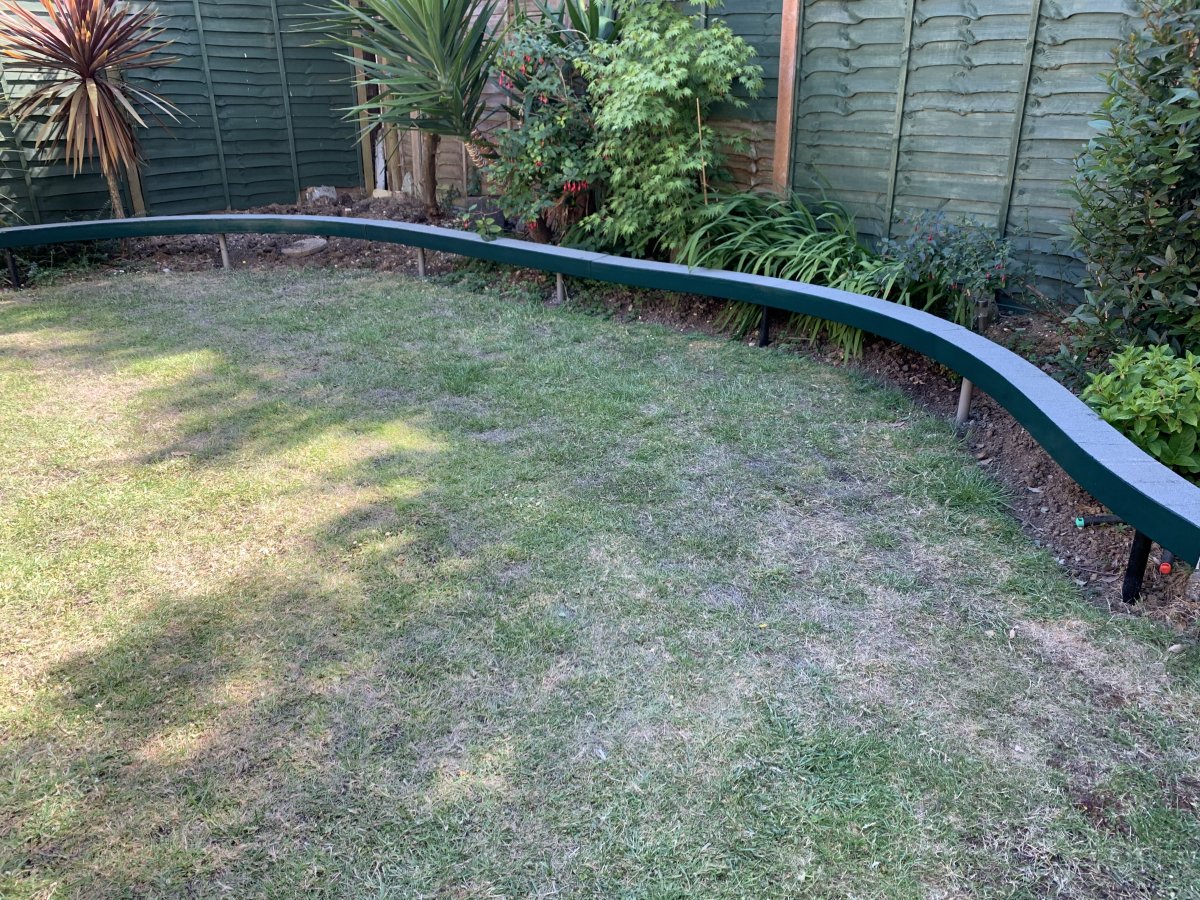
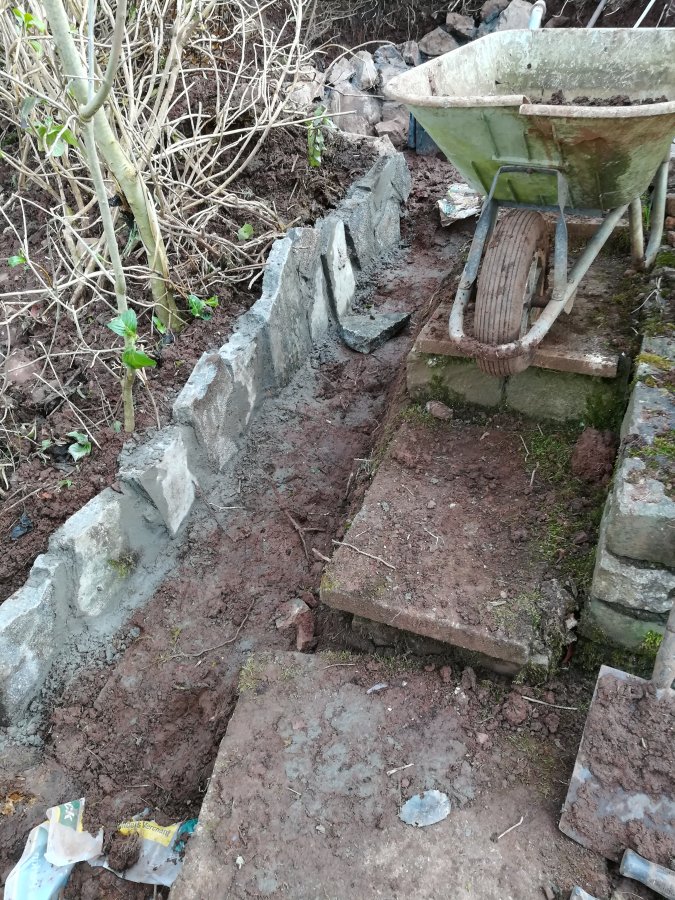
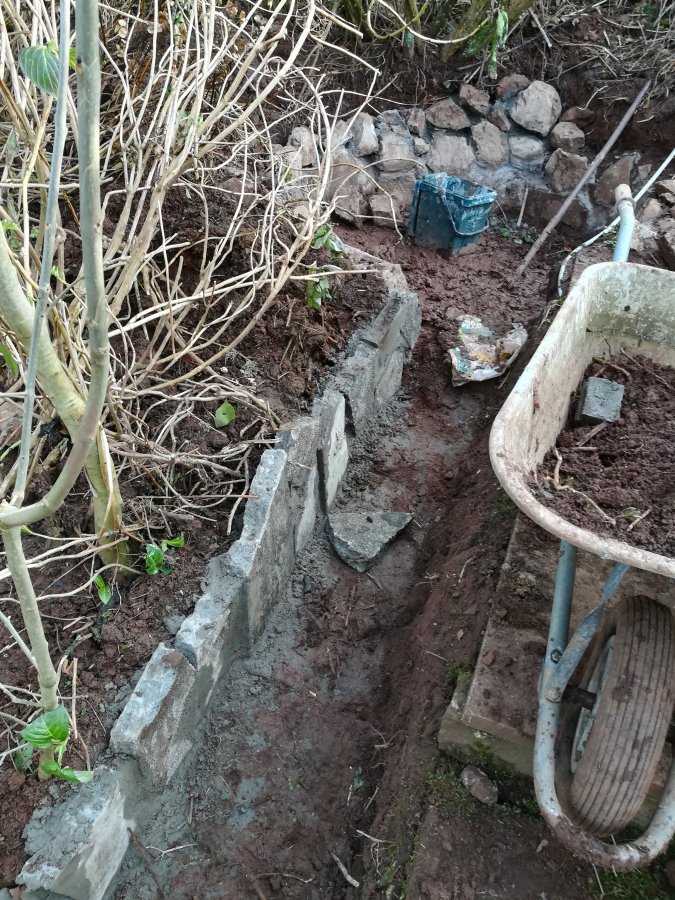
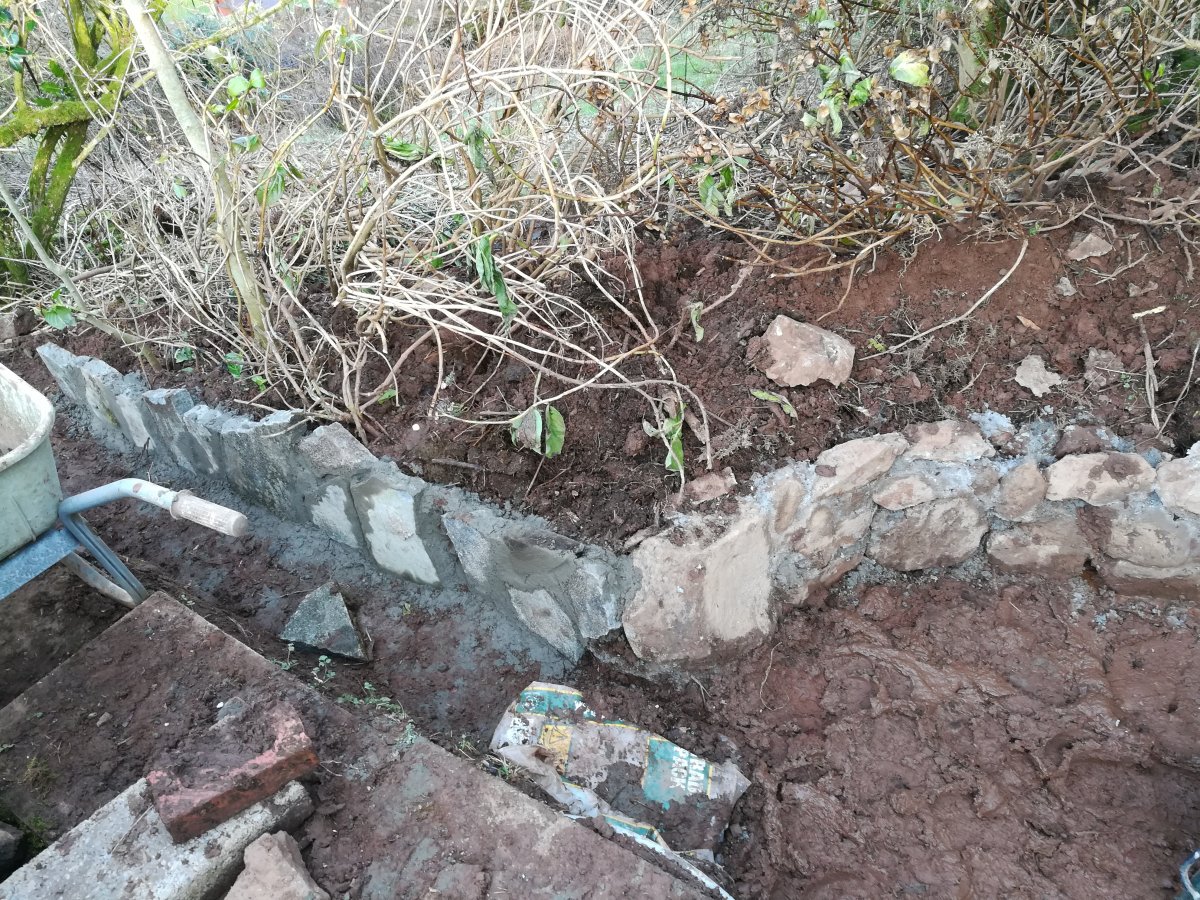
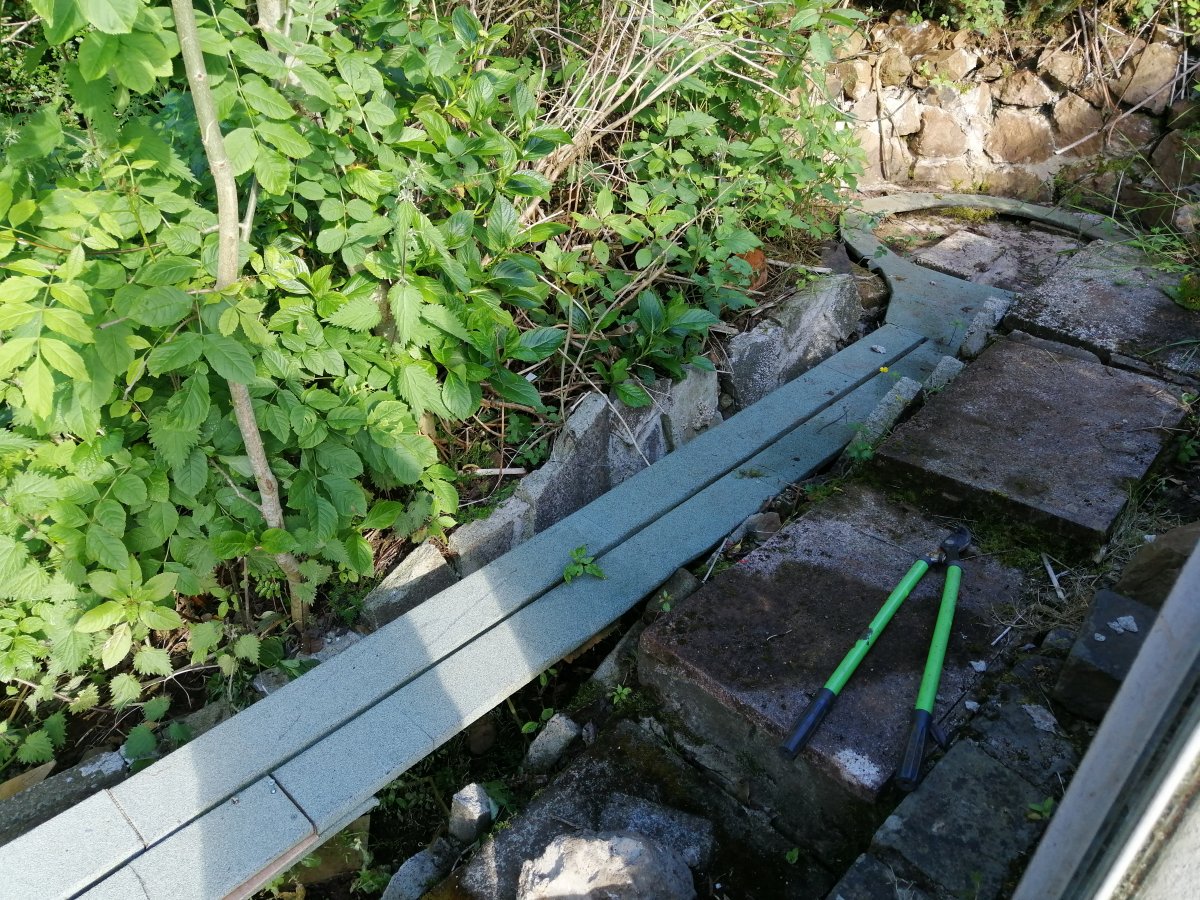
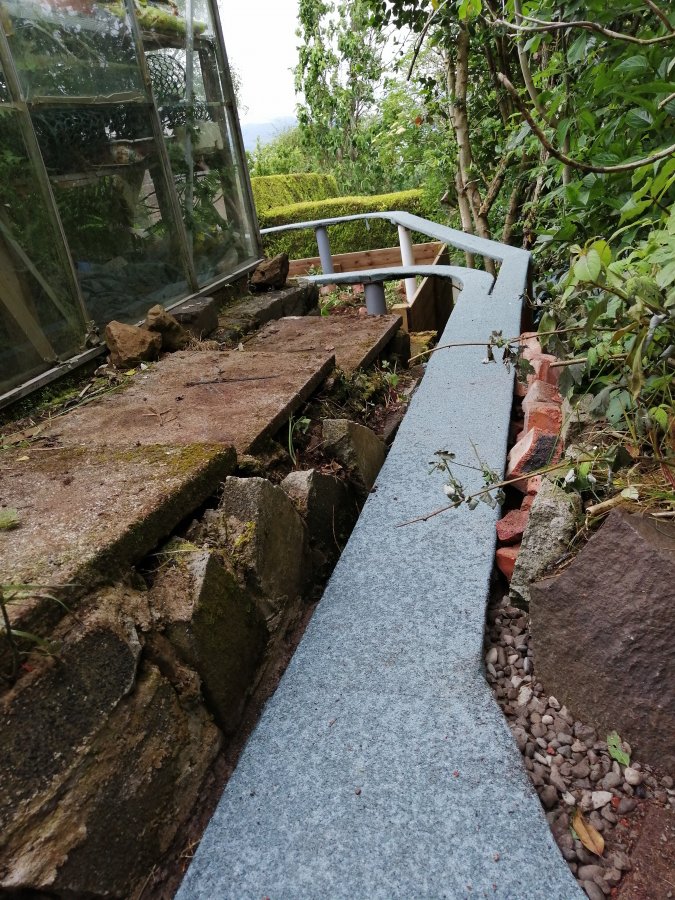
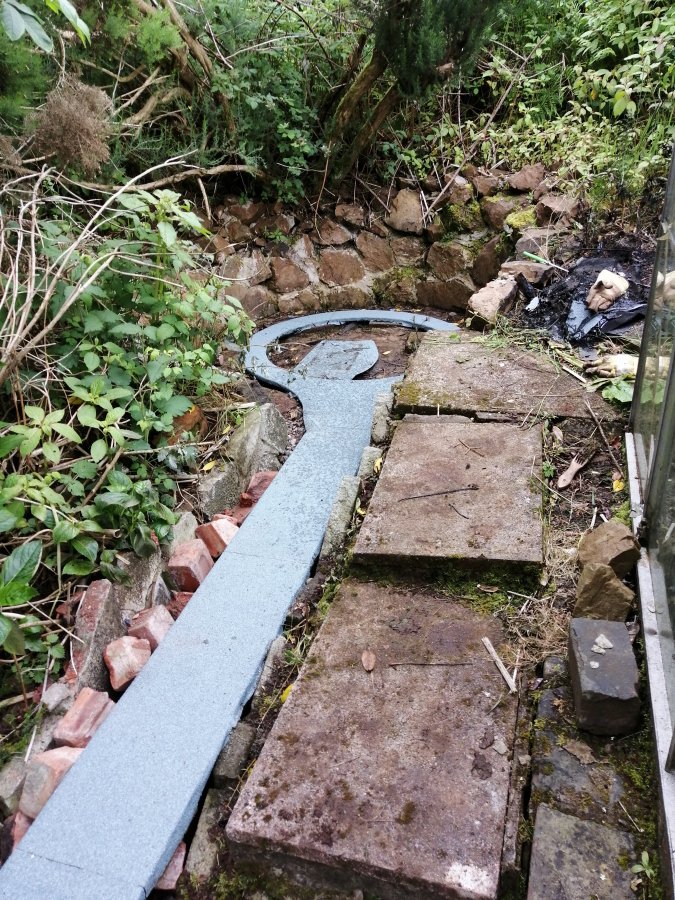
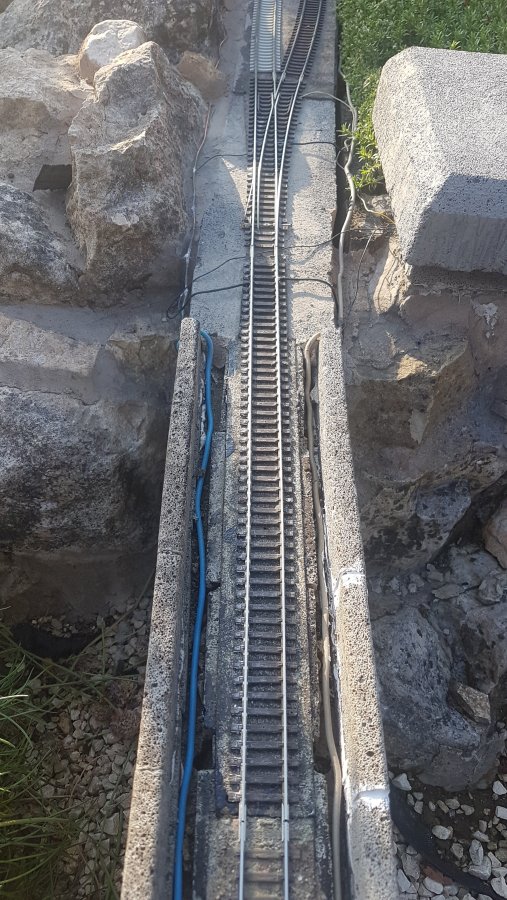
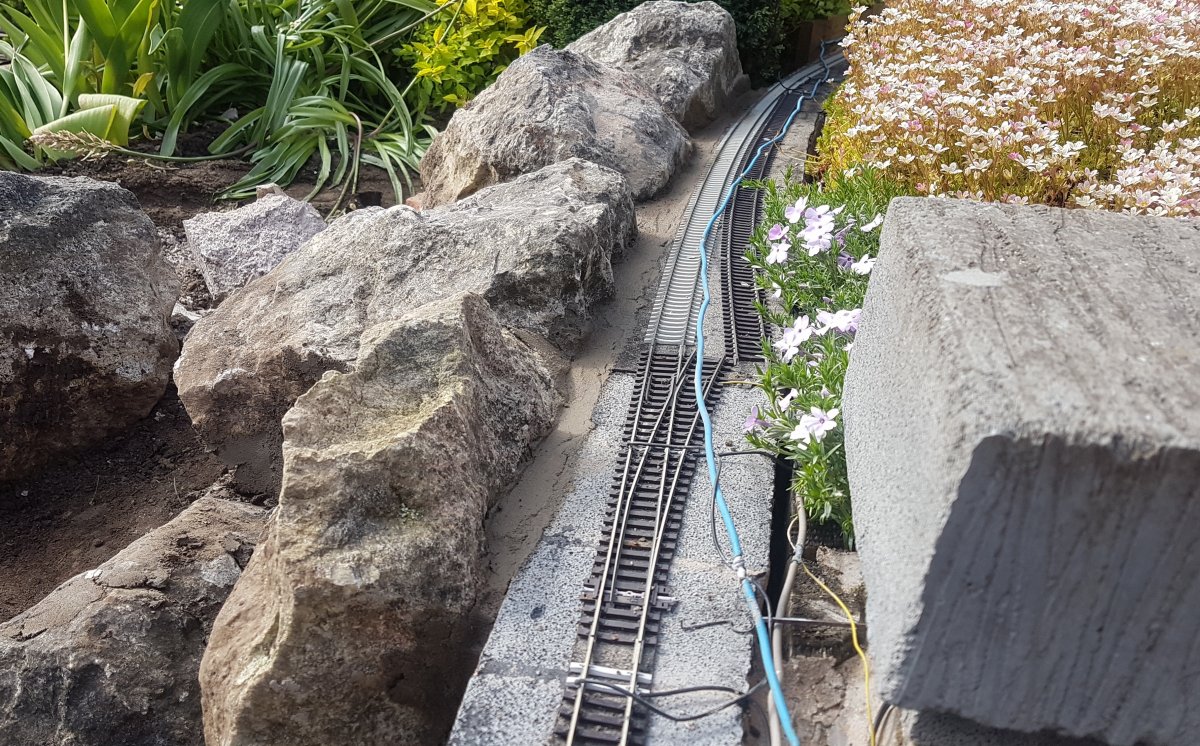
Well, following on from my comments regarding 'small scenic areas' I've taken advantage of the better weather by doing something about the section of track leading onto Low Shott, the smaller of my two viaducts. Being located in full view from my open shed door it's never been a place that I've particularly liked as the track has always looked precariously perched right at the edge of the raised blockwork and I'm amazed that to date there hasn't been any serious 'goings over'. Here's the section in question. The width of the aerated blocks standing on edge doesn't leave a great deal of room to play with when there's two tracks in position and although I did initially put sections of log roll on the face of the blocks they've gradually either rotted away or come adrift so there's currently no border along the lineside, save the one left standing, only the drop below. So it's been a case of finding suitable rocks and mixing the scrapings of sand and cement I have left. Most of the rocks have had to be balanced in a way that there's a nice smooth side facing onto the track and there will need to be additional rocks behind and plenty of infilling in order to securely set them in place. From the rear it's currently not a pretty sight... ...but from the lineside I hope you feel it's an improvement. I'm not sure what the ground cover plant to the right is called but it looks okay out of season although the flowers are quite tall and tend to hide the view when they appear. I'll leave it for now. There's still some more rocks needed before it's finished but hopefully it's another spot that's going to become a good place to site the cameras.
3 points
-
And so, onto the OO. All worked fine, except for a couple of old Hornby PGA wagons, which seem to have developed problems with axleboxes and wheelsets. Anyway, here is a short video of what I ran yesterday. Over the next few days / weeks, I will be trying to give the rest of my stock a good run out.3 points
-
Not the weather for being out in the garden today. Fitted sound to my Grand Central 125.3 points
-
Link to the first running or 2018: The station lighting, unfortunately, packed up working late last year and Ive not been able to resolve the issue. I think the electronics unit into which everything fed into and out of, got messed up and after I tinkered, it very definitely, wasnt going to work. However, should I want lights on, Ive found out that the lights will work perfectly ok, fed from the aux output on the Elite controller - not that i ever play trains in the dark And I have decided - I am determined that I am going to have a day or 2 sorting out the track bondings and have a frustration free Summer!3 points
-
That's a lovely photo Tony - I'm pleased you posted it. I can certainly understand how you and your wife must be feeling, even though I've never felt the loss of someone quite so close to me. I lost my dad when I was only seven so I don't really remember anything about him although I do recall the day itself quite clearly. More recently we've endured the loss of my nephew and Pams son, both in their twenties, and yes, it's hard to accept that they're now both gone but its all the more painful when its someone you spend most of your days with. I know this might sound silly to some people but the greatest personal loss I've ever felt was this August Bank Holiday when we lost our little dog. He was a part of our family and we spent our whole days with him. We'd speak to him just as you would a child, take him with us almost every time we went out. He was our little boy who depended on us for his every need and we were devastated when we lost him. I know you can't possibly compare the loss of a son to the loss of a pet dog but that bond that develops between you is just as strong and the loss just as painfully felt. The photos and little mementos we have kept, and that you will obviously have, are still raw reminders of 14 very happy years we spent together but the enjoyment and happiness that he brought us during that time far outweighs the loss we currently feel. We have to be grateful for the time we have been allowed to share with them and know that our lives have been enriched through them. One thing these events teach you is that you can't plan for the future - you have to live for today, so go on that holiday and enjoy doing all the things you've been unable to do over the past years. Take something personal of your sons along with you so that you feel he's right there beside you. As an example, I have our dogs collar fastened to my rucksack and I feel he's tagging along with us on our walks - it works fine.3 points
copy.jpg.5e9a760b9c33e0e1851c158ea11634a9.jpg)
copy.jpg.afb04d74a0192748a8b3690ea175e7d2.jpg)
copy.jpg.e45bc203e7cf33ec727c906582dc92ec.jpg)
copy.jpg.092fd1d180d2213e8021fc2ac6041742.jpg)