Kris
-
Posts
27 -
Joined
-
Last visited
Kris's Achievements
Member (2/7)
0
Reputation
-
Just gone back after the winter, and pleased to announce that the glazing seal silicone has held rock solid so that's a tip for anyone wanting to fix track to concrete! I know it's stuck solid, because I had to pull a load up... The loop at the far end is round a large shrub and near a huge tree, so the moisture in the soil fluctuates wildly - it's either a swamp or a desert. As a result the concrete and brick structure has developed large cracks so I got rid of it. I have replaced it with the same method as the rest of the railway, fence posts and gravel boards! They don't move, are pre-reinforced and look nice. I shall take some more photos and upload as as update soon if anyone's interested
-
A small garden railway - Advice needed
Kris replied to webba's topic in Layouts In the Planning Stage
In my experience, it's all about the radius of the turns before anything else! I made mistakes of laying everything out, leveling, digging etc before I worked out that I didn't have enough room for the minimum radius turns that my trains would go round. I think Peco still have downloadable templates - print a load off and experiment, but don't try to tighten the turns further than first radius (with flex-track for example) or change levels too quickly or your trains will fall off the tracks, normally after a load of work that then needs changing! Good luck and enjoy -
Yes, it's a Hornby Blue Rapier (Railroad version). It was quite easy to convert to DCC and runs really well. Next step for this train is directional lights. Here are a couple more videos https://drive.google.com/file/d/0B3DrrpIPe5iIeWNBSkZWeXVON0k/view?usp=sharing https://drive.google.com/file/d/0B3DrrpIPe5iIVmpIdnF1aWV6MDg/view?usp=sharing https://drive.google.com/file/d/0B3DrrpIPe5iIUENpX2JGQTJ3R1E/view?usp=sharing
-
As I'm no longer in the planning stage, I'll be updating my other thread in Members Garden Railways! Happy days, thanks for all the help everyone
-
I can now happily say I am no longer in the planning stage, because Hornbeam Railway works! That's not to say it's anywhere near finished, but here's a video of the first run all the way round https://drive.google.com/file/d/0B3DrrpIPe5iIOXYxd3lIeGJMQ0U/view?usp=sharing More to follow
-
It works!!! Here's a link to a video https://drive.google.com/file/d/0B3DrrpIPe5iIOXYxd3lIeGJMQ0U/view?usp=sharing
-
Quality post - thanks. Lots to think about there!
-
Now being a bit ignorant on these matters, I would like to know if anyone has experience of the best DCC decoder to run on an outdoor track before I spend any more money!? I bought a few of the cheapie £10 decoders that worked fine indoors and programming (when I didn't release the magic blue smoke with my wiring skills), but outdoors the loco needs a kick up the backside before it will go, and will then stop dead a yard up the track, and that's after cleaning the track! Having looked on the DIY DCC decoder sites, they say it tends to be down to the tolerance of the resistors used - it says that the higher quality decoders will read data from the track even if the track voltage drops to almost zero, the cheap ones won't. I'd also like the ability to add a capacitor to 'stay alive' for a second or 2 to get over the dirty bits.
-
I'll be there for weeks! Does it work if you pre-mix it and dump it on (obviously protecting the tracks first) ?
-
Sticky ballast - has anyone tried it? http://www.rapidonline.com/hobby/noch-9394-ho-tt-sticky-ballast-grey-300g-55-7820 Looks like you pour it on wet and it dries rock hard. May be worth a look albeit a bit expensive. I'm assuming it may be a less messy way of laying fixed ballast than mixing sand and floor polish together
-
Just to add that I would probably do all the setting up of the JMRI stuff while it's connected to a TV and while you have a keyboard and mouse. There is a zip file on the JMRI website to download, and the rest is fairly self-explanatory, and it's explained very well on the website. It will definitely save some frustration later on doing it in this order.
-
For all those interested, the Pi guide is now up
-
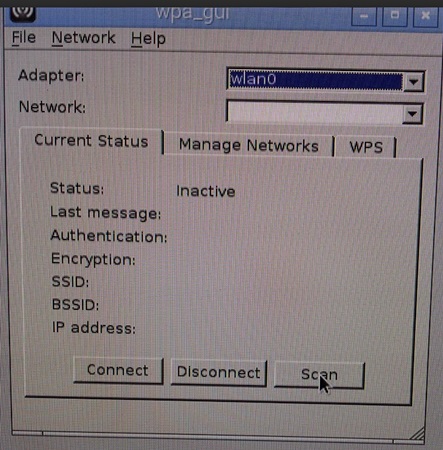
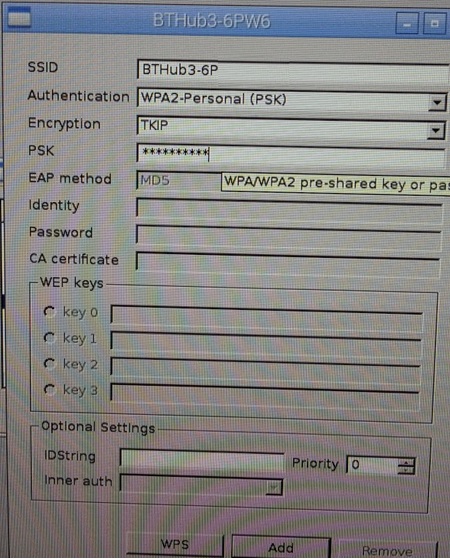
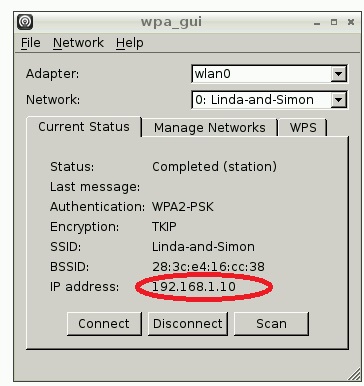
Now we're into desktop mode... Click the start button just like you would a Windows PC, and navigate through the drop-down menus to the WiFi configuration tool (you can use a mouse this time) Now Ctrl+X to exit, then Y to agree to save, then enter. You have just created all the files and passwords required to start X11VNC when the Pi starts. Your mobile device Download a VNC app onto your mobile device - I use the free versions of “VNC Viewer” for my Android phone, and “Mocha VNC Lite” on my Ipad. These are really easy to set up. Once they’re installed they will ask you for a connection. Remember the IP address and password you wrote down earlier? Here’s where you need them. Enter the IP address followed by :5900 (so it looks like 192.145.21.1:5900). This is the port on which you will access the screen output of the Pi. Don’t worry if you don’t understand that bit, just make sure you do it! Some web guides will tell you that you can connect to the Pi by using name, but I found that to be extremely unreliable for some reason; the IP and port has always worked. When it asks for the password, that’s the other bit you wrote down earlier… The test Shut the Pi down, and unplug it from everything. Now power it up and give it about a minute. Open your mobile VNC app, and click on the connection you made. You may need to enter the password again depending on the app you’re using. You should now see the desktop of the Pi on your mobile gadget. It’s a bit slower that running it straight from the HDMI output and you may need to scroll about to see all of the screen, but from there you can launch whichever JMRI software you want. Once it’s running you can forget all about the Pi desktop as the mobile throttles will communicate directly with JMRI without anyone needing to know what is going on with the Pi itself. Just make sure that you log back onto the Pi with the VNC to shut it down properly, otherwise you can ruin the SD card by just unplugging it. As I’ve said previously, there are probably more elegant ways of doing this, but this is just a walk-through of the method that worked for me. Good luck

-
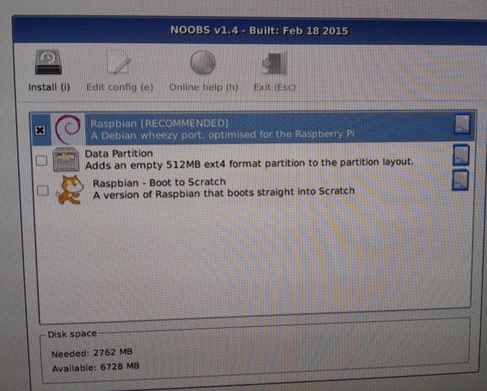
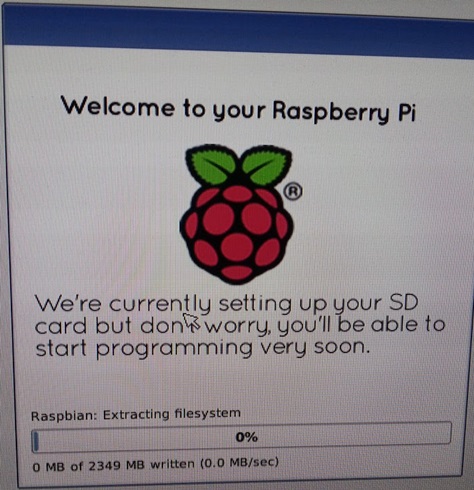
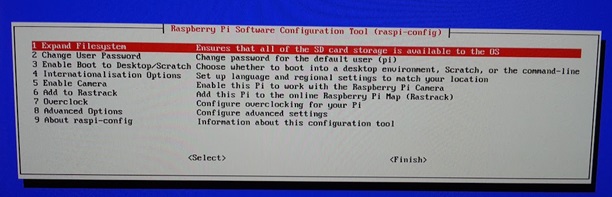
This is my own take on the setup for the Raspberry Pi to run JMRI – there are probably different (and probably better) ways of doing it, but this is what worked for me! Anything I recommend should be taken with a pinch of salt, especially if you know what you’re doing around Linux (which I don’t) and have a more elegant way of doing it! I have split it into 2 parts for ease of reading and because I can't upload more than 10 (albeit dodgy) photos. Part 1 The first step is to connect everything together and use a TV with HDMI inputs, plug in a WiFi dongle, keyboard and mouse. We will set the Pi up to use without a monitor later on, but you will need one to start with. NOOBS operating system I would recommend this page... https://www.raspberrypi.org/help/noobs-setup/ ...and also download SD Formatter 4.0 for either Windows or Mac from the link on the same page. It takes you through how to put the data on the SD card following formatting. I have tried a couple of other operating systems, but this is the only one that worked the way I wanted it to. This is the first screen on bootup. Select “Raspbian [RECOMMENDED]” option
-
Sorry to resurrect a really old thread, but I am currently at this stage where I'm thinking about ballasting some stretches of track. I've laid everything onto concrete, so I'm thinking about making up a mixture of ballast and rapid setting cement powder. I'll lay it on dry and once I'm sure it's all off the track with a soft brush, I'll spray it with a mist of water. In theory it should set and be as hard as, er, concrete........ If anyone's tried this and it failed miserably, please let me know now